Atelier Firis: The Alchemist and the Mysterious Journey

Atelier Firis: The Alchemist and the Mysterious Journey

33 个评价
Synthesis Guide: Activating Item Properties
由 Yurei Okami 制作
Hello, fellow alchemists. I'm YureiOkami, and I made this guide based on some experimentations I did with the synthesis system.

As you may all have noticed, synthesis don't always go as we plan it. Sometimes it's much better, sometimes worse. And in many of those, we can't get all the stars we wanted to.

This guide focuses on clarifying how the activation of the special properties of the items being crafted works.
There's no right universal way to do it, as every synthesis is defined by many different factors, but if you understand how it works you can manage it much more efficiently and reach some properties you thought you couldn't with your current materials.

I'm expecting that those who reached for this guide are already familiar with the synthesis system, so I will not explain its basics in this guide.
   
奖励
收藏
已收藏
取消收藏
Practical Example
For this guide, I decided that a practical example would better explain how the item components work.


The recipe I will be using is one of the earliest ones: the Mining Bomb.


As for the materials:

A 55 Red Kaen Stone


A 35 Green Dova Wood


A 45 and a 35 Red Kaen Stones


And a 55 Neutralizer R


Remember that during synthesis, the color of each component of a material doesn't matter.
That is why the Neutralizer R and the first Kaen Stone have the same component color and value.

In other words, despite the fact that the stone has only red components and the neutralizer has red, blue and yellow components, both count as 55 Red materials. That also means that even though the neutralizer has blue and yellow components, it won't affect these colors any more than it will affect green and purple.


With all components set, we have this preview:


As you can see, none of the properties are maxed.
Our goal for this example is to get all of them maxed out with these materials.

How does it work
First, we must talk about the percentages on the top of the screen during synthesis.

There is one for each color, and they increase as we place materials of that color on the board.
But how does it work exactly?

First, look at these boards:


As you can see, when there are 2 red spaces on the board, the red percentage is 4%.
For 3 red spaces on the board, 9%.
For 4 red spaces on the board, 16%.

The formulae for that percentage is simple: (number of <color> spaces on the board) ^ 2
("^ 2" means "to the power of 2", by the way)

So, if we have 12 red spaces and 3 green spaces:


Red: 12 ^ 2 = 144
Green: 3 ^ 2 = 9

Now that we know how the percentages increase, we see how they affect the synthesis process.


Here's a clean board. As you can see on the right, placing the Neutralizer R will add +55 to the component gauge (the bar highlighted by the red rectangle). We can also see that the bar will get +1 level. That is because the bar is currently 0/40, and by adding 55 it will go above 40 and level up.


Now that the bar leveled up once (as you can see, the number on the right of the gauge is now 1), we can see that the red property now has a dot and a half filled. Meanwhile, both the green and blue properties have half of a dot filled.

This is the most important when you are aiming to activate properties.
When the component gauge levels up, every property fills half of an icon.
The properties which share the same color as the material that caused the level up fill a full icon and a half instead.

By hovering the 35 Red Kaen Stone, it shows on the right window that the component gauge will level up again. Since the material is red, we should get another full icon and a half, reaching full 3 dots.


As you may have noticed, I focused on placing the bigger red materials first.
That is because the percentage boosts the contribution of a material of that color, but the percentage only changes after the material has been placed. That means that when you place a material, the percentage increase it brings won't affect its contribution, but only of the materials of that color that will be placed after it.

By placing the bigger ones first you assure that smaller ones that will come next will have a great boost to its contribution to the gauge already set for them. Also, if two materials have the same size, you will likely want to place the one with less component value first, as the other one would make better use of the percentage boost.


With 100% red boost, the 55 Kaen Stone is adding 110 to the component gauge.


And finally, we managed to max the red and blue properties. All that is left is to place our green material. But that's when the problem appears. There are 2 icons to fill remaining to max the green property. As 1 level up fills 1 icon and a half, to fill 2 we need at least 2 level ups. But the right window says our green material will level up the gauge only once.


And there it is. 27/40, which means our green component is missing 13 points in component value. We could replace our green material for one with one > 48, like this one:


Unfortunatelly, you don't always have a material that can add enough value to the synthesis.
But there are other ways to handle this.

For example, we know that a level up gives every property a half icon. For 2 icons, we need 4 level ups of any color then. So if we replace our green material with a big red one...


Now, since it's a big one with low value, we place it first to boost our percentage early for our 55 Neutralizer R:


And there you go. We got 5 red level ups and 2 icons to fill.

Sucess!!
Notes
  • Usually, you should always place materials with bigger size before smaller ones of the same color. But there are times when the big one has much more component value than the small one. When in doubt, try changing the order and see how it goes. As long as you don't accept the final prompt, you can experiment on material placement as much as you need.

  • Materials get the boost from the percentage of its color on the moment they are placed. That also means that if you place a material over another, which erases the previous one, it will still get the percentage boost from the moment it was placed, even if after the placement the percentage dropped.

  • Some bonus lines improve the contribution of materials to the component gauge. If you can't seem to reach the star you want to, might be a good idea to try a catalyst that has one of those lines.

  • Materials can have multiple colors. These are your best friends for items with many different colors to fill. If a material has 2 or more colors, the game adds the bonus percentage for all the colors it has and uses it as bonus percentage for it.
    For example, 3 red spaces = 9% and 4 green spaces = 16%. If a material has both red and green color, the bonus percentage for it will be 9% + 16% = 25%. Still, the bonus for each single color increases exponentially. If instead we had all of those spaces of the same color, we'd have 7 spaces = 49%. So this works the best when the board is filled with as much of a single color as possible.
    A gauge level up usually only counts as a single color, but for multicolored mats it counts as every color the mat has. It's a powerful tool for getting a lot of different colored traits, so don't forget to use them well.
9 条留言
Yurei Okami  [作者] 2017 年 6 月 3 日 上午 7:16 
About the skills, Flips let you flip the shape of the material either horizontally or vertically, which gives you the option of 2 different shapes per material. Some products already start with a Flip skill unlocked without having to level them up.
Rotate is considered an upgrade to Flips, so when you unlock Rotate it replaces whatever flip skill the product has. As the name suggests it allows you to rotate the material by 90º when placing it on the board, which gives you 4 shapes per material to work with. :steamhappy:
Yurei Okami  [作者] 2017 年 6 月 3 日 上午 7:16 
Now, about Rotate and Flips, those are skills that allows you to "transform" the shape of a material during synthesis. After selecting the materal, you can change its shape before placing it on the board as long as the skill is unlocked for that synthesis. You can unlock them by leveling your skill in synthesizing that specific product, which also means that those skills are bound to it and aren't shared by any other products, so you have to unlock them for each product individually.
Yurei Okami  [作者] 2017 年 6 月 3 日 上午 7:15 
Hi, Jealous Witch :happypug:

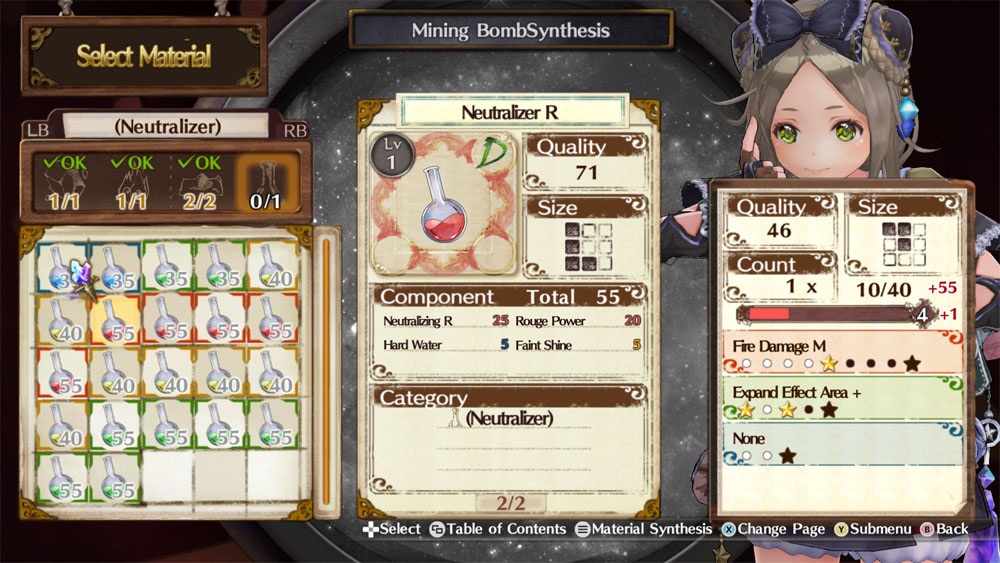
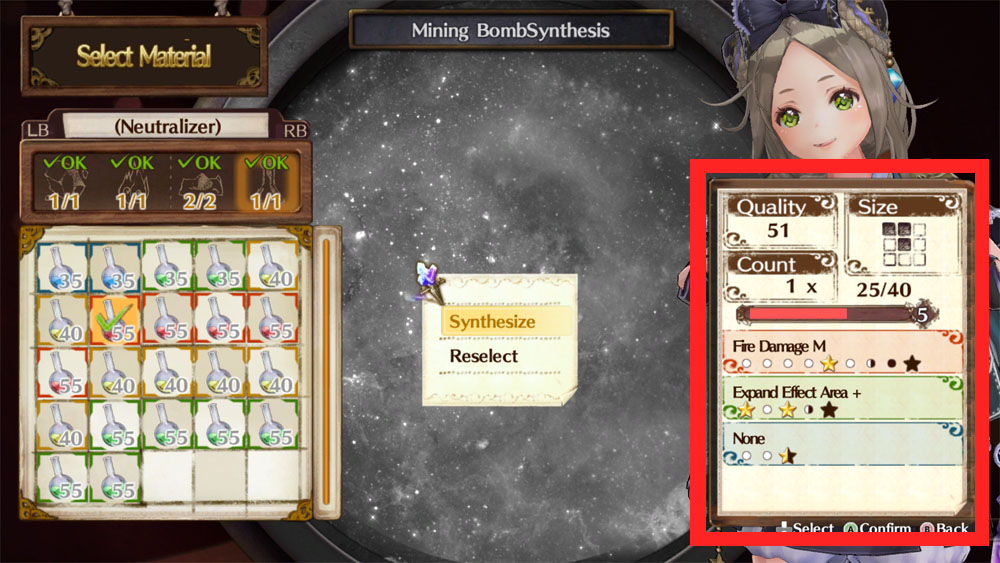
Every synthesis table has an extra line that is hidden. By wearing the Alchemist costume during synthesis, you can unlock that line. For example, when synthesizing without a catalyst, like I did in the second part of the guide, you have 2 lines: Quality +10% (Top left line) and Size +1 (Bottom right line). But, if you are wearing the Alchemist costume, a third X shaped line (the Trait Transfer +1) shows up in the middle. Those hidden lines are usually very useful, so unless you know you are not going to use a specific extra line's bonus in a synthesis, it's a good idea to always wear the costume when you are going to synthesize something.
Jealous Witch 2017 年 6 月 1 日 下午 11:27 
Another few questions. What is "Bonus lines that show up during Synthesis" increase by 1? it is a bonus from Alchemist costume, and What does skill effect Rotate, Vertical flip, Horizontal flip etc. do?
motaku96 2017 年 4 月 2 日 下午 4:02 
Thanks for the guide. The game doesn't tell you nearly enough to get this deep.
Yurei Okami  [作者] 2017 年 3 月 21 日 下午 7:20 
By the way, guys o/

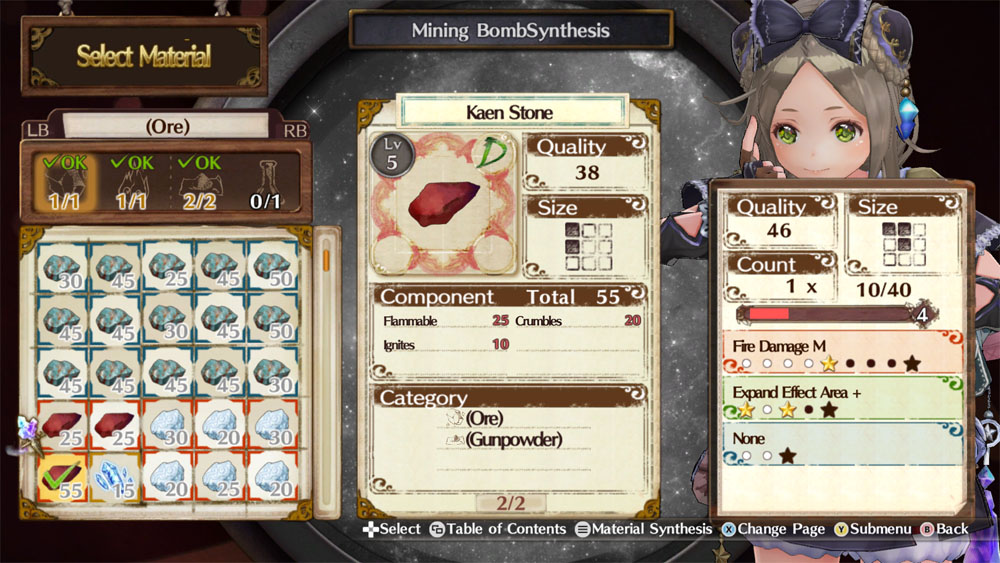
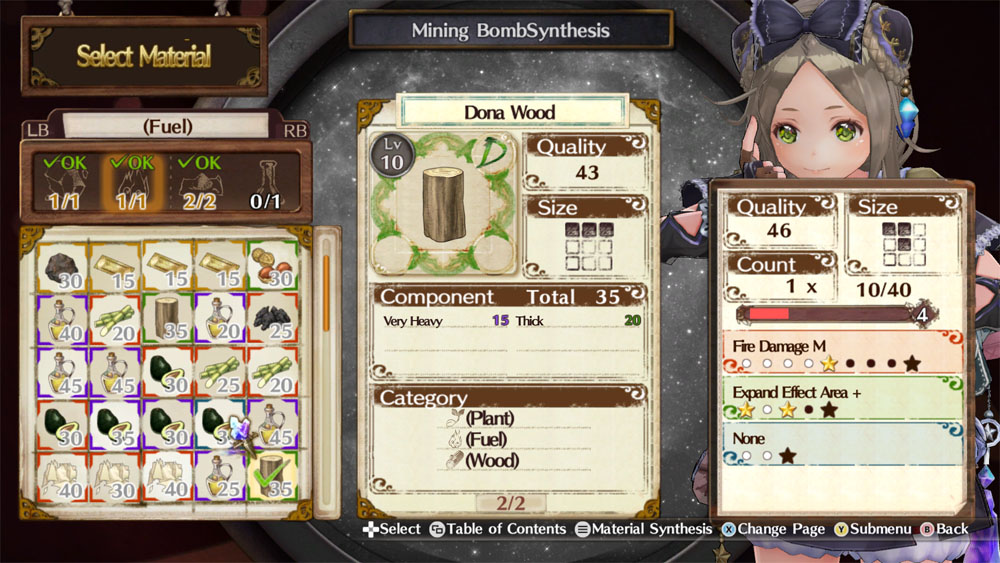
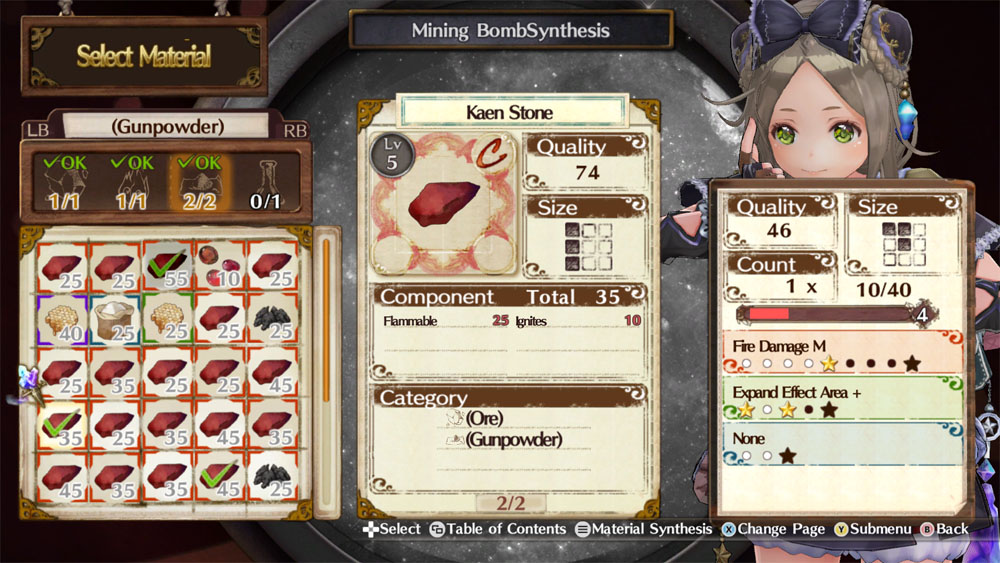
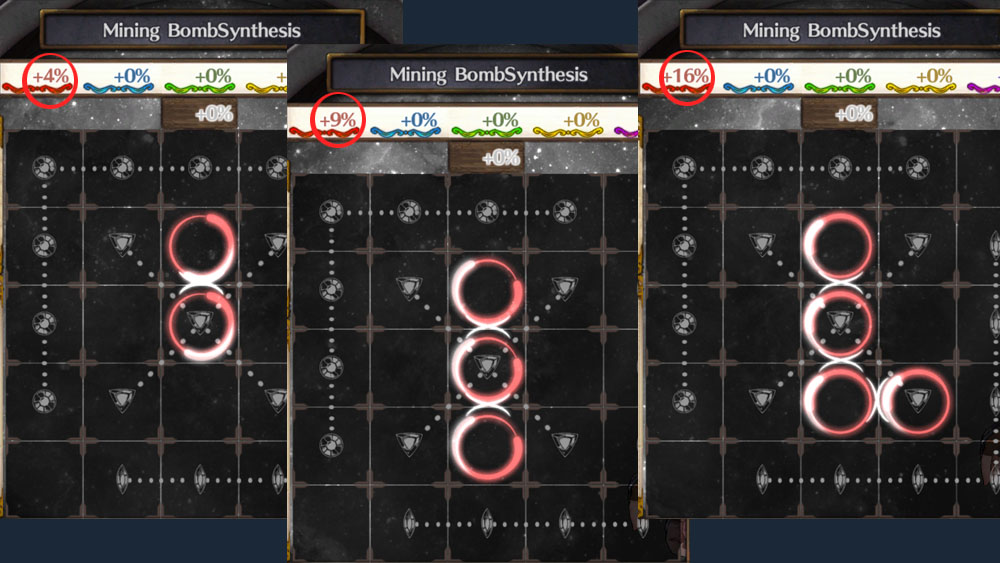
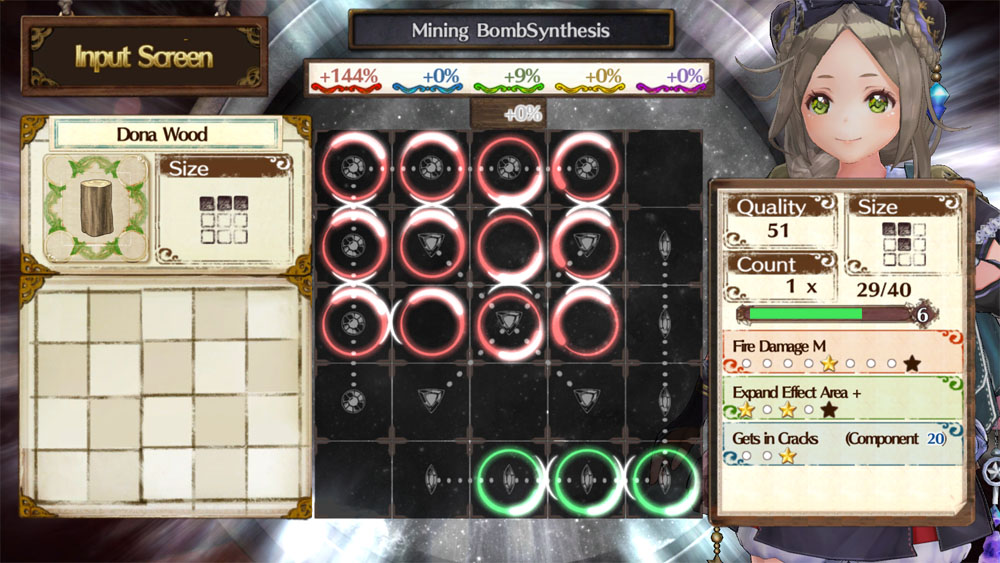
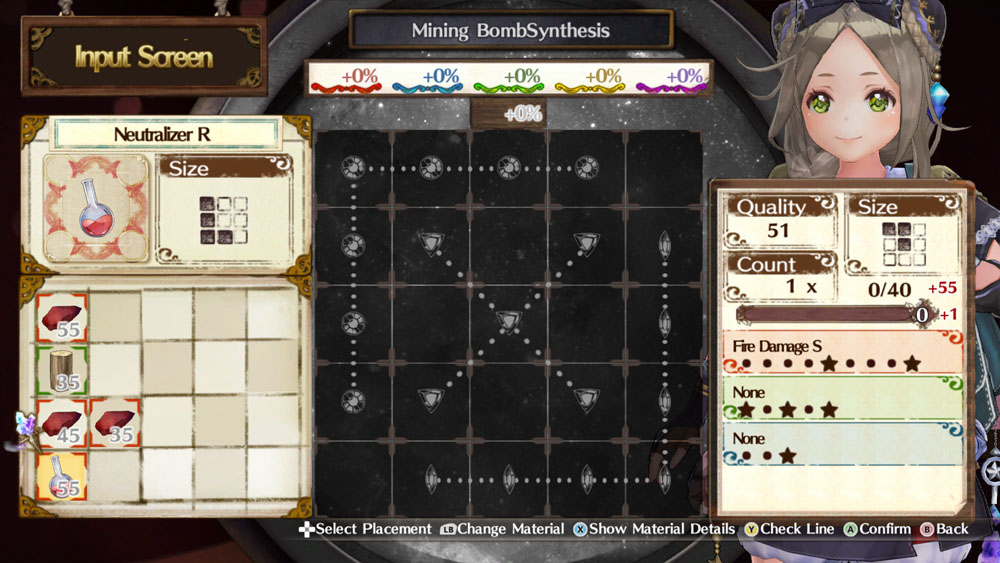
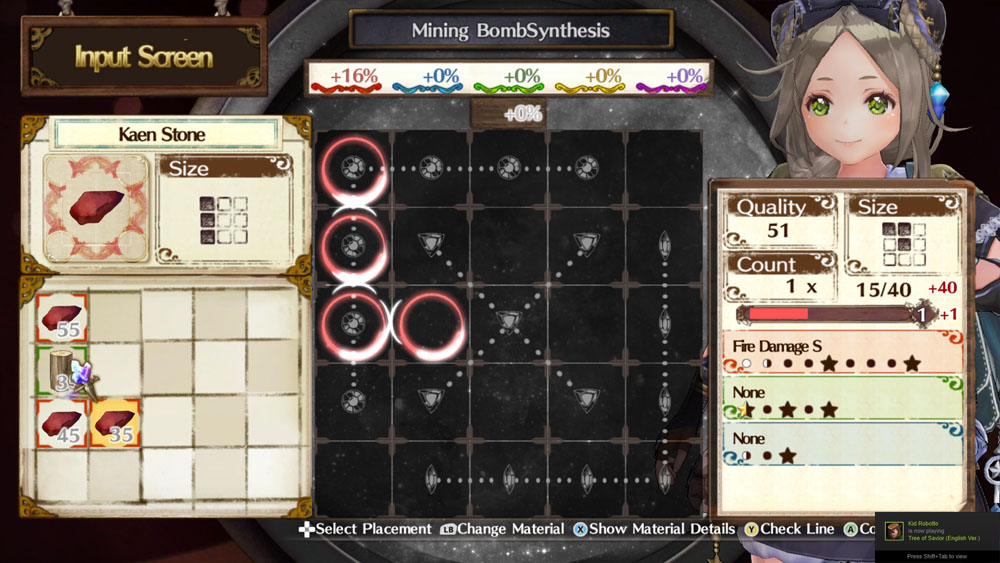
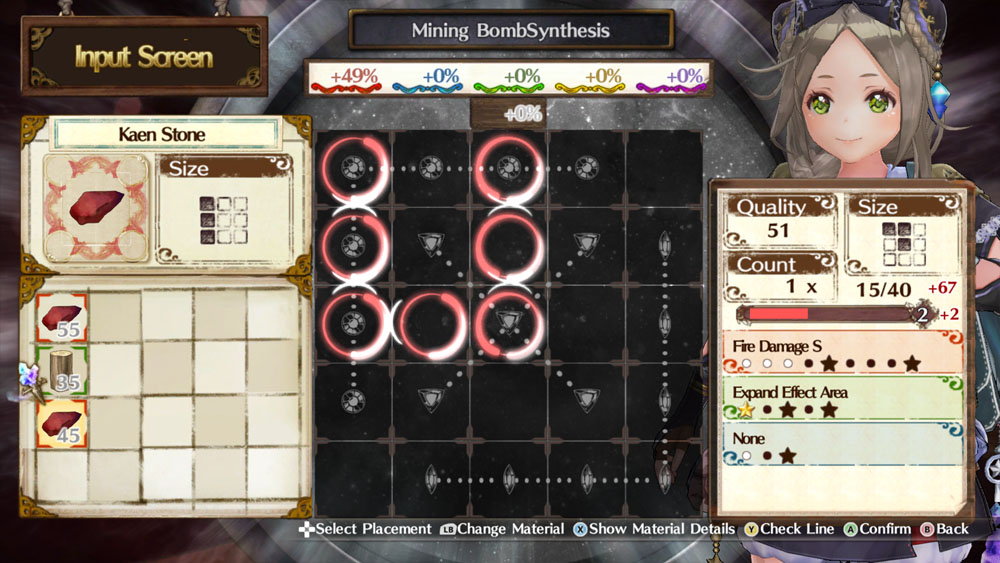
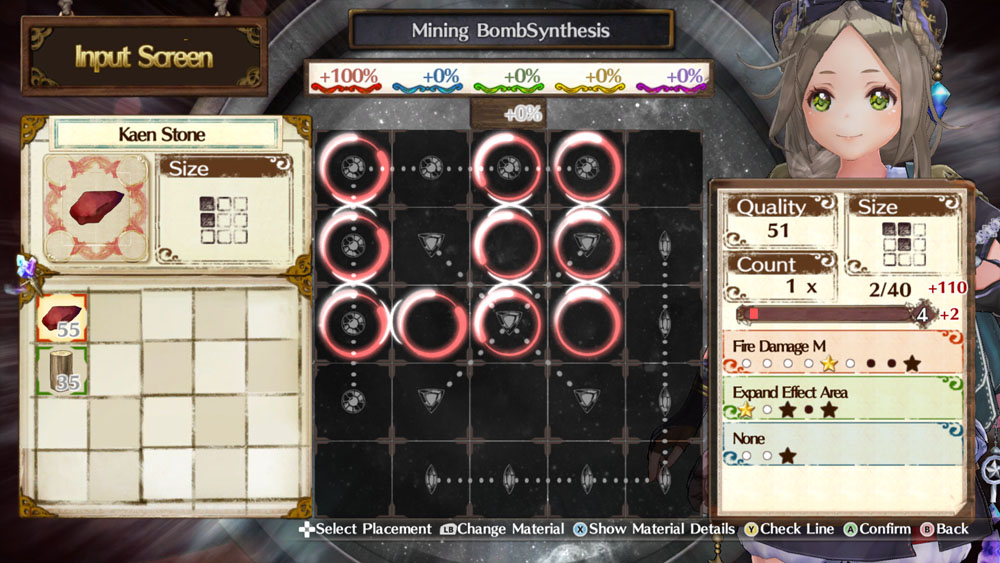
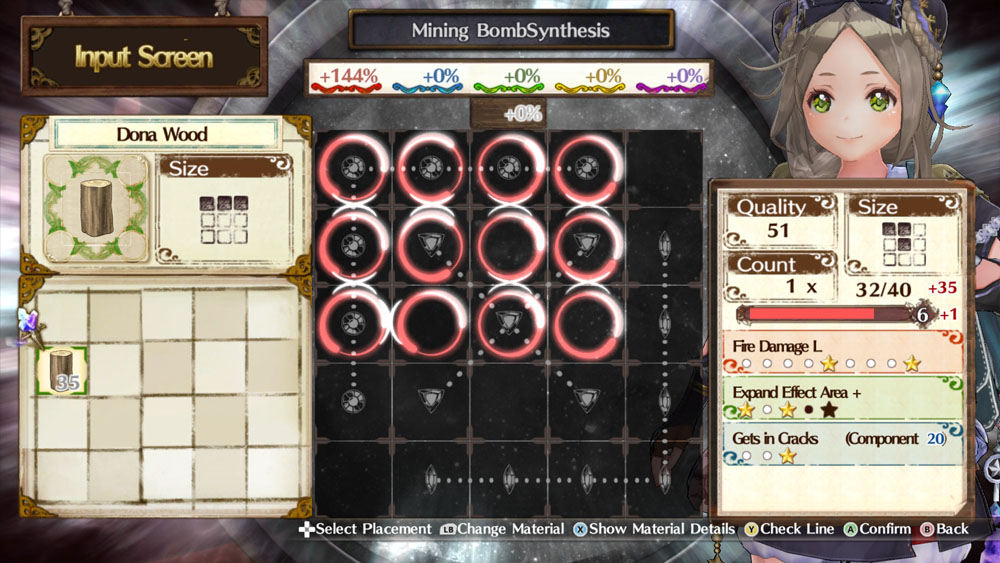
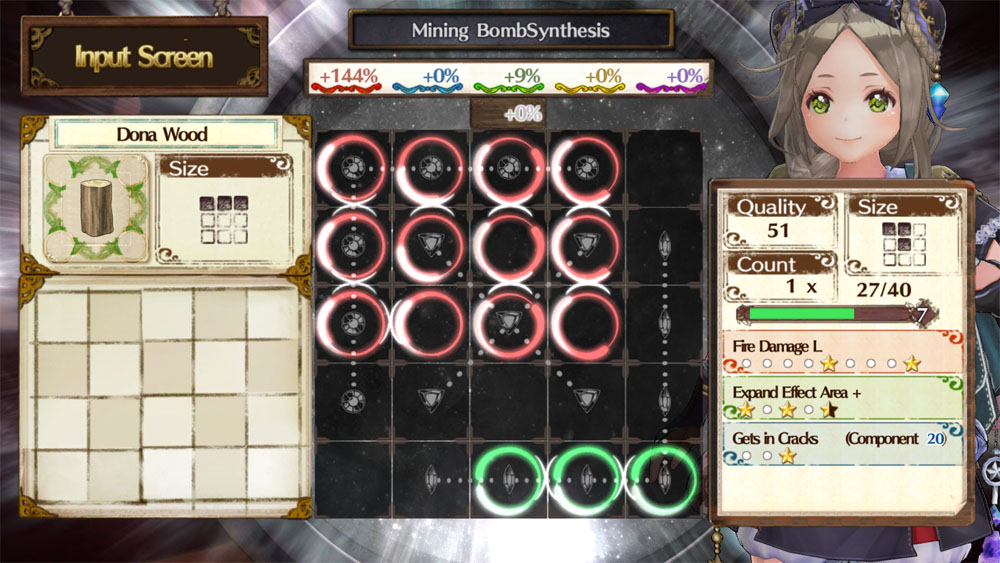
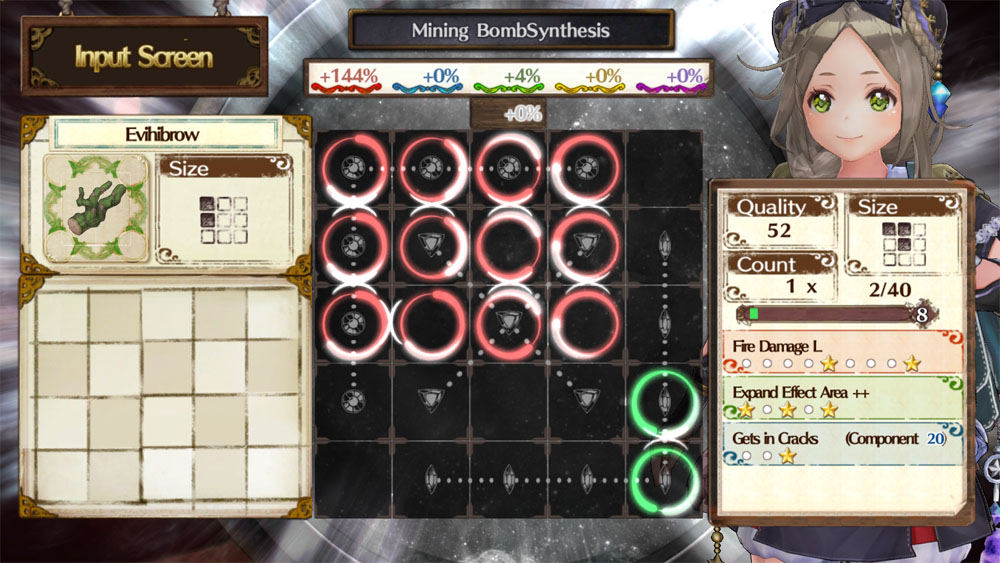
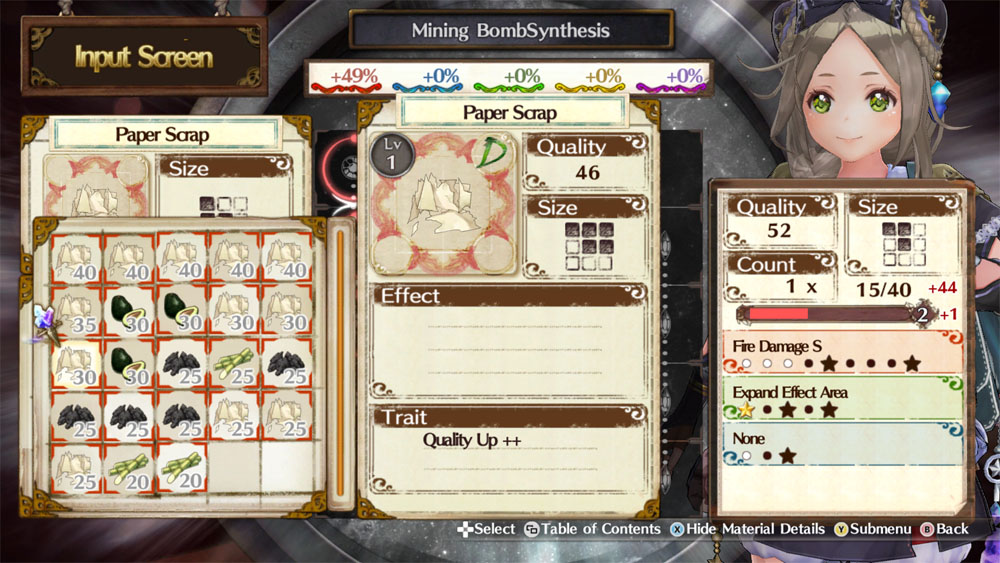
Keep in mind that materials can have multiple colors though. If a material has 2 or more colors, the game adds the bonus percentage for all the colors it has and uses it as bonus percentage for it.
For example, 3 red spaces = 9% and 4 green spaces = 16%. If a material has both red and green color, the bonus percentage for it will be 9% + 16% = 25%. Still, the bonus for each single color increases exponentially. If instead we had all of those spaces of the same color, we'd have 7 spaces = 49%.
A gauge level up usually only counts as a single color, but for multicolored mats it counts as every color the mat has. It's a powerful tool for getting a lot of different colored traits.
Gonna add this as a Note.
Yurei Okami  [作者] 2017 年 3 月 21 日 下午 7:19 
@MEOWGGOTS!@!

2-
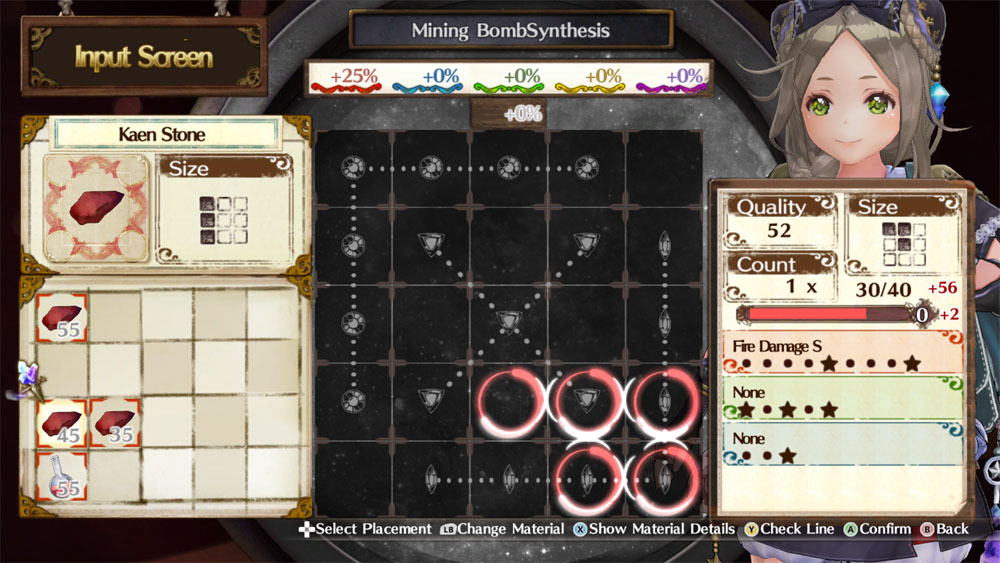
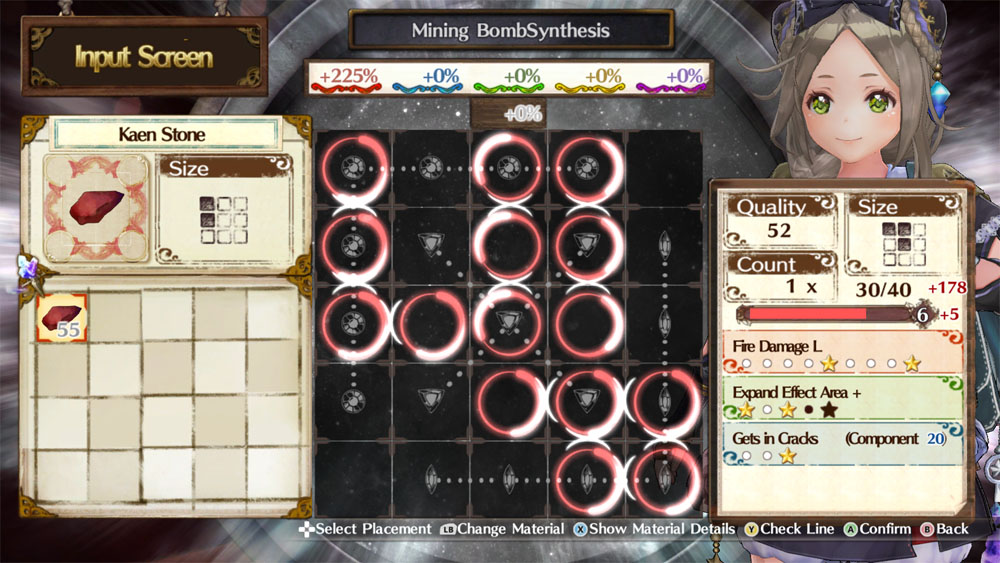
As for replacing pieces, no there aren't any. After a material is placed on the board it only serves two purposes: boost the color's bonus percentage and keep the bonus lines activated. Since the color percentage will only affect materials of that color, if you have none left then you won't need that bonus anymore. If you also don't need the placed material for a bonus line, then it has no purpose in the board, so you can just remove it with no problem.
Yurei Okami  [作者] 2017 年 3 月 21 日 下午 7:19 
@MEOWGGOTS!@!

Glad you liked it o/

1-
So, as far as I've noticed alchemy level doesn't affect synthesis. All of the product's parameters, like quality and size, seem to be determined by the materials, the synthesis process and transfered traits.
I don't know if it affects anything other than recipes' requirements though. For example, it might affect recipe xp you get from a synthesis, or the discovery of certain recipes. It will probably take a few playthroughs for someone to figure that out, so for now we can just assume it doesn't.
Curry Bread 2017 年 3 月 21 日 下午 4:08 
Thank you for the guide. It helped me a lot in improving my alchemy! I'd like to ask a couple questions if that is fine.

1 - Does alchemy level (the general level that acts as a requirement for recipes) have any influence in the result of a synthesis?
2 -Certain recipes can have lots of ingredients and that end up being inevitable. After I place all pieces of a certain color, are there any repercussion if I simply replace them?