LOGistICAL

LOGistICAL

评价数不足
Town score & how to obtain highscores
由 The BMachine 制作
This guide will explain how exactly town score works, what makes a town score high, and perhaps most importantly, how to optimize your town scores to compete for a place in the highscores.
   
奖励
收藏
已收藏
取消收藏
What is town score, and how is it calculated?
As you may or may not have noticed, each town will receive a score upon completion. This score is based on a lot of different factors - the exact formula can be found by clicking on the score on any completed town. It looks like this:


Let's take a closer look at each of the factors, and how it relates to the town score:

  • Population: this is simply the populaton of the town. Towns with a higher population give a higher score, but (usually) also have higher input requirements and more resource lines.
  • Town multiplier: this is a hidden value that multiplies the received score, and almost always the required goods. For example, a town with a population of 2,000 and a multiplier of 5 will typically need 10 tons of one or more goods, and sometimes one to three extra goods of which less is required. This multiplier is normally set per region - easier regions will have multipliers of 1 or 2, while the hardest regions in a module may have a multiplier of 10, 20 or even 100+.
  • Resource lines: the number of different resources a town requires. As seen in the formula, this number is an exponent of 1.5, meaning towns which require a large number of resources are exponentially better for score. A town that has 4 inputs of 100 tons will score higher than the same town with 1 input of 400.
  • Tonnes required: the sum of all town inputs. It simply multiplies the score by the total tonnage.
  • Trucks: the number of trucks used to complete the town - not used in the score calculation.
  • Truck tonnage: the total tonnage each of your used trucks can carry. E.g. if you use 4 8-tonners to complete a town, the truck tonnage is 32. Since the score is divided by this number, using a lower total truck tonnage means a higher score.
  • Tonnage hauled: the total tonnage delivered to the town. Not directly used in the score calculation, but it is part of the play efficiency.
  • Play efficiency: how this is calculated exactly is a little complicated, but the general gist is that the more tonnage goes to waste, either through town consumption or through overfilling, the lower your efficiency. A lower efficiency gives a lower score. NOTE: there is currently a visual glitch, where if all of a towns inputs drop to 0, the efficiency resets back to 100% - this is purely visual, the actual efficiency will be calculated again when you restart the town.
Why is town score relevant?
Some time ago, highscores were introduced to the game. This adds a bit of a competitive element, where players can compete for the highest score on a certain town, region, or module.

The highscore for a certain town can be found if you have completed that town by selecting it and hovering over the red 's' at the top, like this:

You can also find highscores per region or module by opening the statistics menu (F2) and hovering over the score for the module or region you want to check.

Of course, it is fully possible to complete every module without ever even thinking about the score. But for me, it adds an extra layer of challenge to an otherwise relaxing game, and it gives me something else to work towards.
So how do I get high scores?
Most of the factors that go into calculating a town are set per town. There are two that the player can directly influence: play efficiency and truck tonnage. The key to getting high scores is to keep truck tonnage as low as possible, while not losing out on too much play efficiency.

If you only want to go for region or module highscores, you can probably get away with finding the towns with high potential score and only trying to score well on those. Remember that towns with more resource lines give exponentially more score. For example this town only requires 47 tons per resource, but because there are so many of them I could still rack up a really good score:


And now for some concrete tips on how to get a high score on any town.

  • Truck boosts. Especially for towns that are not very isolated, truck boosts are the single most important factor for lowering your truck tonnage. If two towns are close together, a single truck with a loader boost can sometimes make 2 or even 3 trips in the time it takes a nonboosted truck to make a single trip. This means you can effectively use less than half as many trucks! Conversely, for towns that are far apart, power boost becomes far more important.
  • Of course, boosts don't just grow on trees - they have to be earned. The best way I found to do this is to find a lot of towns that can be completed with only one or two trucks, and complete them first. Sometimes you will get a loader boost, and with a bit of luck it will have a multiplier of 64x, giving you 640 loads. That should last quite a bit, and if you can get such a boost on most of your trucks, you are well on your way to getting high scores.
  • Industries. Logically, trucks have to travel for longer if an industry is far away, and while it is traveling the town can easily consume a lot of their resources. Building industries as close as possible is always better score-wise, but it may become quite tedious very quickly, or even dip into your cash supply (although there are some, albeit boring, ways to grind for an effectively infinite amount of money). Try to find a balance that works for you. You can also build storages - in the above town, since each input is only 47 tons, if I can build a storage close by and overfill it with 150 tons by simply making one delivery with my entire fleet, that should be more than plenty to finish the town, without having to build and upgrade industries.
  • Try to get an idea for how many trucks can load from an industry, so you don't have to upgrade more than necessary to remove tedium. For example, I find that a level 2, tier 2 industry can just barely keep up with 2 8-tonner trucks with load boosts.
  • Try to develop a feeling for how many trucks you need. If all my industries are really close, I generally find I can get away with using around 10% of the tonnage of one input WITH load boosts - so if a town needs 8x400 tons, I will attempt it with 2 20-tonner trucks with load boosts.
  • Overfill towns, but not too much. You want to overfill inputs enough so that they don't drop out of the green during the completion, since that will make it very difficult to complete the town at all, but not so much that a lot of it goes to waste - after all, that would decrease your play efficiency unnecessarily. This is again something you will have to get a feeling for.
  • Always save before tackling a large score town, and set your autosave interval as high as possible. That way if you screw up you can reload an earlier save and not lose any score.
Industry swapping
This is an advanced technique that is relatively complicated so I decided to give it it's own section. It can be a lot of effort to set up correctly, but it can blow your score out of the water.

Sometimes, a town needs a lot of resources, but there is only one town close by that can be built in. As an example, take a look at this Russian city:
.jpg]
The city needs 500 towns of various resources. Normally, that would be doable with about 5 8-tonners. But the town directly next to it only has space for 2 industries! If we have to use the towns to the north and south we will need far more trucks - probably at least 200 tons in total since they are so far away.

The solution? We only use the closest town, and just sell and build industries there as we complete the town! We want to build the industries that take the most effort to supply and upgrade first. In this case, that would be milk since it takes 2 inputs, and everything else only takes one. Note that the onions, stone fruits, other fruit from 5th group and flowers from the last group only take fertilizer as input, so let's build a refinery for diesel in the 6th group too.

Next we need to make sure that we have everything we need to swap out the industries later. Everything we haven't built yet requires fertilizer. so a level 3 size 10 farm of some kind to produce that would be useful.

Then we need to check that the materials needed for upgrading these industries are also close by. You can check what materials an industry will need when hovering over it in the build tab. Level 2 should be plenty to complete the town, In this case we will need crates and chemicals for the onions, stone fruit and another fruit (say, apples), steel and chemicals for the flowers, and wood and dynamite for the iron ore. To be precise:
  • 10t wood
  • 10t steel
  • 30t crates
  • 50t dynamite
  • 200t chemicals

All of these can be easily stored in an overfilled storage in one of the towns to the north or south - except the chemicals, for which we'd best build a level 1, size 10 chemical mine.

Now that we have everything needed in place, it's time to do the city. First fill up the milk requirement (remember to overfill; probably to about 2x for this one). Then start filling up the diesel, and while your trucks are working on that, sell the dairy farm and build an onion farm. Use your remaining trucks to level it up twice, and by the time this is done the trucks should have filled the diesel. Repeat for all the other inputs.

All in all, this is obviously a lot of effort, but it can be quite rewarding. In this particular town I got a score of over 3 times the second place!
No-consumption modules
Some modules (currently Xmas-2017, and upcoming Brazil) feature different gameplay, where towns don't have consumption. Since efficiency will always be near 100%, the only factor a player can influence is truck tonnage, and the only way to currently score high in these modules is by using as few trucks as possible. This basically comes down to patience - sure, you could get an insane score on China by completing it with a single tuk-tuk, but it would also take years - so find a balance that works for you. Note that the score formula may change for upcoming no-consumption modules.
Happy scoring!
A lot of modules still have a lot of room for score optimization. With these tips and tricks, hopefully you are a little more interested in highscoring!
7 条留言
Razorflamekun 3 月 13 日 上午 11:34 
Thanks for the guide! Upvoted!
Looking 4 Hunt Waifu 2023 年 9 月 4 日 上午 3:32 
beat the game in a day ez
Bodhi's Pool Repair 2020 年 1 月 4 日 上午 2:27 
Thank you for your work and effort you put into this guide! Upvoted!
Techhead7890 2019 年 2 月 9 日 下午 5:31 
Ah, so truck tonnage is by unique trucks? So if one 1t truck visits 8x times, that only counts for 1t total tonnage, rather than accumulating for each visit? Tiny trucks would explain some of the insane high scores, I'm lazy so I only use big trucks :)
The BMachine  [作者] 2018 年 7 月 3 日 下午 5:21 
Yeah, it certainly doesn't add to the realism :P to each their own.
TheRealCelticBatman 2018 年 7 月 3 日 下午 2:53 
Voted :successchip:
TheRealCelticBatman 2018 年 7 月 3 日 下午 2:52 
Thank you for this. It is clear you put alot of time and research into this guide.

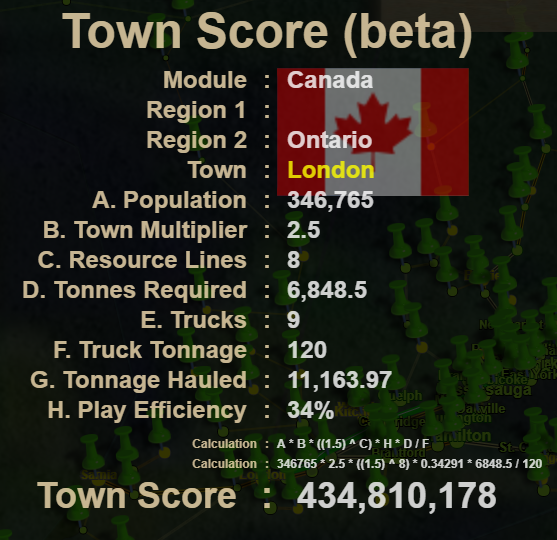
It does tell me that the scoring is a bit arbitrary as a result, since the size of the trucks used has a HUGE amount of weighting of the score, and for reasons that don't really have a logistics basis. When in the heck would it benefit a trucking company or its freight recipient to (taking it to the extreme) receive 320 tuck tucks versus 16 articulated, 8 b-double, or where possible 4 road trains or a couple of mining trucks? The paperwork!

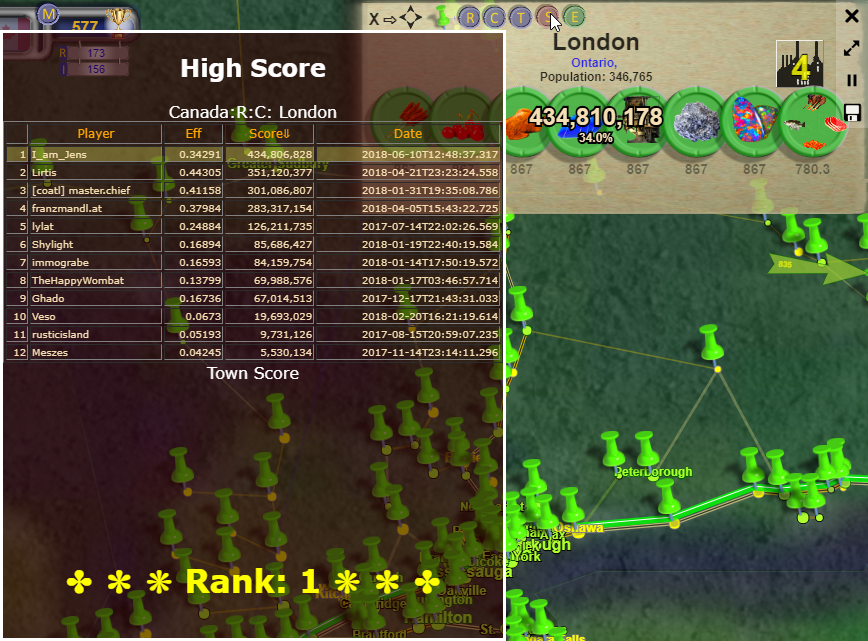
The net result is for me that I am more about successfully completing the game than worrying about the high score for a town. So, I feel more understanding for the scoring system, but actually less interested in it as a result. YMMV :GG: