使命召唤®

使命召唤®

37 个评价
TPM 2.0 and Secure Boot
由 Rommel 制作
PCs using Windows 11 likely already have both security features enabled, as they are required for the operating system. Windows 10 systems will require updates if TPM is disabled or if a legacy TPM version (1.0 - 1.2) is enabled. While TPM 2.0 requires Windows 10 version 20H2 or later, Call of Duty requires Windows 10 version 22H2 or later.
   
奖励
收藏
已收藏
取消收藏
TPM 2.0 and Secure Boot
Required Operating System:

Windows 10 (version 22H2 or later)
Windows 11 (any version)
TPM 2.0 Requirements:

TPM Version: Must be 2.0
CPU Support:
Intel: 8th Gen or newer (with Intel PTT) | Supported Intel CPUs
AMD: Ryzen 2000 series or newer (with AMD CPU fTPM) | Supported AMD CPUs
BIOS Setting:
Referenced as Intel PTT (Intel CPUs), AMD CPU fTPM (AMD CPUs), or systems with a discrete TPM chip (dTPM) in the UEFI/BIOS
Secure Boot Requirements:

BIOS Boot Mode: Must be set to UEFI, not Legacy
Disk Partition Style: Must be GPT, not MBR
BIOS Setting: Enable Secure Boot
TPM
1.Press Windows key + R to open the Run dialog box.
2.Type tpm.msc and press Enter.
3.If TPM 2.0 is enabled, you’ll see “The TPM is ready for use” under the Status section.
4.If you see “Compatible TPM cannot be found”, TPM may be disabled in your BIOS, or your system may not support it.

tpm.msc details your Trusted Platform Module Status, in this example TPM 2.0 is active.


General Process for Enabling TPM 2.0
1.Access your BIOS/UEFI settings (Advanced Restart → UEFI firmware settings).
Accessing your BIOS can be accomplished in many ways; however, one of the easiest is to restart your machine from Windows.
In Windows 11, go to Start → Settings → System → Recovery. Next to Advanced startup, select Restart Now.
In Windows 10, go to Start → Settings → Update & Security → Recovery. Under Advanced startup, select Restart Now.
2 Once your Windows 10/11 machine has restarted, go to Troubleshoot: see Advanced Options → UEFI Firmware Settings.

Windows Advanced options

3.Navigate to either Advanced, Security, or Trusted Computing (depending on motherboard manufacturer, consult official documentation). See Figure 3 below for example reference.
Intel systems: Enable Intel PTT or Security Device Support.
AMD systems: Enable AMD CPU fTPM.
4.Exit and Save changes (generally F10) and reboot.
Confirm in Windows with Windows Key + R → tpm.msc to check TPM 2.0 is active.

Please note: Your BIOS settings and interface may vary depending on your hardware manufacturer. The example below is for reference only, showing TPM 2.0 referred to as "AMD CPU fTPM" and enabled on the Settings tab in Advanced mode.


Check Secure Boot
Press Windows Key + R to open the Run dialog box.
Type msinfo32 and hit Enter.
In the System Information window (you can use the search bar to find each setting):
BIOS Mode → should say UEFI
Secure Boot State → should say On
What the System Information Means:

Secure Boot State: Off
Your system supports Secure Boot, but it’s currently disabled. Enable it in your BIOS.

Secure Boot State: Unsupported
Your system may not support Secure Boot. Check your motherboard documentation.

BIOS Mode: UEFI
Your PC supports Secure Boot, and the machine can be configured to turn it on.

BIOS Mode: Legacy
You’ll need to change Boot Mode to UEFI; however, you may be required to convert Disk Partition Style from MBR to GPT to enable UEFI and Secure Boot.


System Information shows the status of the BIOS Boot Mode and Secure Boot status. In this example, UEFI is set, as required, and Secure Boot is on.
Confirm the disk partition style is set to GPT. Converting if MBR
Checking Disk Partition Style:

MBR (Master Boot Record) is an older standard for Disk Partition Style, with GPT (GUID Partition Table) being more commonplace today. However, if you are unsure if your drives are partitioned as GPT – required to set your BIOS Mode to UEFI to enable Secure Boot – you may check by:

Steps:

Type Disk Management in Windows search bar and press Enter.
Right-click on the drive with your Windows installation.
Select Properties.
Select the Volume tab in the new window.
Confirm GPT is listed under Partition Style.
If GPT is listed, you can proceed.


Disk Management allows you to check the Partition Style of your disks.

In the Volume tab of a disk’s Properties menu will list the Disk Partition Style. In this example, the disk is set as GPT (required).


If MBR is listed under Partition Style instead of GPT, you will need to convert your Disk Partition Style.

Requirements to Convert MBR to GPT:

Windows 10 version 1703 or later
MBR disk must have at most three partitions
Operating System must be 64-bit
Bitlocker or encryption must be turned off
Dual boot not in use
BIOS must support UEFI mode
Secure Boot must be disabled before starting.

Steps:

Open Command Prompt as Administrator
Press Windows Key, type cmd.
Right-click on Command Prompt → choose Run as Administrator.
Validate Disk
Type mbr2gpt /validate /allowFullOS and press Enter.
If this step succeeds, it’s safe to proceed.
Convert Disk
Type mbr2gpt /convert /allowFullOS and press Enter.
This will shrink the partition slightly and convert the disk to GPT.

Reboot Into UEFI Mode
Restart your PC.
Enter BIOS (using Advanced Restart or by pressing Del, F2, or F10 during boot).
Switch Boot Mode from Legacy to UEFI.
You may enable Secure Boot once system boots successfully into Windows again.
Enable Secure Boot
Requirements:

Ensure BIOS Boot Mode is set to UEFI not Legacy (also referred to as CSM).
Confirm your Disk Partition Style is using GPT not MBR.
Enable Secure Boot in BIOS.

General Process for Enabling Secure Boot:

Access your BIOS/UEFI settings (Advanced Restart → UEFI firmware settings).
Accessing your BIOS can be accomplished in many ways; however, one of the easiest is to restart your machine from Windows.
In Windows 11, go to Start → Settings → System → Recovery. Next to Advanced startup, select Restart Now.
In Windows 10, go to Start → Settings → Update & Security → Recovery. Under Advanced startup, select Restart Now.
Once your Windows 10/11 machine has restarted, go to Troubleshoot: see Advanced Options → UEFI Fireware Settings.

Navigate to the Boot tab within the BIOS.
If you are having difficulty finding Secure Boot in your BIOS, many BIOS include a search feature (typically accessed by pressing F9); You should consult your PC or motherboard’s official documentation for detailed instructions.
Secure Boot (or Secure Boot State) should be set to Enabled. See Figure 8 below for example reference.
Exit and Save changes (generally F10) and reboot.
Confirm in Windows with Windows Key + R → msinfo32 if Secure Boot is enabled.

Please note: Your BIOS settings and interface may vary depending on your hardware manufacturer. The example below is for reference only, showing Secure Boot enabled on the Boot tab in Advanced mode.


How to convert bios to uefi mode from legacy (or CSM)
Access the BIOS/UEFI Firmware
Using Advanced Restart or by pressing Del, F2, or F10 during boot (depending on your motherboard).
If Windows boots up normally, restart and try again.
Locate the Boot Mode Setting
Once inside BIOS/UEFI:
Go to the Boot tab or section (may also be under Advanced or Startup depending on your motherboard brand).
Find the setting labeled Boot Mode, Boot Option, or UEFI/Legacy Boot.
Change Boot Mode to UEFI
If it says Legacy, Legacy Only, or CSM (Compatibility Support Module) → change it to:
UEFI
Or UEFI Only / UEFI First (depending on your options).
If there is a CSM setting, disable it.
Enable Secure Boot (Required for Call of Duty: Black Ops 7)
Navigate to the Security or Boot tab.
Locate Secure Boot and set to Enabled.
If greyed out, make sure you:
Have UEFI mode selected
Save & reboot into BIOS again
Save Changes and Exit
Click Save & Exit tab or press save hotkey (generally F10).
Choose Save Changes and Exit → Yes.
Your system will reboot in UEFI mode.

Confirm After Reboot

After booting back into Windows:
Press Windows Key + R, type msinfo32, hit Enter.
Look for:
BIOS Boot Mode → should say UEFI
Secure Boot → should say On
17 条留言
noahbrycebmx 11 月 10 日 上午 9:34 
How do I do this too the steam deck
одиночка 10 月 5 日 上午 11:10 
минус миллион пользователей на старых материнских платах и процессоров
Ruchir 10 月 3 日 上午 5:08 
@DarkPhantomNL

Nice, I didn't know that I got another beta access code from COD Next stream and used it for access on PS5 so I played whole day yesterday on that will check this out today on PC hope fully it works as my TPM 2.0 version is also 3.93.0.2
DarkPhantomNL 10 月 2 日 下午 2:51 
3.94.0.2 is working fine for me just played bo7 for 4 hours on the game pass pc with no problems so when it says update bios its just another message bug in the bo6 HQ when i started up bo7 it does not give any message
YDevil 10 月 1 日 下午 12:08 
Updating the bios to the kernel version 3.94.2.5 helped me, I also completely reset all the keys inwin 11 and bios, and everything worked and all warnings disappeared
Ruchir 9 月 28 日 下午 12:20 
I have everything enabled as expected
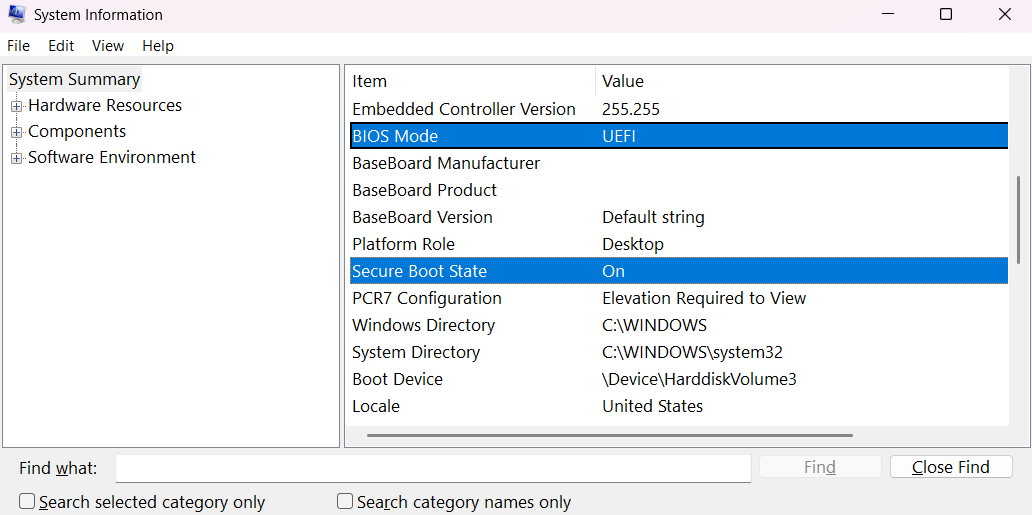
BIOS Boot Mode → UEFI
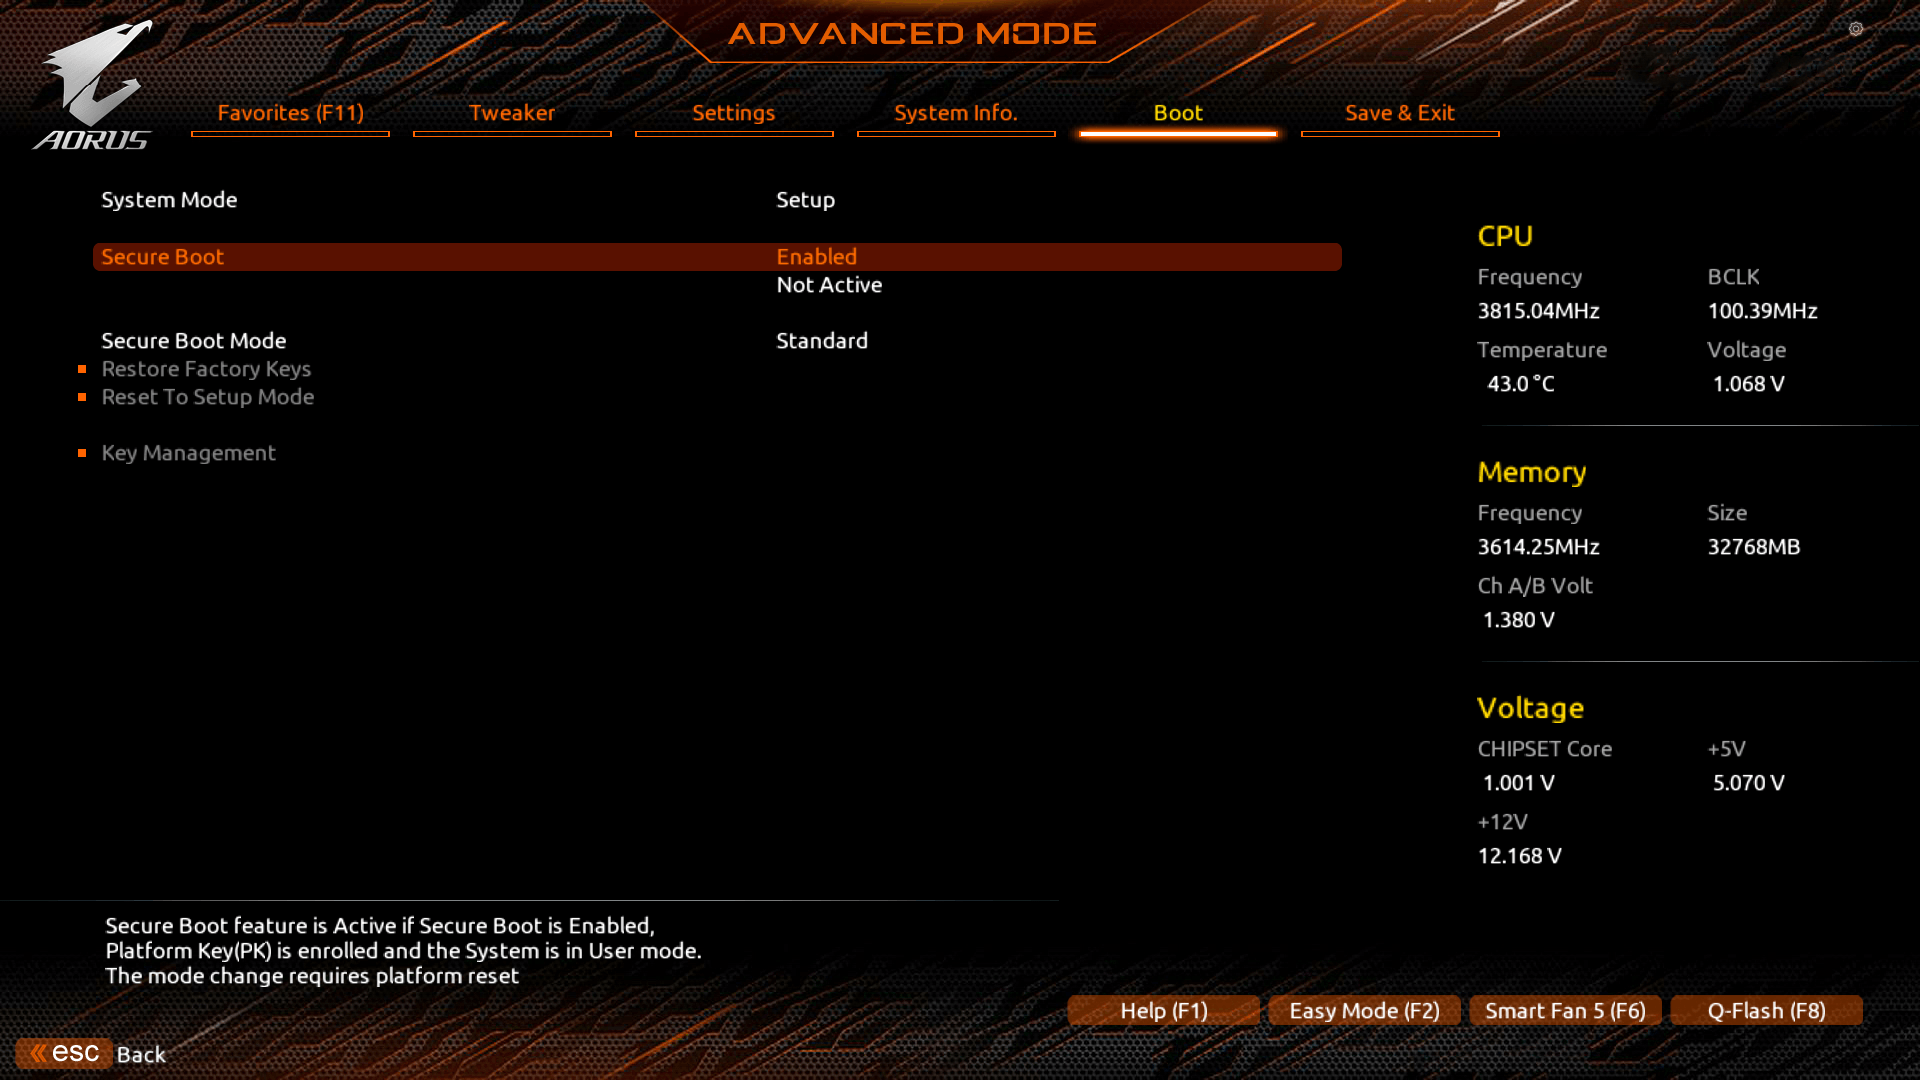
Secure Boot → On

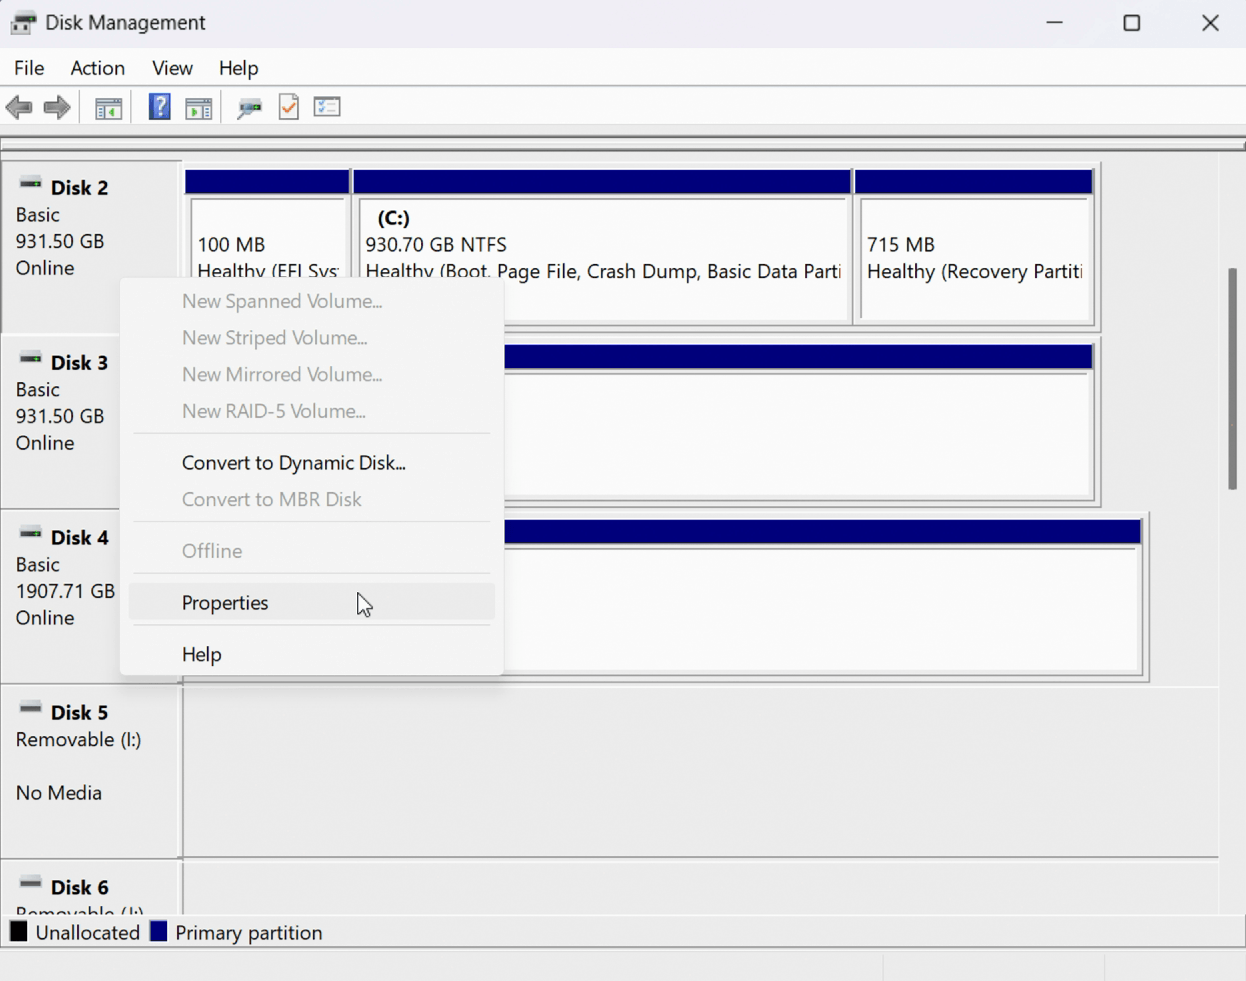
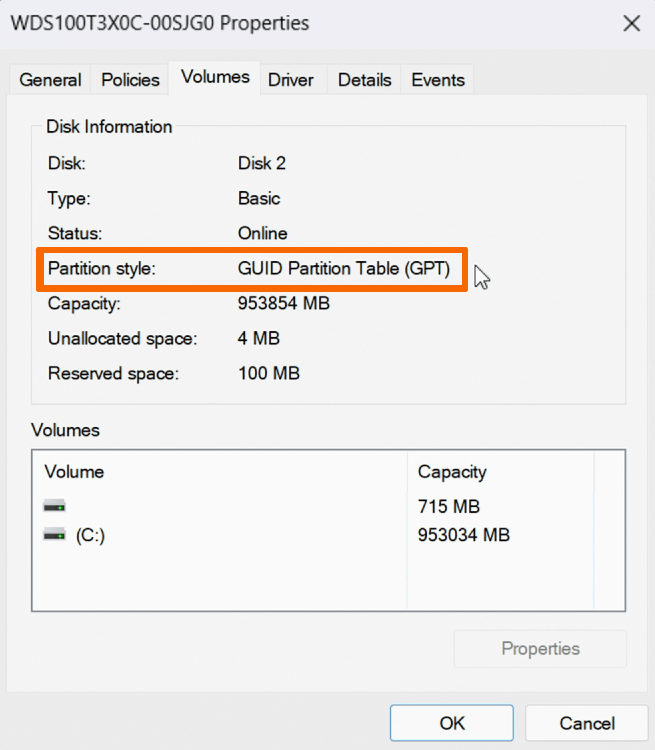
Disk Partition Style → GPT

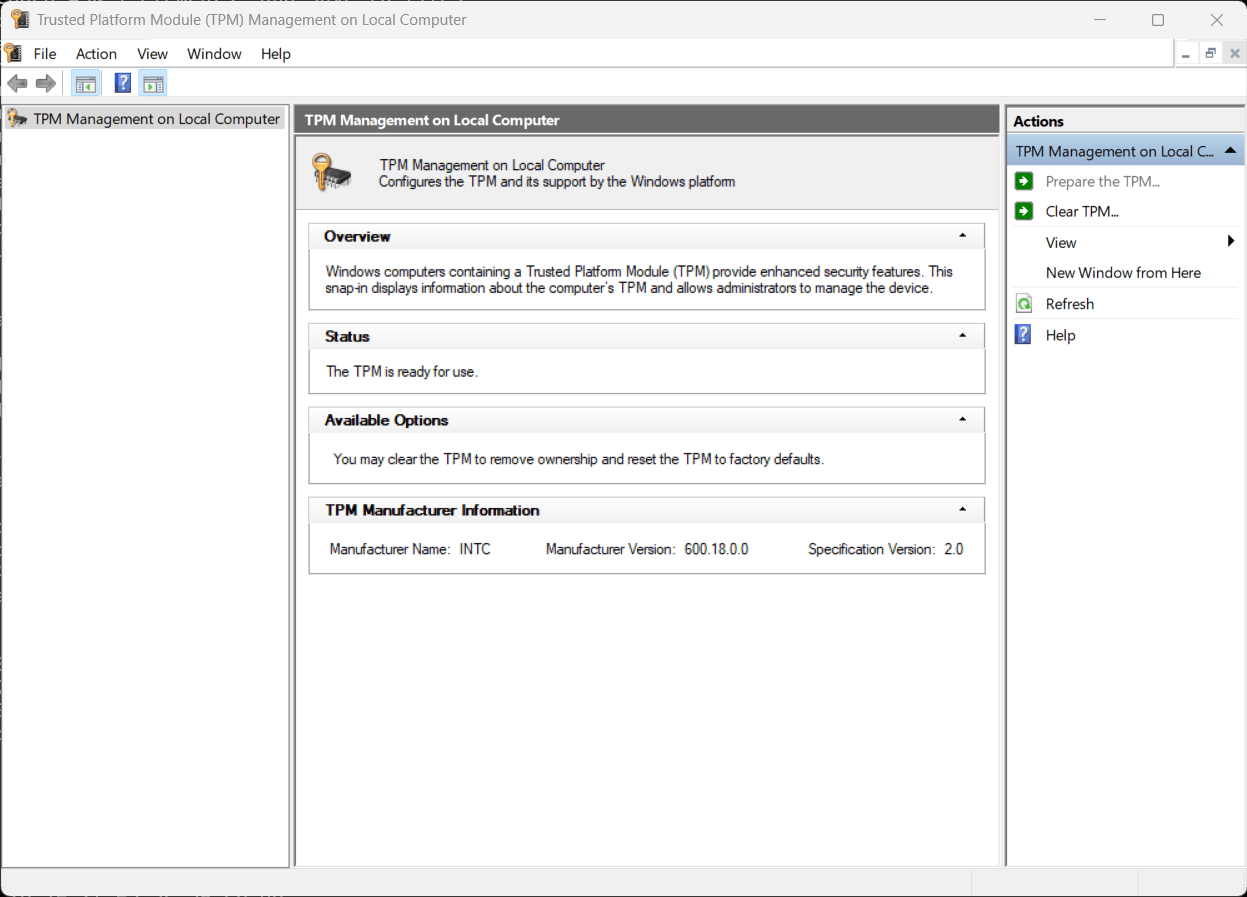
My TPM is also showing "The TPM is ready for use"

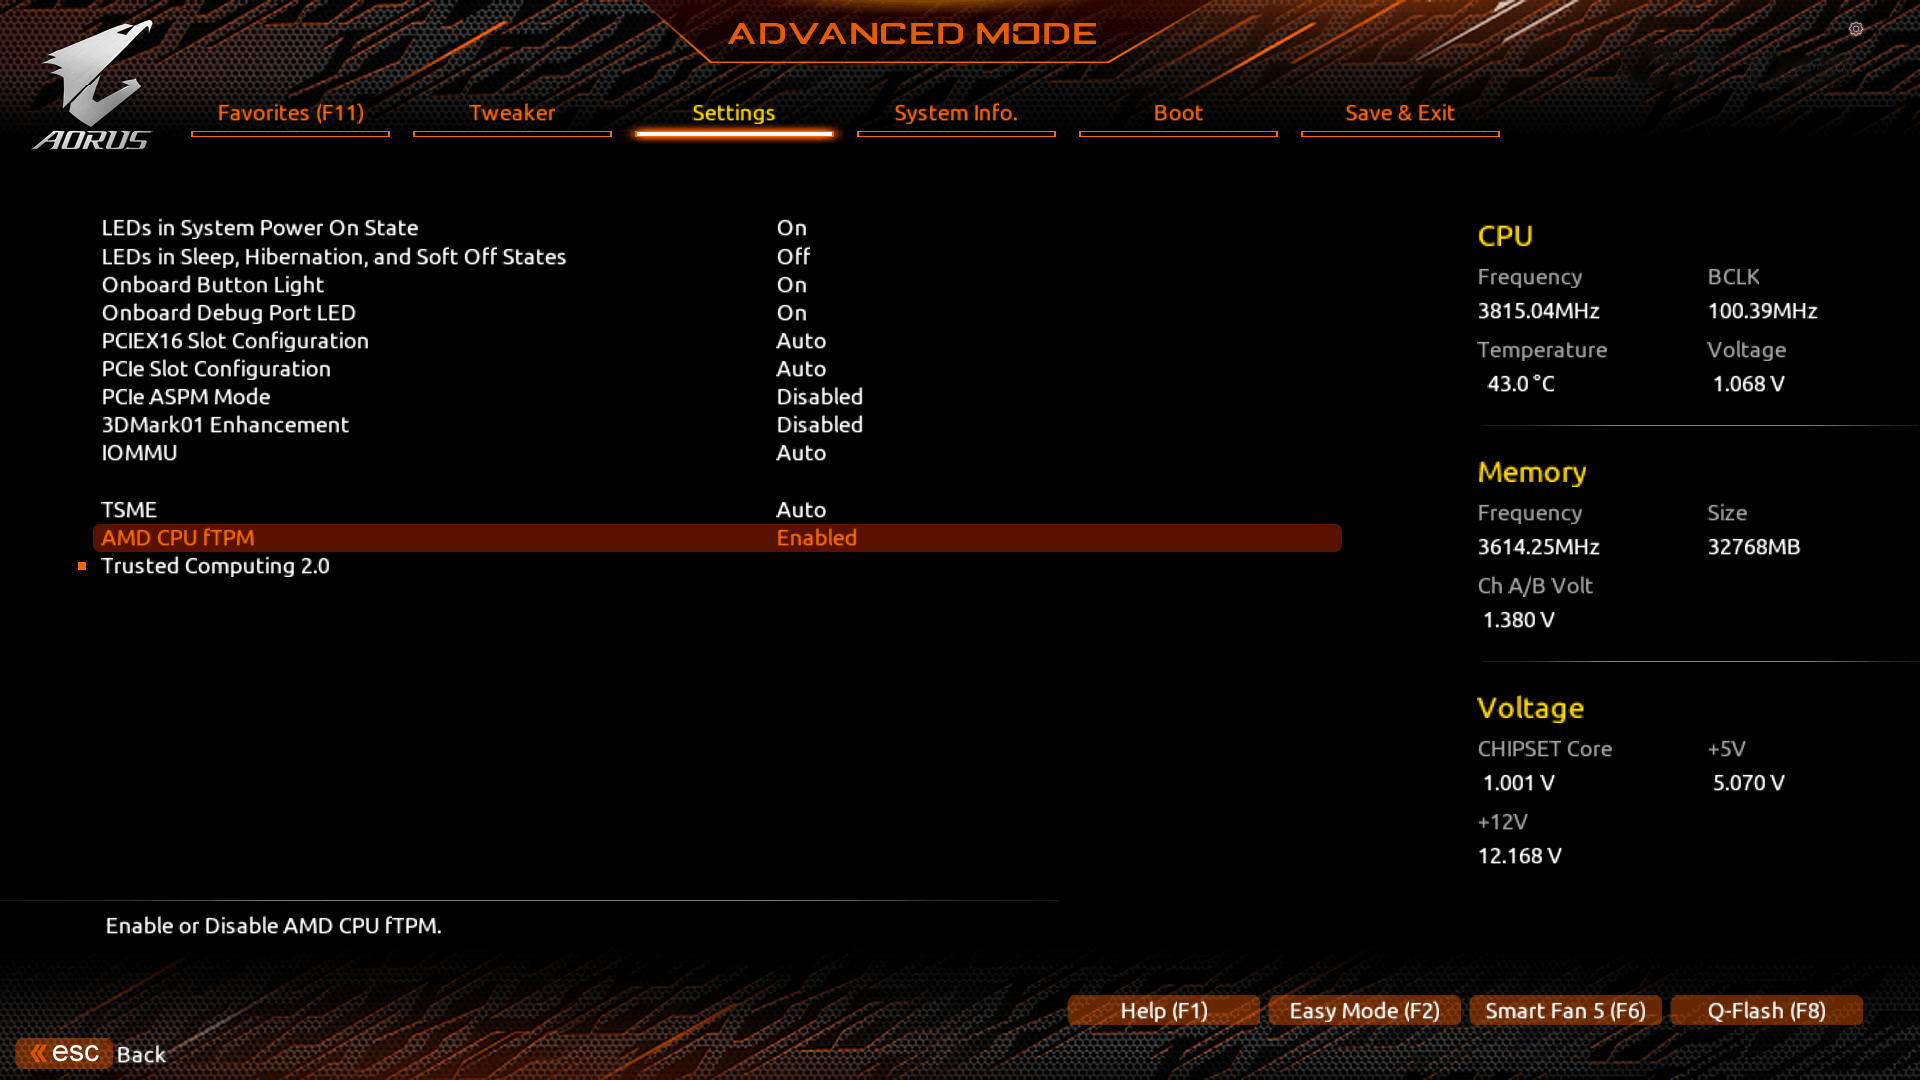
My TPM Manufacturer is AMD and Version is 3.93.0.5 while on the Activision support page shows 3.92.5.0 is OK
So clearly my version is a higher version then the one listed still I am getting warning.
DarkPhantomNL 9 月 5 日 上午 6:46 
@johnny blanco no you did nothing wrong originally you dont need it yet for black ops 6 tpm 2.0 will be needed when black ops 7 comes out, so i hope after the release of black ops 7 that message will be gone for the people that has tpm 2.0 becuase black ops 7 comes trough the same launcher as black ops 6
Johnny Blanco 9 月 5 日 上午 12:42 
It's strange, the Battlefield 6 beta also required TPM 2.0 to be enabled and I successfully turned it on and played the game. But now Call of Duty is asking to enable this service again. It's like I did something wrong.
ᴾᵁrᴾᴸᴱᴴᴬᶻᴱ420 8 月 14 日 下午 3:37 
UEFI
Micheal 8 月 13 日 上午 5:23 
Same problem, All on, still getting TMP 2.0 warning. MSI motherboard and AMD Ryzen 5 56000X