Rebel Transmute

Rebel Transmute

评价数不足
Speedrun Guide with Maps
由 duckfist 制作
Basic glitchless speedrun route with annotated maps and detailed notes.
   
奖励
收藏
已收藏
取消收藏
Introduction
Hi
After finishing my first blind play, I started making maps and sketching out a rudimentary speedrun route. I just finished my first speedrun attempts and wanted to share my route with the community to provide some closure for myself, as I'm not sure if I will continue playing it.

Disclaimer
I have not consulted with the speedrunning community at all for this game. I haven't been in any Discord servers for it, and I haven't watched any streams or videos or other runs of it yet. This is just for fun. Feel free to create your own rules or consult with other community members. For the time being, I am simply taking my past experience speedrunning other games and applying it here within reason.

Also, I wholeheartedly expect this route to be instantly obsoleted by major strat discoveries, skips, rerouting, and attempts by serious™ speedrunners. I may update this with some relevant links in the future for runners who want to dive deeper, but I probably won't keep this guide's route up to date with the meta or anything. However, I do hope this can help some other early speedrunners or anyone looking to pick up a basic route. Let me know in the comments if there are any blatant errors and I will try to update those. And of course, feel free to share your run or route ideas too; even if I don't update this guide's route, I'd love to hear about what crazy and cool stuff can be done.

Most importantly: Have fun. It's a good game and the movement is pretty sick to go fast with.

My Run History
Personal Best:
Any% speedrun in 1:40:22, on March 24, 2024, Twitch VoD[www.twitch.tv]
  • Playthrough 1: 27h48m in-game time at 88%.
  • Playthrough 2: ~15 hours casual and map-making semi-routing run
  • Playthrough 3: ~8 hours routing run
  • Playthrough 4: 2h38m in-game time speedrun test, split-making and route correction
  • Playthrough 5: 1h52m RTA stream on Twitch
  • Playthrough 6: 1h40m RTA stream on Twitch
  • I can probably save ~10 minutes with better execution alone. I may do another run to eliminate a major routing error I made near the end for a cleaner video.
  • Another ~20 minutes can probably be saved by not having to purchase or collect various upgrades/augments I routed in for safety, plus more efficient Force Respawn usage and skipping save points.
  • If further sequence breaks are found, I can see this going under a hour.

My Rules
  • Timer starts on selecting a new game file.
  • Timer ends the moment the final boss dies.
  • All accessibility/assist options are DEFAULT.
  • No macros, autohotkey or any of that.
This run is relatively glitchless. I'm allowing skips and/or sequence breaks for myself but I didn't really find anything except a few wall clips I can't reproduce, and a high jump out of the water in early Abandoned Quarry that saves like a minute. If there were major glitches like pixel-perfect frame-perfect wrong warps or boss skips, I probably wouldn't do them. I abuse Force Respawn often to avoid backtracking and to skip a few cutscenes where you get trapped in a room with some enemy encounter.
Setup
Route info, strats, and tidbits
  • 9 bosses are defeated in this route: Grey Matter, Carapace, Blood Cocoon, Bloat Specimen, Goliath, Devouring Worm, Cerebellum, Berathrum, and Hive.
  • This route collects all sorts of optional stuff for safety, detailed in the below sections. The Batteries, Weapon Crystal, Blaster Upgrades, Synthetic Oil, Personnel Data, and purchased/found augments can all probably be skipped if you can get good enough at surviving.
  • In order to warp TO a teleporter, you do not have to repair it, you only need to enter its room at least once.
    • No teleporter repairs or save point repairs are purchased in this run.
  • Must speak with Dr. Anaya near the beginning for a gate to open to access the first boss.
  • At some point before, you must visit the terminal near final boss door to allow accessing switch room PC in Sunlit Dome Arboretum.
  • At some point before, you must visit the terminal in eastern Foray Surface Labs to allow accessing switch room PC in Sparkblood Mines visit 2.
    • Somehow, I was able to skip doing this during a practice run. The event in the Sparkblood Mines PC room somehow triggered even though I never visited the above terminal. My following run did not let me proceed. Perhaps I missed a detail here.
    • In general, I'm not 100% certain about which event triggers are absolutely necessary for beating the game. Please let me know if it's possible to skip them reliably.
  • In Sparkblood Mines 1, there's a section where you're meant to have flipped 2 switches elsewhere in the zone before proceeding. The first reduces the speed of various crushers throughout the zone, the second reduces the speed of conveyor belts. I wasn't able to do this section without flipping at least one switch, as it's too hard for me to dash across the long fast conveyor while avoiding the fast crushers. The first switch isn't too far away and makes it much easier. The second switch is quite far away with a miniboss in between, and luckily not necessary - although the fast conveyors are quite frustrating.
  • It's possible to activate some switches from behind closed gates by getting lucky with enemy projectiles hitting them (I think?). I was able to open gates in Coral Fissure and Sparkblood Mines this way, but it's hard to reproduce.

Techniques
Here's what makes this game really fun to go fast in. The harmonization of the various movement mechanics, whether intended or not, make the basic platforming gameplay a satisfying experience from a controls perspective.
  • "Water Dash Cancelling": Press Jump before pressing the Dash button to reset the Dash cooldown to execute it faster. Might be a glitch, but please don't fix it since it makes the game cooler.
  • Sliding: You can slide off of ledges or jump out of a slide to preserve your sliding speed; although, you gradually slow to walking speed the longer you spend in mid-air. Sliding through doors is optimal since slide speed is carried through. You can bounce (or bomb-bounce) out of a slide-jump to continue preserving your speed as well. Note that slide-jumps have a shorter height (~2 tiles) than a non-sliding jump (3-tiles) - this is often the most determining factor in choosing when to slide, slide-jump, or air dash in combination through sections.
  • Dashing: Generally faster than sliding, although you must land on the ground or bounce off of an enemy or obstacle to reset it - ideally, you jump and then dash like ~3 frames afterward in order to be as close to the ground as possible, and then repeat that sequence for the fastest possible horizontal movement. Although this is hard to do consistently and accurately.
  • Bomb Bouncing: Place a bomb at your feet and press the bounce button to gain great height. You can do this off of any surface, enemy, or object that you can normally bounce off of.
  • Shinesparking/super dashing/what is this called: Press L1 to do a fast continuous dash to the left or right from a standing position or while hanging from a wall. Takes around 1 second to execute. By pressing Jump after colliding with a wall, you will continue dashing at an upwards 45 degree angle. There might be more mechanics to this, and I probably missed many other opportunities for it in my runs.
  • It's possible to clip through some walls. I was able to clip through the purple blocks in southwest Sparkblood Mines by air dashing out of a shinespark against it, I think.

Default Augments
  • 0.25 | HUD: The HUD. Disable at some point.
  • 0.25 | Neurolon GPS: Map location info. Disable at some point.
  • 0.25 | Injector Interface: Enables healing. Always keep on.
  • 0.25 | Foray Expeller: Keeps Red Flux on death. Disable when doing force-respawns when
    low on cash (noted throughout the guide)

Collected Augments in the Route
  • 1.50 | Wave Blaster: Wide shot for higher damage and faster injector refilling. Always keep on.
    • From a room in Coral Fissure, takes like a minute to kill that huge slug and ride the annoying platform.
  • 1.00 | Blood Extractor: Injector fills faster to heal more often. Always keep on.
    • Found in Foray Surface Labs first room.
  • 2.00 | Reactive Blood: Very fast healing when health is low.
    • Great for when fights are too damaging, a.k.a. when I'm too impatient to practice and learn the fights properly (Cerebellum, Hive)
    • Purchase from Clang in town for 300 RF after rescuing Apprentice Pearl.

Other useful augments I decided to remove from the route
  • 2.25 | Overcharge: Triple shot, super strong.
    • I decided to remove this from the route since it's so costly. Still a great safe strat.
    • Can buy from Scavenger Clang for 500 RF, no need to rescue any other bots.
  • 2.00 | Blood Blaster: Higher damage on full HP. Not sure, should remove for final boss though.
    • On second thought, nah skip this, 2.00 too costly, hard to maintain max HP for now.

Consumables Collected
  • x1 Fuse (found)
  • x1 Weapon Crystal
  • x2 Batteries (0 purchased, 2 found)
  • x2 Blaster Upgrades (1st costs 150 RF, 2nd costs 500 RF + 1 Weapon Crystal)
  • x1 Synthetic Oil (get before Sunken Basin entrance, sell for 250 RF to afford late game buffs)
  • x7 Personnel Data (100 RF each to afford late game buffs)
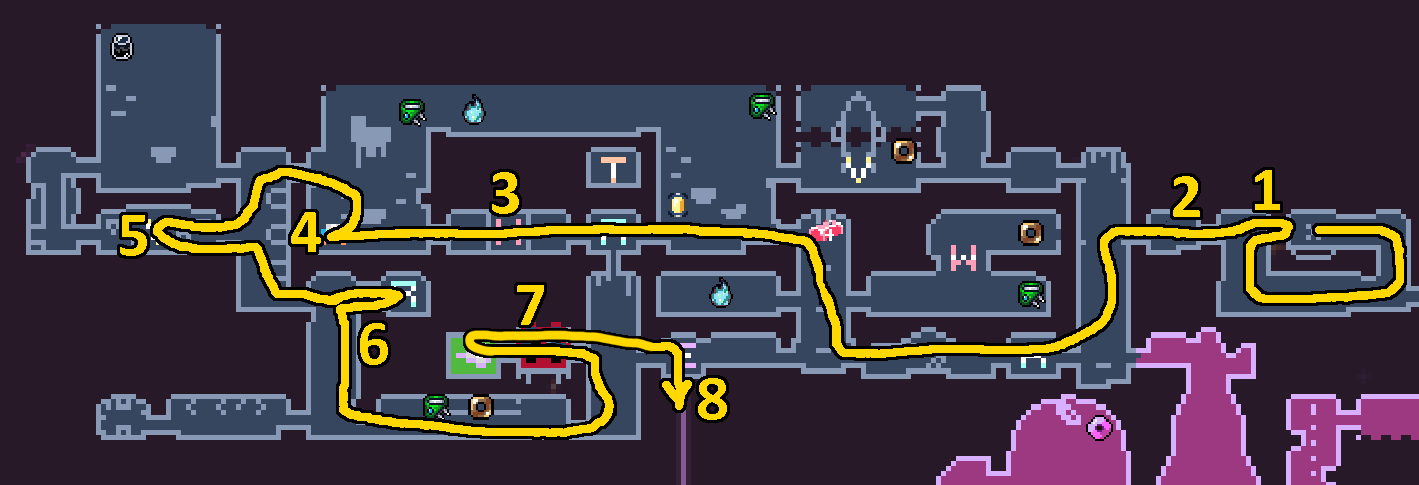
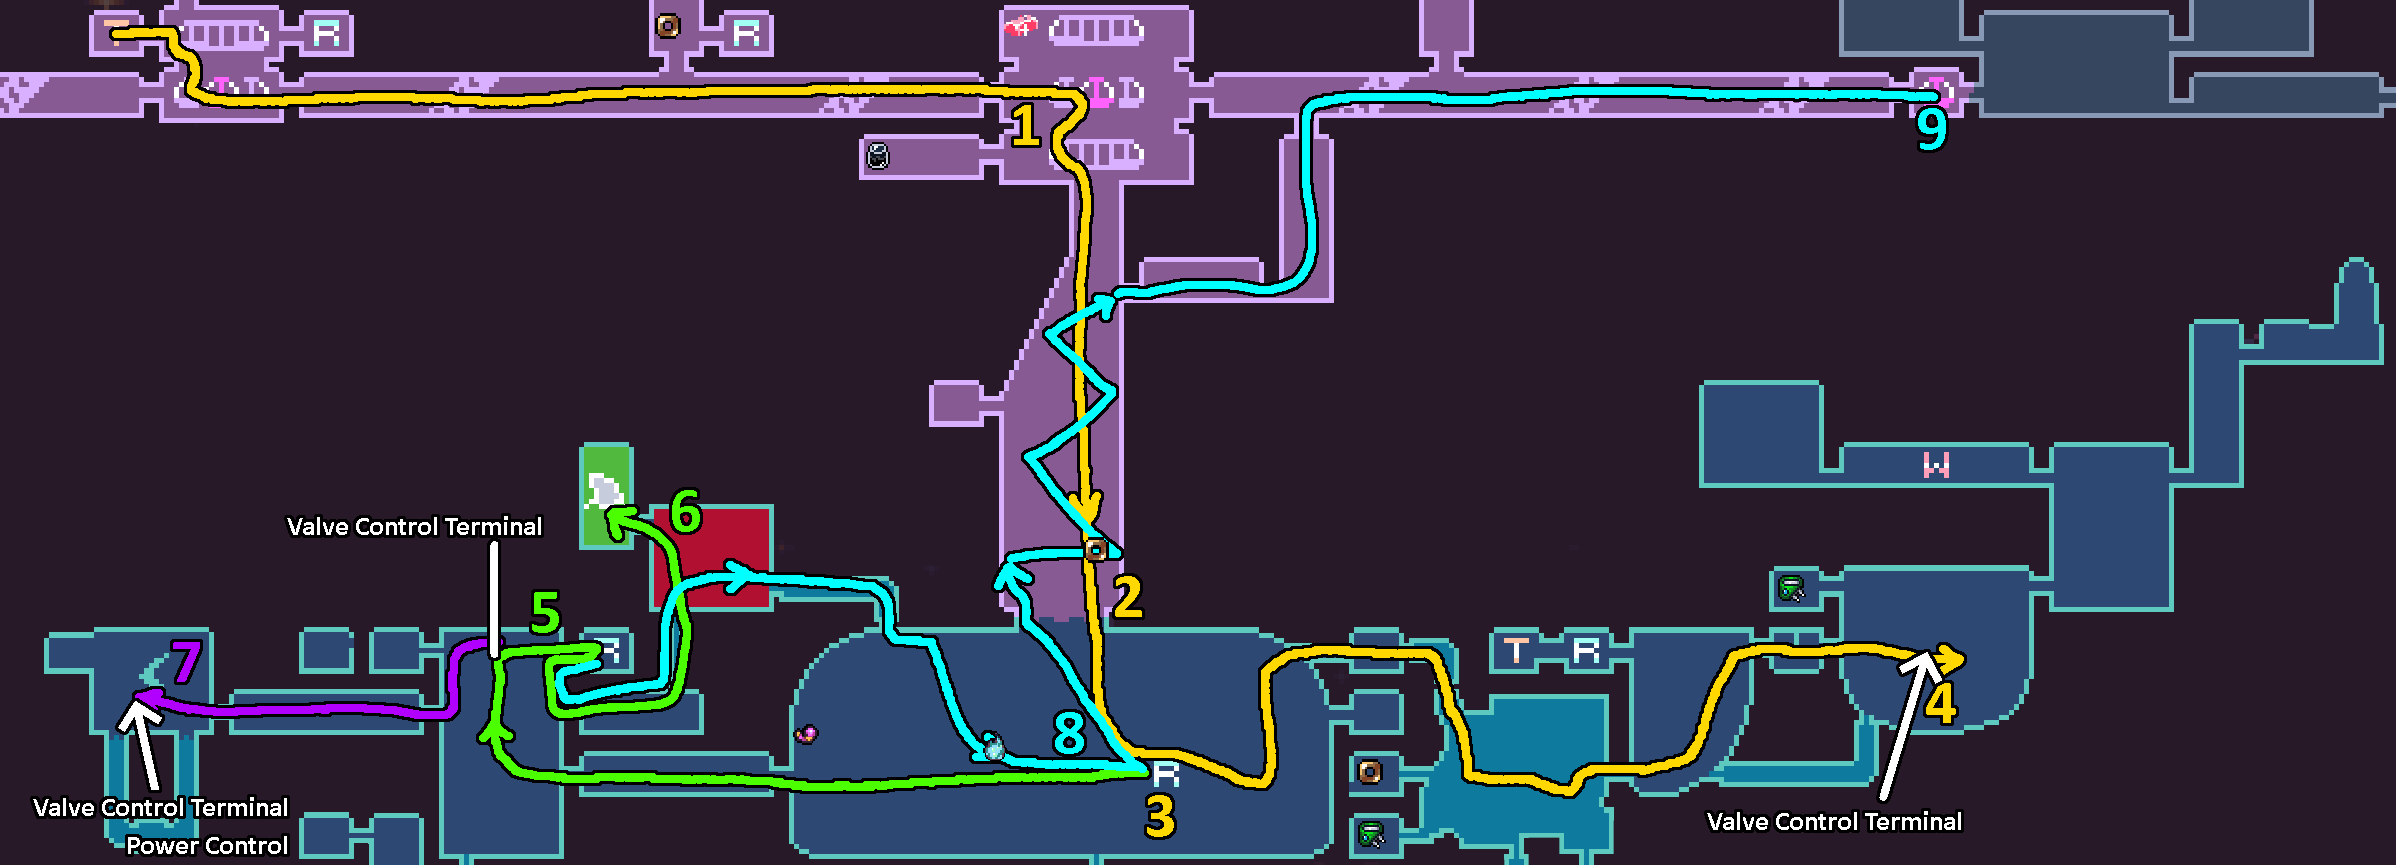
01 - Foray Surface Labs
  • (1) Get Augment: Blood Extractor
  • (2) Get Sparkblood Injector
  • (3) Miniboss
  • (4) Get Survey Core (Map) & x1 Fuse
    • use Fuse on gate
  • (5) Dr. Inaya - (talk once; required to open gate in next room)
  • (6) Save, EQUIP BLOOD EXTRACTOR
  • (7) BOSS: Foray Enforcer - Grey Matter
    • Upgrade: Humming Symbiote (blaster destroys bubbles and metal enemies)
  • (8) Elevator to Abandoned Quarry
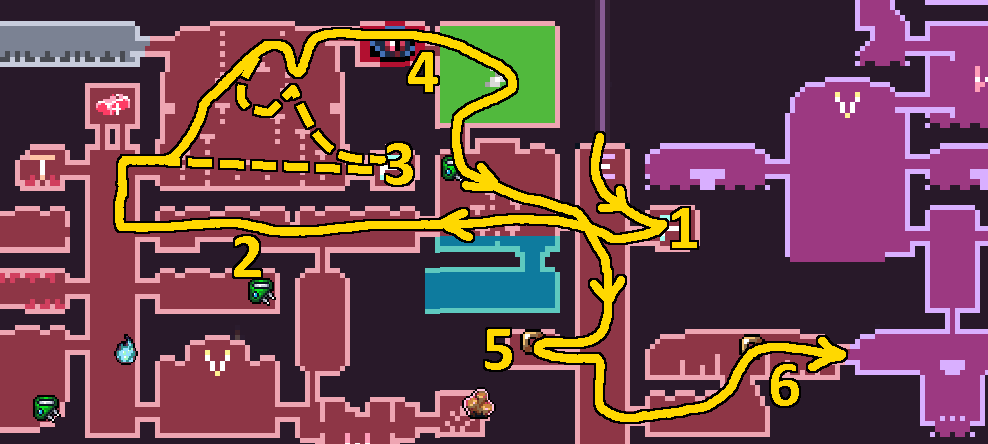
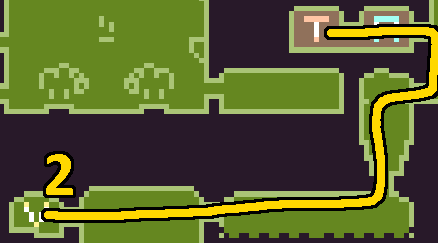
02 - Abandoned Quarry
  • (1) Save
  • (2) Water jump shortcut
  • (3) OPTIONAL Safety Save
  • (4) BOSS: Tortured Matriach - Carapace
    • Upgrade: Shimmering Symbiote (air dash)
  • NOTE: NEED 200 RF for upcoming weapon upgrade + force respawn so start saving up
  • (5) Get Personnel Data (1)
  • (6) Get Personnel Data (2) on the way to Coral Fissure
    • Good candidate to skip, takes ~10s to get
03 - Coral Fissure, The Overgrowth
  • (1) East to The Overgrowth entrance
  • (2) Save
  • (3) Boss: Infested - Blood Cocoon
    • Upgrade: Viscous Symbiote (bombs)
  • (4) Backtrack to bomb barrier
    • Possible big shortcut by reverse opening the gate somehow (enemy triggered?)
  • (5) SAFE STRAT: Bomb elevator shortcut
  • (6) Visit Welder Bot vendor and buy Blaster Upgarde 1 for 150 RF
  • (7) SAFE STRAT: Bomb elevator shortcut
  • (7) Get Personnel Data (3) to the Northeast
  • (8) Save point
    • UNEQUIP Augment: Foray Expeller to avoid the 50 RF respawn costs for while
  • (9) Miniboss
  • (10) SAFE STRAT: Bomb elevator shortcut
  • (11) BOSS: Glutinous - Bloat Specimen
    • Upgrade: Centrifugal Symbiote (spin bounce)
    • FORCE RESPAWN
  • (12) Get Augment: Wave Blaster
    • This takes forever to get... but the weapon is so good.
  • (13) West back to Coral Fissure
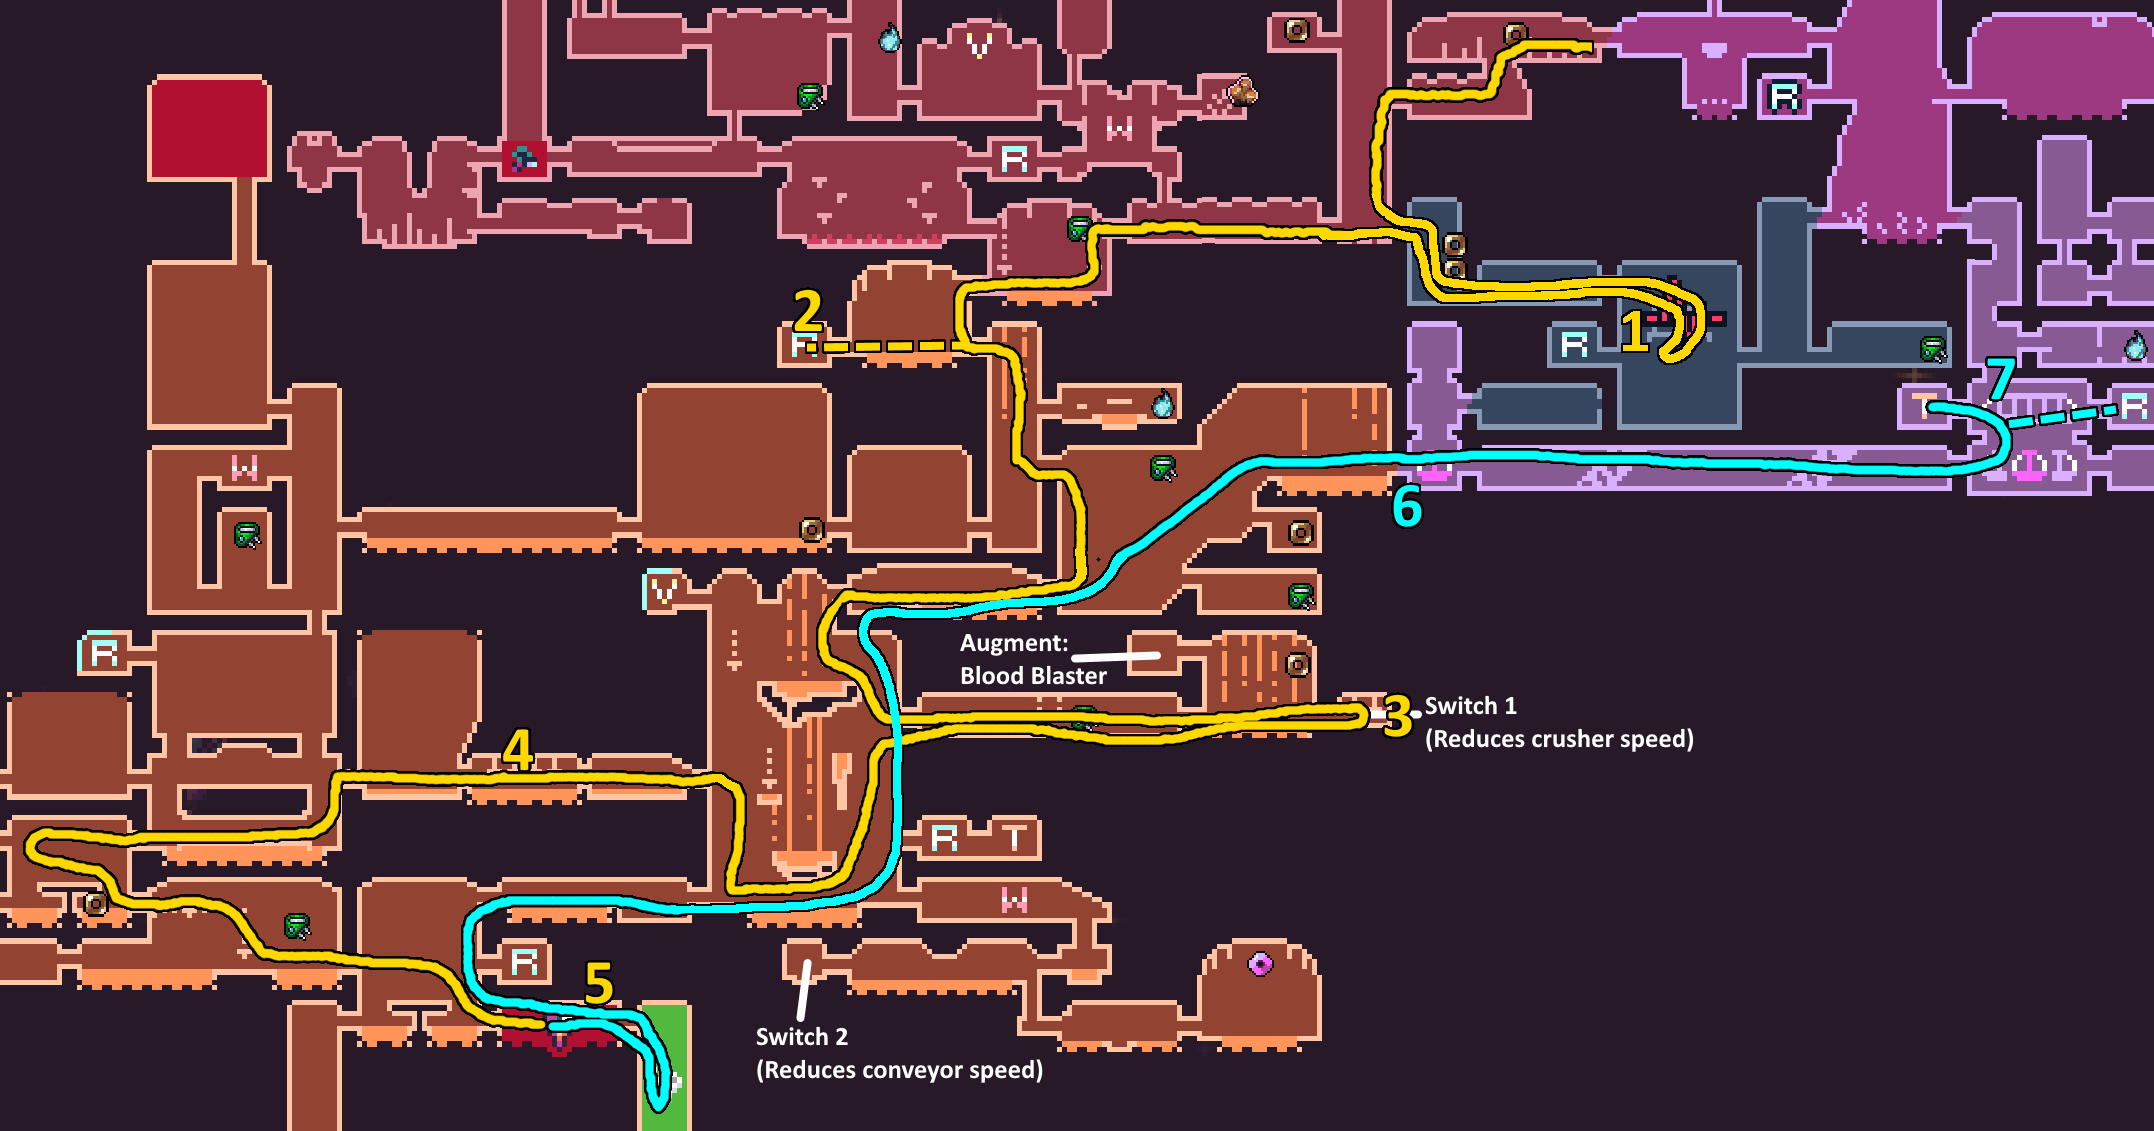
04 - Sparkblood Mines 1
  • (1) Talk to the main computer
    • Optional 2 discs here but it's kind of a nightmare
  • (2) Southwest to Sparkblood Mines and save
  • (2) EQUIP Augment: Wave Blaster
  • (3) Hit switch (reduces crusher speed)
  • (3) Get Personnel Data (4)
  • (3) OPTIONAL: Get Augment: Blood Blaster in top-left room (I skip this now, won't mention it anymore)
  • (4) Difficult platforming rooms without hitting Switch 2
  • (5) Optional Save
  • (5) BOSS: Mining Drill: Goliath
    • Upgrade: Clawed Symbiote (wall jump)
  • (6) Go east to Reef Set Subways
  • (7) Teleporter to The Overgrowth and SAVE when there
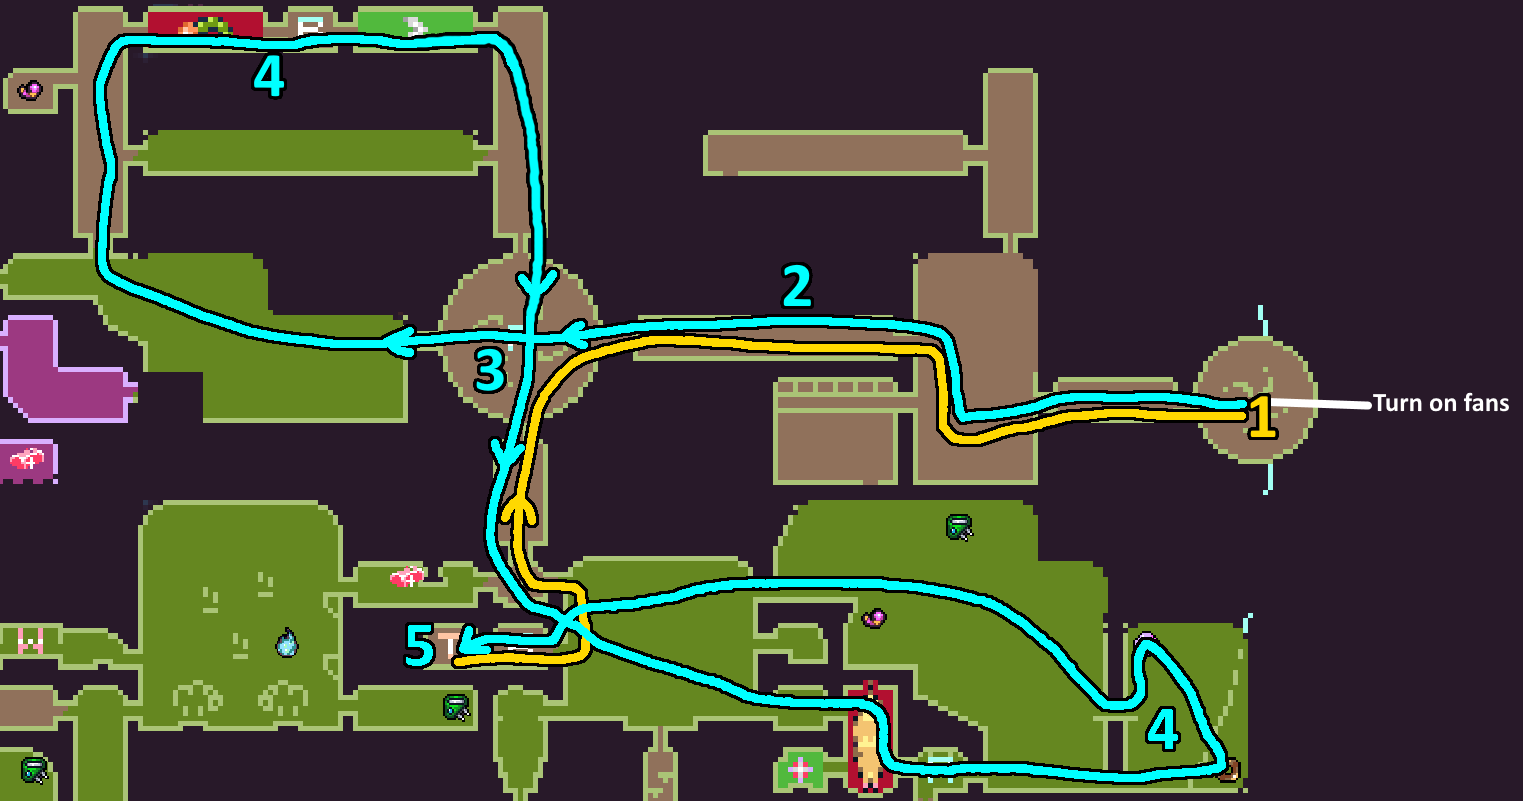
05 - Sunlit Dome Arboretum
  • (1) Red switch puzzle (upper-right, then upper-left, then bottom)
    • Enables all fan chutes, to crash through barriers
  • (2) Miniboss (return trip only - maybe force respawn?)
  • (3) Destroy barrier
  • (3) Save
  • (4) BOSS: Biomechanoid - Devouring Worm
    • Upgrade: Pressurized Symbiote (super dash)
    • FORCE RESPAWN or run back to central save
  • Get Weapon Crystal (1) and Personnel Data (5) at easternmost room
    • This takes forever... try to cut out this weapon upgarde entirely next time
  • (5) Teleport to Reef Set Subways
06 - Sunken Basin
  • (1) Get Battery
  • (1) Walk to Rail Yard Station train stop
  • (1) Get Personnel Data (6) and Synthetic Oil
  • (2) Get Personnel Data (7) while falling then enter Sunken Basin
  • (3) Save (to warp to later)
  • (3) Rescue Apprentice Pearl
  • (4) Valve Control Terminal (OPEN)
  • (4) FORCE RESPAWN to central chamber
  • (5) Valve Control Terminal (CLOSED)
    • Save? If you die it SUCKS because you need to re-open first valve
  • (6) BOSS: Death Angler - Berathrum
    • Upgrade: Breathing Symbiote (gravity suit + water spark)
    • FORCE RESPAWN (but DON'T if your save is still in the central area)
  • (7) Terminal puzzle then activate PC
    • Close valve, bottom switch, open valve, water spark to top switch
  • (7) FORCE RESPAWN (to skip miniboss)
  • (8) Return to central Save
  • (9) Backtrack to Reef Set Subways then East to the final train stop
    • Can dash against central save point to dash spark back up the shaft
    • Then dash to the right one platform above the infected computer thing to make it to the pipe
07 - Clean-Up
Event Trigger Thing
  • (1) Continue East to the event trigger in Foray Surface Labs
  • FORCE RESPAWN then return to Reef Set Subways - Central Station
  • Teleport to The Overgrowth and SAVE

Buffing Up for Safety
  • SAVE here at The Overgrowth
  • EQUIP Augment: Foray Expeller now or you lose all your money when respawning
  • (2) Vendor Evelynn, Sell Synthetic Oil (x1) and Personnel Data (x7) for 950 RF
    • FORCE RESPAWN (-50 RF)

  • (3) Warp to Foray Surface Labs, pick up Battery (2) beneath the teleporter and buy Augment: Reactive Blood for 300 RF from town
    • FORCE RESPAWN (-50 RF)
    • UNEQUIP Augment: Foray Expeller again

  • (4) Warp to Coral Fissure, go west to Vendor: Evelynn for Weapon Upgrade 2 (500 RF + 1 core)
    • FORCE RESPAWN (should be out of money)
  • Warp to Sparkblood Mines
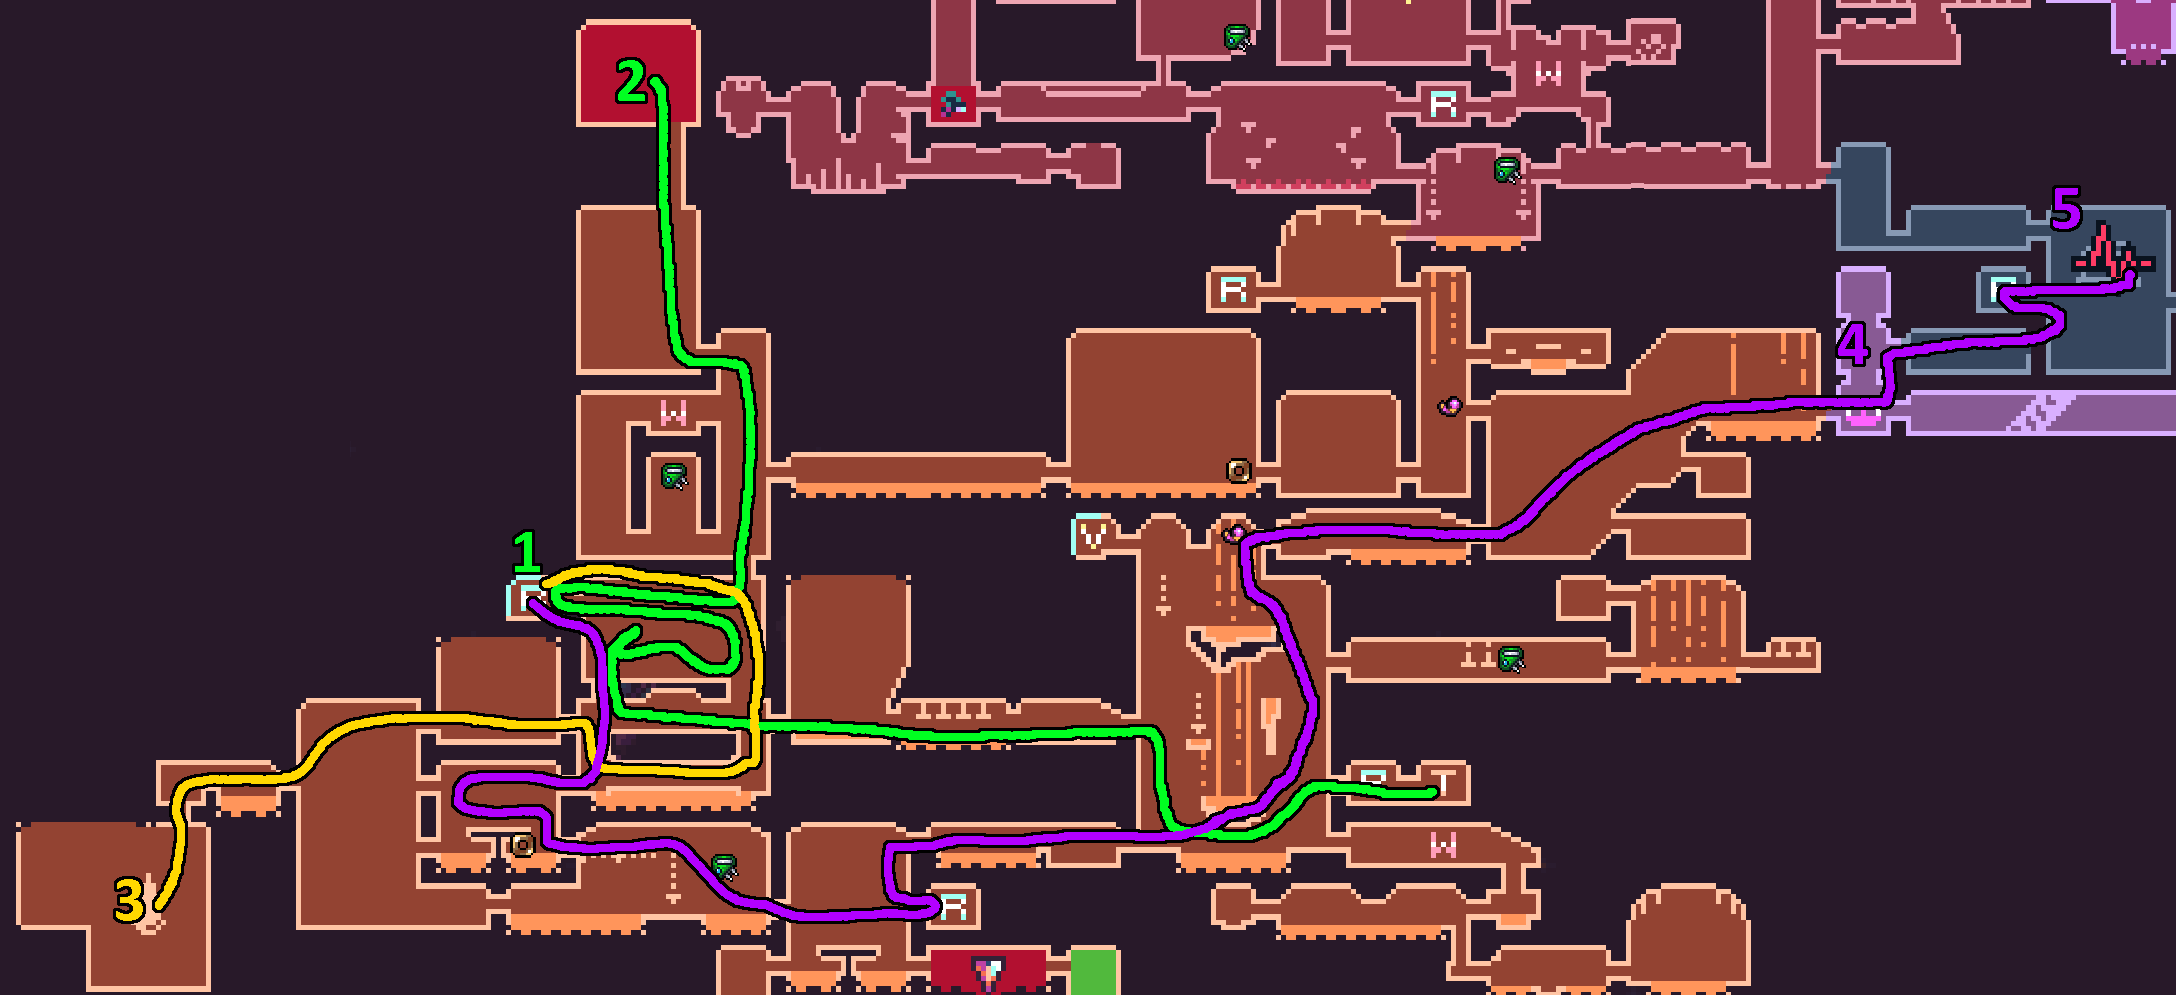
08 - Sparkblood Mines 2, End
  • (1) West Save Point (take upper route, NOT the "shortcut")
  • (2) BOSS: NGC Contractor - Cerebellum
    • Reward: Open gates
    • FORCE RESPAWN
  • (3) Terminal Switches #3
    • Bottom right, then bottom left, then upper switch
    • Dream 1: Kill the 3 worms
    • Dream 2: Left, Down, Right, Right, Right, Up - shinespark on the side of the last platform
    • FORCE RESPAWN
  • (4) Run to the final boss door Save Point (via leftmost train station shortcut)
    • Really nasty run back. Figure out how to shorten this. Why does the upper gate remain closed?
  • (5) BOSS: Corporate AI: Hive

~gg

SEE YOU NEXT MISSION
4 条留言
SnapKick 5 月 11 日 下午 2:17 
This guide was made before the Enter the Synapse update, so the route listed here will very likely have inconsistencies as a lot of the map was changed up since then
geodescent 5 月 11 日 上午 10:26 
Abandoned Quarry item 5 (data disc) is simply not possible with the route listed. You can't jump high enough that early in the game
SnapKick 2024 年 4 月 22 日 上午 6:30 
Other thing of note is about the water dash cancel, you can just hold the jump button. I initially came across this same thing, but thankfully IllegalSam noticed you don't need to mash A or hit it perfectly. It's 100x more comfortable and faster to just hold.

Otherwise, once again, this is all super sick and much more effort then I think anyone in the main speedrun community has put into documentation thus far. If you're ever interested in checking out runs for this game again, or if anyone out there reading is interested, I ofc suggest checking out the most recent and top runs on speedrun.com and maybe checking out the discord if you want, otherwise this is a cool alternative any% route with a lot of good info in it. GGs
SnapKick 2024 年 4 月 22 日 上午 6:30 
Neat stuff! I'm the mod for RT on speedrun.com and can really appreciate what you've done here. Lot of neat routing for a semi-casual speedrun route, and I can appreciate that you've added
safety checks. I may run the board but I completely understand and approve of doing runs for yourself.

Figured I'd share a couple things to add onto this, namely some of the more recent videos from runner Animach1ne: https://www.youtube.com/watch?v=g0XpR4KG45w&list=PL8zhHi-oGThhNxOpJKQuUvy5FC-DIi09W

Lot of cool tech and such in there with input display for most of them, highly suggest giving them a watch, especially the videos on Quarry Skip, Mine Skip, and Bounce Tech/Super Bounce. They're all a bit tricky, especially Mine Skip (which we've since found a easier way to do) but they're all super sick and worth checking.