The Void Rains Upon Her Heart

The Void Rains Upon Her Heart

评价数不足
Ultra Quickplay Scoring and Collection Guide - v8
由 Awedish 制作
Unlocked by reaching level 30 in Quickplay, this is a guide for optimizing scores and collecting medals in the second quickplay mode.
   
奖励
收藏
已收藏
取消收藏
Introduction
This guide focuses only on the game's Ultra Quickplay mode (UQP) and is meant for players looking to collect more sublime medals within the mode. The guide provides the maximum score/number of sublimes obtainable from each monster, general strategies, and optimal gift loadouts. To give this guide some credibility, I have personally achieved level 74 – the maximum possible level as of version 8, and collected 422 sublimes. I also have 300 hours of playtime.

WARNING: POTENTIAL SPOILER CONTENT:
Guide contains a list of all playable characters, all monsters, and many power gifts.
GENERAL SCORING STRATEGIES

➢Survival
To get an optimal score, you need to survive and achieve a full combo. The game rewards you with a 1.25x score multiplier so long as you don’t take damage, dropping to 1.10x for taking damage once, then to 1.00x when you’re hit a second time. There is also a substantial amount of score available for not dropping the combo. Since quickplay is a fast mode, you can easily restart if you’re hit, then try again.

There may be some attacks that you find difficult to dodge. Some attacks are near-impossible to react to at high levels, while some can be overcome with a bit of practice. Use Freeplay to better understand the boss patterns and craft your own ways of dodging them. Identify any patterns that are beyond your dodging skill and keep them in mind. For non-final bosses, you can easily "hope" that the boss won't use that attack for the duration of the fight, as they will cycle between their possible attacks. Bringing in panic gifts is another great way to avoid dodging patterns you dislike. Lastly, the helper bubbles, umbrella and fallen angel, can help to trivialize many patterns.

Improving your dodging skills in general is out of the scope of this guide. There are many resources and videos available online that can give you advice on how to improve your skills in bullet hell games. Time and practice will go a long way in this genre. Here's one video from Shmup Junkie that I personally found helpful.

Key Points:
  • Know your hitbox
  • Learn how to "stream" and misdirect bullets
  • Move efficiently, and don't move if you don't need to.
  • Don't look at your character, it should be in your peripheral vision
  • Use practice tools (freeplay)
➢Breaking Monster Parts, Avoiding Overkill
For an optimized score, you need to break as many parts as you can. Most fights follow this principle exactly, with a few exceptions noted below.
  1. Split Veyeral, Storm Veyeral, and Molten Veyeral. In these fights, the main blob splits into smaller pieces. Each fight has 3 sizes of blob. The maximum score is obtained by breaking the large and medium sized veyerals, while leaving the small veyerals alive on screen. When the battle ends, points will be awarded for the remaining veyerals on screen.
  2. Certain shy battles. Shy battles feature infinitely respawning monster parts. For Ventra and Guardian Soul, you want to avoid damaging anything that isn’t a light core or soul fragment, since these are the parts that reward the most points, and your combo won’t drop for letting other parts past the screen. For Shy Momo, you want to avoid damaging the bloom petals if possible. Ideally, you break only one bloom petal and then destroy the bloom core. In practice, you will probably break two bloom petals per core.

Overkill refers to the excess damage done to a breakable part. For example, if a glyph has 26 health remaining and your charge shot does 46 damage to it, you overkilled that part by 20 hp, deducting all damage from the monster’s fear. This may not seem like a lot, but overkilling many parts can add up, potentially leading to fewer parts broken in total. This effect is most noticeable in fights where breaking every part is tight (e.g. Trinity, Ventra) or in shy battles. To minimize overkill, try to avoid using charge shots if they will overkill a monster part. If done correctly, you may be able to break an extra monster part. Monsters with few breakable parts, such as Amalga and Prisma, usually have enough leniency to break the parts with charge shots anyway.

Monster parts will vary in their fear amount, and may have armor, which is basically a damage reduction. For certain fights, it may help to refer to this spreadsheet made by Rando Randy and Tsilla. It's a cheat sheet on all the monster's breakables, which can help with your strategy.
https://docs.google.com/spreadsheets/d/1evqhb8SOoKZXfuZymnCQklv8uGfDnkAeQ354wK7UzEY
➢Panic Usage
Panics have uses for both survival and scoring. Obviously, you can use panics reactively to prevent a hit, but you can also plan out when to use panics, particularly for certain phases in thorned bosses. For scoring, using panics can help you break monster parts in spots that are otherwise hard to reach. Some examples would be Ventra's right-most prong in her second phase, flip flap's rotating prongs or body, or even petals of a glass flora monster when they rotate behind their body.

In certain fights, panics are key to optimizing score. Using a panic on certain monster parts will immediately destroy the part, and reduce the monster's fear less than it would normally be reduced. This allows more of that part to be broken, which means more score. Below is a comprehensive list of monster parts with this property:
  • Blot Turret (phase 2)
  • Alter Blot Turret (phase 2)
  • Null Blot Turret (phase 2)
  • Voltage Veyeral Orb
  • Frozen Veyeral Orb
  • Molten Veyeral Turret (phase 2)
  • Forma Glob (phase 2)
  • Nix Polyps Polyps (both phases)
  • Tox Polyps Polyps (both phases)

UQP limits the number of panics you can equip by imposing a score reduction. Different characters are allowed different amounts of panics. You never want any score reduction for your optimal score, but there is still a way to get unlimited panics in quickplay. The trick is to use the Entropy power gift, which generates a panic every 20 seconds if you have none. But it doesn't end there. If you bring a duplicate copy of entropy, it will regenerate panics as long as you have less than 2 panics. This is very helpful for scoring, as it allows you to hold onto a panic while still having one recharge in the background. Deadly monster patterns will often come multiple times within the same 20-second time frame, but they may also not happen for 30 seconds or more. Thus, having 2 entropy gifts offers a lot of flexibility. Entropy doesn't count as any panics towards score reduction, so you can still equip other panic gifts. The Tower gift is a very strong choice, as it will significantly increase the panic duration for only one star.

The downside to using entropy is that it causes many fights to drag on beyond their welcome. Fights can easily take 4 or more minutes as you're stalling, waiting for panics to replenish. A good amount of patience and stamina is needed to maximize the score for these fights. Secondly, you still need a way to keep the combo somehow. The easiest way to do this is by using the global damage of an aura, which does minimal damage to all parts on the screen while holding the combo for you. Alter devil's innate aura and the plant glyph aura are the only viable methods for high level fights. The radiant and void aura requires taking a hit, and spark thorns requires you to stay in focus for too long. Spark thorns can be used for the much lower attack speed Voltage Veyeral fight. In this case, gifts that extend the combo timer are also required.

Alternatively, you may find it easier to max out on your panic limit rather than using entropy. Using the Forest power gift is a very cost effective way to get panics that also last for a long duration. This is all you need for her heart. On alter heart, Tower + Forest provides 4 very long panics. Duration is the most important variable, as it gives more time to break parts.
➢Charge Shot Cancelling
Charge shot cancelling is an advanced technique that can be applied to niche scoring situations. It allows the player to cancel the charge shot they’re currently holding without firing it. To perform it, you need to have the charge swap key bound and be using either type A, C, or D charge shot. While holding a fully charged shot, simply press the charge swap key to cancel it, and return to firing normal shots. This can be useful in situations where you’re trying to minimize damage to non-breakable parts, such as traversing between Flip-Flap’s ends or avoiding overkill damage in a shy battle.

In the example below, I charge up to avoid shooting at Trinity and minimize damage. When I'm ready to shoot again, I press the charge type button to fire regular shots instead of a charge shot.

SUBLIME MEDAL COLLECTION

➢Effect of Monster Level on Score
You may have noticed that although you gain higher scores from defeating higher level monsters, the amount of score gained between each level is inconsistent. This is caused by hidden level thresholds, between which the score increases linearly:

  • Level 1-15: 25% score increase per level
  • Level 16-25: 10% score increase per level
  • Level 26-45: 5% score increase per level
  • Level 46-999: 1% score increase per level

NOTE: The score increase is based on the monster score at level 1.

Monsters are capped at level 42 in ultra quickplay, or twice their maximum level if unallowed to reach level 999. You will get the most score from playing on level 42; however, each level past level 25 only increases the monster score by 5% of the base value, which isn’t a lot. Moreover, the final levels mostly increase attack speed, which creates very quick bullet patterns. An easier alternative is to fight monsters on level 32. At this level, you have access to all your power gift slots, which allows for some very powerful builds.

At level 42, a monster will have 6.35x the Level 1 score.
At level 32, a monster will have 5.85x the Level 1 score.
➢Theoretical Maximum Score Calculation
In general, the score can be found by adding each individual monster part that gives score. This includes the base monster, a full combo, phase changes, and monster parts. A level 42 fight has a 6.35x score multiplier, which stacks multiplicatively with the 1.25x hitless multiplier. Taking Lavalin as an example, she has a base score of 500, a combo score of 1000, 34 wings giving 10 motes each at level 1, and 4 glyphs giving 25 motes each at level 1. The theoretical maximum score at level 42 is:

6.35*1.25*(500+1000+10*34+25*4) = 15398.75
rounded down to 15398.

Always use the part counts of the maximum level monster when doing calculations, as monsters may gain parts based on their level. For example, Sandrome has 18 segments at level 3, growing up to 25 segments at level 11, which is the maximum. One exception is Default, which cycles between its various forms as its level increases.

Unfortunately, not all monsters are as simple as the above example. Some battles have parts that are infinitely respawning. In this case, a calculation is done to see how many of those infinitely spawning parts could be broken in a single fight, and the score is based on that value. This calculation assumes you have unlimited panics, which is unrealistic for a real run. For example, Blot's turrets contribute to 1% of her fear bar. Phase 2 starts at 50% fear, so you could theoretically break 50 turrets, if you somehow had that many panics, and managed to hold combo while damaging blot as little as possible. A similar calculation is done for shy battles. For Ventra and Guardian Soul, it is assumed you only focus on breaking the light cores and soul fragments, which leads to the highest score. Finally, the amount of barrier breaks possible for Chroma is estimated to be 19.

Sabima's TVRUHH Database contains a more detailed look into scoring, as well as many other things about the game: https://docs.google.com/spreadsheets/d/1gxM-ivHPukXwGFs56O2a6GRNqWP-_jG2ChTJHf6Qxtc
➢Ultra Quickplay Scoring Table
Below is a scoring table for every monster in UQP. The "Maximum Sublimes" refers to the amount of sublimes you would obtain if you reached the theoretical maximum score.
Use the Google Sheets link for a table format: https://docs.google.com/spreadsheets/d/1b8KgZZmqs9kSTi2sDegFDpLJhH4xeF1pIKGYW_V75zY/


Some monsters are humanly unoptimizable. Shy Momo is the most infamous example. There is no way to break that many petals to get the 12 sublime score due to overkill damage, even if you somehow manage to only break 1 petal each time. There is no other monster in the game that comes close to being hard to optimize. A few other monsters have sublimes that are mathematically possible, but out of human reach. I have noted this in the spreadsheet.

It is technically possible to achieve a higher score than listed. This can be done by timing a highly damaging charge shot at a breakable part just before a phase change. This is quite rare, especially at high levels. The best example of a fight where this is possible is Photoxai.
BUILDS/LOADOUTS

➢Character Considerations
Characters in TVRUHH have many minor differences, but the important things to consider when choosing a character are their starting gifts, effects, panic capacity, and gift capacity. Many effects, such as adamant will, are irrelevant for quick play or score optimization. Defenses are marginally useful if using constellation gifts to increase your damage.

Heart shots are the best and most well-rounded shot type to use. Feather shots can be good in niche situations where you're able to hug the boss closely for most of the fight. Star shots are never worth using, and neither is the friend beam. Star shots do not currently have good enough gifts to allow its DPS potential to compete with heart shots. In addition, the high attack speeds in UQP typically force the player to make big dodges and drain the star meter. The friend beam and helper shots struggle to single-out breakable parts and don't have a great DPS either. Finally, Alter Devil's cycle of pain also lacks DPS, as each shot type is only active 1/3 of the time.

Aside from shot types, only Alter Devil has a notably useful gift. An innate rage aura is great for maintaining combos in long battles where you need to milk out score, e.g. Blot or Frozen Veyeral. Alter Devil's anxiety does not make up for the loss in DPS from cycle of pain, so they should not be used as a DPS option.

Defect and Alter Heart are allowed 4 panics in quickplay, which is very situational. Alter heart is always the better choice, since Defect's panic duration is a reduced 1.67 seconds instead of the normal 2.0 seconds. Forma is the only fight where having 4 panics is relevant, as entropy is not quick enough to recharge panics before her globs leave the screen in phase 2. For all other fights, it's not worth it to sacrifice DPS to bring a 4th panic.

To Summarize, you want to:
- Use Her Heart in most battles
- Use Alter Defect in some fights if you prefer feather shots
- Optionally use Alter Devil against fights that allow score milking
- Optionally use Alter Heart against Forma for a higher score
- Never use Defect, The Devil, or Alter Twin
➢Power Gift Considerations
Gift slots are limited, and there are only a limited amount of gifts to consider using. The image below summarizes which gifts you should consider bringing. Not all beneficial gifts are included, as they may be outclassed by another gift. In general, strong gifts of the shot type (pile of hearts, everything) are frequently taken. Element changing shots can be helpful against some bosses. Movement speed is important for dodging at higher levels, and panics with panic duration are generally useful. Helper bubbles are also excellent for defense. Other than constellation stacking, don't bother with gifts that increase your damage by a flat amount (e.g. glass petal, fang), since there will always be better options.

Note that the ordering of some gifts matters. Specifically, Pile of Hearts and Real Wing should be placed before gifts that affect fire rate, as they reduce the fire rate by a small percentage at the time they are equipped. Also, constellations are only worth using if you stack 3 of them at a time.

https://steamuserimages-a.akamaihd.net/ugc/2270441745016669740/686790E79493FAB5AECE97A7B52A1D7A61715595/?imw=256&&ima=fit&impolicy=Letterbox&imcolor=%23000000&letterbox=false
➢Build Exemplars
Builds will vary depending on the monster you are fighting. Below I provide 4 main builds, which cover most UQP battles. Each build can be altered to suit the needs of a boss accordingly, e.g. adding Reflection or Boundless.

Swap-outs to consider:
Reflection, and maybe even link synapse to increase DPS in some cases
Tower/Forest, for panics
Thorns/Illness for more damage
Boundless, cheeses some bosses and good utility in general
Fallen Angel, Umbrella, Denial for defense

1. The default loadout
This is a versatile build that could be used to clear any boss. Use it when there's no better option to use. Used correctly, this build is enough to take down even the final bosses.

[Her Heart]
Pile of Hearts
2x Everything
Rhythm
Ripple Effect
Quick Mite
Double Time


2. Machine gun loadout
This build focuses heavily on charge shots and is very effective against bosses with many breakable parts to refill the charge meter. Used correctly, there is very little downtime between charge shots, making for a very quick fight. Optimal uses: Nova, Echo, Joule, Kiwi, Flip Flap...

[Her Heart]
Pile of Hearts
Everything
3x Star Flower
Double Time
Quick Mite
Heartbeat
(Charge Element Gift, e.g. Spicy Fruit)


3. Entropy scoring loadout
This build allows you to squeeze out more score out of monsters using panics. Used correctly, you should see a significant increase in your score when clearing a monster normally, even up to 10 sublimes! Optimal uses: Blots, Frozen Veyeral. For Nix/Tox Polyps: use her heart instead, take the first half of this build and add DPS

[Alter Devil]
2x Entropy
2x Denial
Tower
Quick Mite
--4 EXTRA SLOTS TO CHOOSE DEFENSIVE/UTILITY GIFTS--
Boundless, helper bubble, extra starting panic, fear sense...

4. Feather burst loadout
This build is great in specific situations where it's possible to stay close to the boss for most or all of the battle. It is extra good when the boss has an elemental weakness. Used correctly, the build can skip the entirety of some fights. Optimal uses: Monovai, Blue Veyeral, Snowball, Null Roundsaw, Sandrome....

[Alter Defect]
Real Wing
Spectrum
3x Crescent
Tower
Void Glyph
Wingless
Neo World
Chitin Wings
(Feather Element Gift, e.g. photon sword)
5. Special Cases
For some bosses, a more fine-tuned build is required or helpful to obtain the maximum score. They still use the same general gifts, but typically favor defensive options to minimize overkill.
Examples: Chroma, Forma, Shy Momo, Trinity, Molten/Voltage Veyeral...
Final Thoughts
Thank you for taking the time to read my guide. I hope you could find some use out of it. Feel free to find me on the Veyeral Games discord (discord.gg/UmA7Tuv) if you aren’t already in it. I would be happy to answer any questions or take suggestions for this guide. Bye now.
Appendix: Practice!
Freeplay mode is an important tool for success, particularly in the harder boss fights and thorned battles. Thorned monsters have many phases and a large HP pool, making them difficult to cheese even with a good build. Optimizing these monsters requires learning their patterns and a lot of patience. Give yourself many revives as a practice tool for the boss patterns that you struggle with. If you can reach even a 20% consistency to dodge their hard patterns, you have good odds of a run that succeeds. High damage and short duration panics (stack embrace, scissors, and broken glass) also help to skip phases to make practicing faster.

I’ve posted videos of the final bosses, as well as many other monster clears to my YouTube channel, to show that they’re possible. Come and say hi!
https://www.youtube.com/playlist?list=PLa30EdHvQwugZVA4a-CJPQlg7gaKGRZ_e
10 条留言
Awedish  [作者] 2 月 12 日 下午 3:37 
Thanks for the comments! I've been holding off playing this game, so unfortunately i haven't been keeping this page up to date. Its exciting to see that a lot is changing and that there are actually others who play this mode haha
q_cubed 2 月 12 日 上午 5:23 
Lastly, Awedish's score sheet is not up to date with every monster added after v8.0, while also leaving out a couple more Sublime medals that have been found to be possible. My own score sheet (similar in style, I wonder why) can be found here. [docs.google.com]
q_cubed 2 月 12 日 上午 5:23 
Modern Builds 2025 cont.

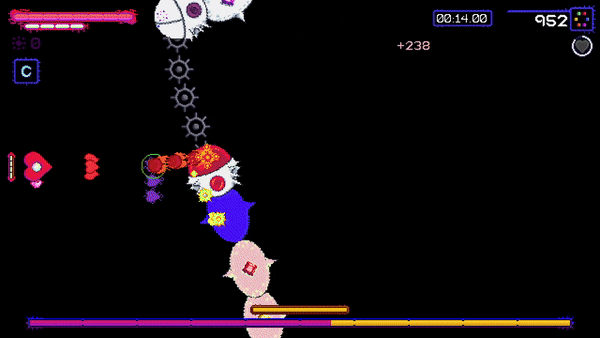
There is a lot of flexibility in the Defect build, with the first cuts usually being Love Note, Thorns and Rhythm, so feel free to supplement this with move speed, Element Change or other utility gifts.
Sometimes the Love Mite-induced spreadshot can be annoying, so use Elation instead.

Building a Feather Shot loadout is still possible too (though I personally never use feathers) - Something like this:

Twin Heart -- Hydra Plant x3, Real Wing, Rainbow, Wildfire, Drumsticks, Chitin Wings, Tower, Natural Glyph (1202.9 DPS)

Twin Heart turns out to be much stronger than Alter Defect, as you can combine a triple Constellation with Chitin Wings. By changing the order of the Element Gifts, you can choose what you want to attack with - if you still need a Focus Element, remove Drumsticks (or Tower if you're feeling extra bold).
q_cubed 2 月 12 日 上午 5:21 
Modern Builds 2025

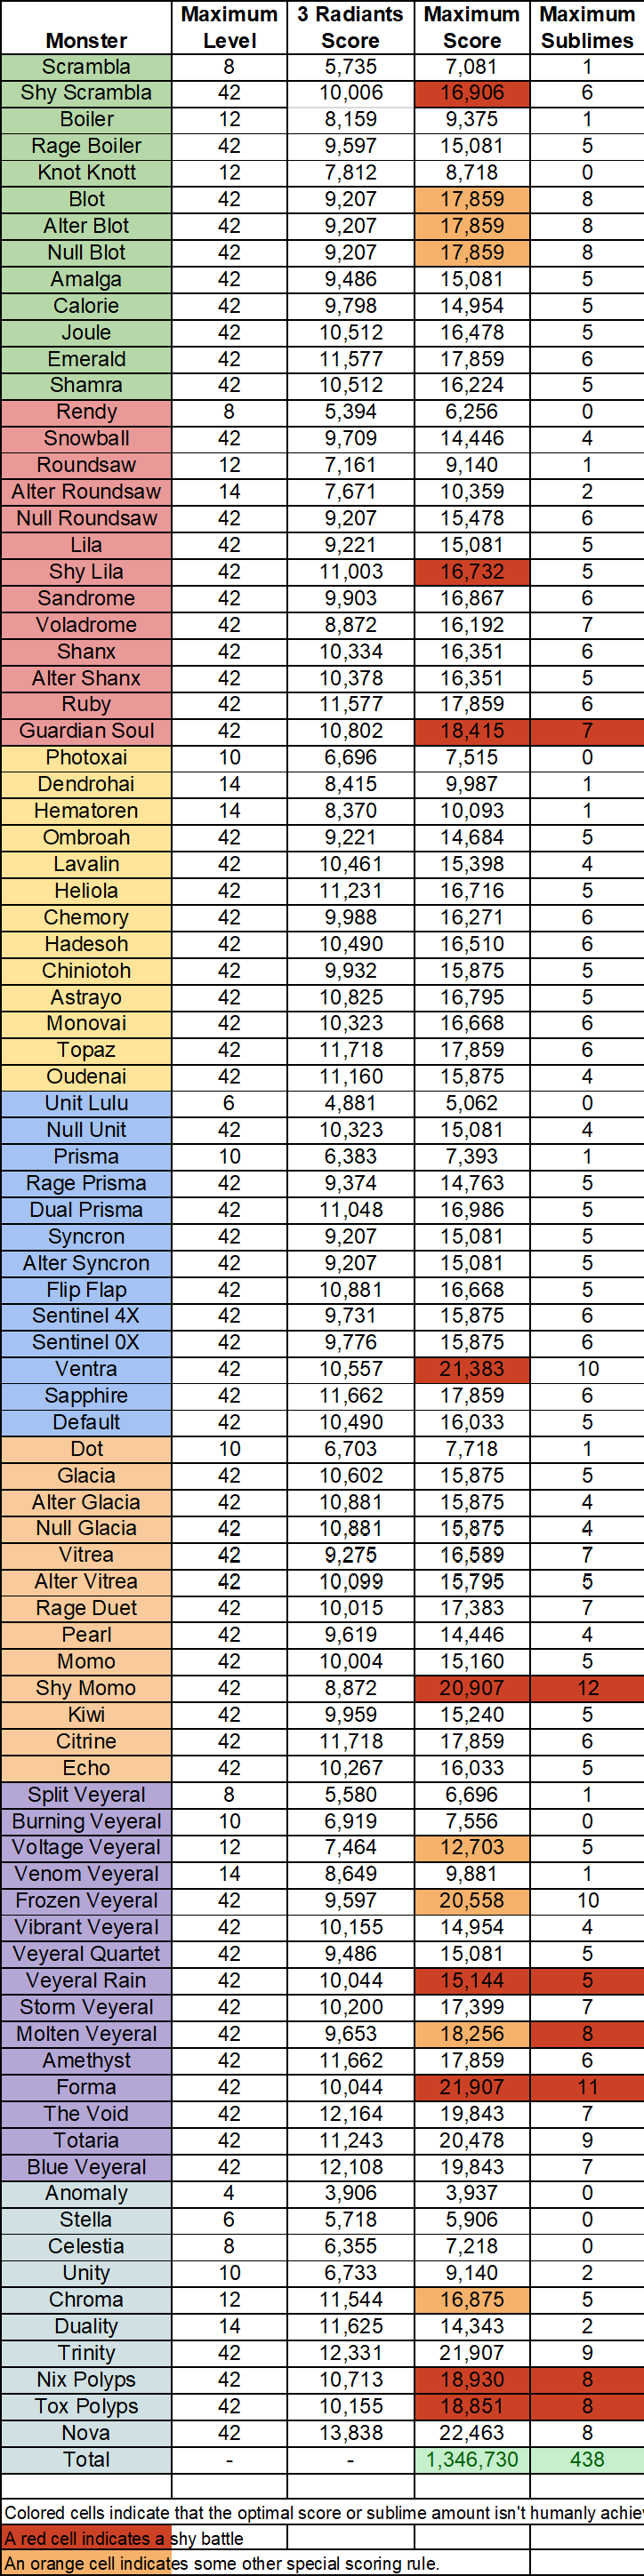
While this guide still holds lots of useful tips, some of the information is outdated. Specifically, the best builds have changed in lieu of the fall 2024 Gift rebalance. If you're only getting into UQP, you may want to use these builds instead:

For Maximum Damage
Alter Twin -- Hydra Plant x3, Friend Spiral, Bracelet, Flip Flapped, Split Unit, Petrichor, Forest, {Charge Element}
Alter Twin is actually the most effective for dealing high damage, especially on monsters with many breakable parts. The obvious caveat is that her damage is imprecise. Against a boss with a Radiant weakness, replace the Fruit and Split Unit with Broken Heart.

For Higher Precision
Defect -- Crescent x3, Pile of Hearts, Rhythm, Love Mite, Thorns, Love Note, Icy, Void Glyph, Tower (622.2 DPS)
Constellations are an integral part of dealing high damage after being buffed last year, while Everything is no longer useful to us.

[cont.]
Companion Cube 1 月 7 日 上午 11:14 
Hello, I'm a new player trying Ultra Quickplay
I want to ask about the strength of Paint Brush and Puncture
I like these two gifts very much, but I don't see them in the gift guide section. Are they add to game after the guide was written, or are they just a trap?
Not a native English speaker, sorry if what I say is weird
Light0234 2024 年 4 月 2 日 下午 2:44 
yeah i tought it was just a "your shots are all elements" gift.. thats till i unlocked it and noticed the massive attack speed increase
Awedish  [作者] 2024 年 4 月 2 日 下午 1:45 
@Light0234 sure you can make replacements, but the reason you get spectrum isnt so your shots can be all the elements, it's because it has good value in giving you +1 damage and +2 shots per second for 3 stars. The focus only element changing gifts work too, if you're targeting a weakness
Light0234 2024 年 3 月 29 日 上午 1:09 
spectrum can easly be replaced with a element gift in most cases (typically bosses with just one weakness) sure the shotspeed reduction on both burn and toxic hearts are a pain but this can be minamized with just one shotspeed gift
Awedish  [作者] 2024 年 1 月 6 日 下午 1:54 
@~SLAIM~ Quickplay can be a bit tedious, but it doesn't take that long to unlock all the content. The dev also mentioned they might add an unlock all button when the game fully releases.
~SLAIM~ 2024 年 1 月 6 日 上午 7:22 
Can u drop your save file? I not have 3k hours for unlock all content)