奇塔利亚童话

奇塔利亚童话

65 个评价
Complete Walkthrough with Tips for Kitaria Fables
由 Mr. Moyer 制作
This is a FULL GUIDE for Kitaria Fables. Caution: spoilers ahead. Maybe you're a new player doing research before you start a new game. Maybe you've been playing a while but can't figure out how to start a certain side quest or where to find a certain item. Or maybe you just want to know the most efficient crops to farm and sell for cash. Well, I can help with that.
2
6
   
奖励
收藏
已收藏
取消收藏
Introduction
Hi, I'm Dave. I like to play RPGs and adventure games. And that's what this is. Some people will call it a "farming simulator" but really the focus is not on farming but on the exploration and finishing the quests. The farming is only there to make food that will restore your health, and make food to sell for profit that you can then spend on upgrades to your weapons and armor. There are a few quests that require you to bring some veggies that you grow yourself to someone, but aside from that the farming aspect is totally optional. Most of your time will be spent slaying monsters to collect the items they drop, which you need for weapon and armor upgrades, while you explore the world and help people out with some side quests.

I've played through the game three times now. It seems you can complete the game in about 30 in-game days if you really rush through it, this amounts to roughly 25 hours in the real world. But if you take your time, play casually, and spend a while doing 100% of EVERYTHING, it might take about 50% longer than that. So the game isn't really incredibly long, but it is intended to be played about an hour or two at a time so you can make it last over the span of a couple of weeks that way. It also has a few things that make it seem like they were planning to add additional dungeons and more boss fights, probably another week of in-game content (about 10 more real-world hours)... but for some reason they just didn't.

The game is pretty straightforward, once you get used to the controls. But there are a few side quests that can be a bit tricky to start because you won't even see the request for them unless you go to a certain place at a certain time with certain items in your backpack. So my walkthrough will guide you through the game one step at a time. In particular, I found ttwo quests hard to find the starting points and there were two that I found BY ACCIDENT which, according to comments in the forums, a lot of people miss. But all the quests are pretty simple to follow once you get started on them, the in-game quest journal has really nice descriptions of what you're trying to do for each one.

So... let's get into this.
About the DLC
The DLC for this game is all just cosmetic items that make your character look a little different. If you paid for those items, you will find them in the mailbox outside your house, then you can equip them by using the MIRROR in YOUR HOUSE at Thunderbunn Farm. They have no combat or exploration or farming advantages, no buffs. Just changes your appearance. You still have whatever stats and buffs the ACTUAL equipment you're wearing gives you, these are just like a "pretty sleeve" that goes on top of your gear. So if you get the free Light Wings DLC, for example, and you have the Evil Bone WIngs already equipped... when you put on the Light Wings you still retain your Lifesteal and your backpack will still show the Evil Bone Wings are equipped. But you will LOOK like you have streams of light coming off your back, instead of the black bones from the evil bone wings. Listen, it will make more sense if you just get one or both of the free DLC and try it yourself.

If you did not pay for the DLC, the mirror will still have a few different colored variations of fur for you to try out, but none of the "clothing" items will be available.
Bugs and Glitches
I didn't notice too many bugs or glitches while playing this game. But I didn't play on co-op mode and I didn't use the cosmetic DLC at all (except the free ones). But there were a few bugs and oddities in the vanilla single player game.

Sometimes when you boot the game, it fails to recognize a controller. USUALLY this can be fixed by exiting the game, check to make sure your controller is plugged in/charged/turned on, and then run the game again. Even if your controller didn't accidentally come unplugged, most of the time just re-booting the game is enough to get it to recognize the controller.

In the forums, some people have real problems with their controllers though, so if restarting the game once or twice doesn't fix it... it might be just broken. But the game can be played with keyboard and mouse, too.

There is a cut-scene where the developers seem to have FORGOT TO DRAW ONE OF THE CHARACTERS in that scene, so it LOOKS like nothing is happening at all, but if you read the dialogue something rather important is actually happening. This is at the end of the Crystal Cave on top of the Ice Mountain area. Feel free to laugh at it when you find it.

In combat, many times you will kill your enemy before their attack animation starts, but their attack still hits you - sometimes a second or two after they die. Very annoying.

In combat, sometimes you will dodge an attack when you see the flashing red attack indicator, but the attack will hit you anyway, sometimes after a short delay. Very annoying.

Not really a bug or glitch, just some poor game design...
Your spells and skills cooldown times are too long to "stun-lock" enemies. But some of them (Flower PIxies and Greed come to mind) can spam-fire their spells so that you will get stunned, then stunned again before you recover from the first one, then immediately stunned again while still stunned from the second one, and you will DIE without even getting a chance to take a step back from the enemies because they basically have no cooldown timer for their magic and skills. So be careful when dealing with enemies who have the power to stun or freeze you. Especially try to avoid fighting them in groups.

The "resist status effect" buff you can get on certain hats and wings DOES NOT SEEM TO WORK, or maybe it provides a benefit too small to see. There is functionally NO WAY to resist or cure status effects in this game. So when choosing your equipment, ignore those buffs and look for other benefits instead - like movement speed, physical/magical defense, and life-steal.

The "Reflect Physical/Magic Damage" buff on certain hats and wings DOES PRACTICALLY NOTHING. Enemies typically will hit you for less than 30 damage per hit, many do single-digit damage per hit against you, and reflecting 10% of that isn't eneough to make a dent against the enemy's HP. You're better off ignoring the damage reflection buff and picking equipment because of other benefits.

The "Penetrating Damage" buffs are also useless. Enemies with armor still take half damage from whatever damage type (physical or magical) they are armored against normally without this buff. And the buff ignores 15% of their armor, which is insignificant considering this will result in roughly 7% extra damage from your attacks - and only the ones they are ARMORED AGAINST, so your 70 damage strike against a Forest Golem might go up to 75 damage but your magic spells will still be doing triple digits because the golem doesn't have armor against magic. And only a handful of enemies in the whole game have armor anyway. Most enemies don't. So the buff is only MILDLY helpful against three or four types of enemies. It's more effective to use some armor with buffs that are useful in more general situations, against more than just four types of enemies.

The story in this game is really flimsy and kind of lame. Just sayin'. It almost seems like they intended to add more content and then go back and rewrite the story before release, but they ran out of time or money. The game is still fun because of the farming, blacksmithing, combat, and exploration. But the story is lacking. You will probably notice that a few dialogues give you a choice of how to respond. NONE of these matter (except ONE side quest involving a pumpkin and a pearl, you'll know it when you get to that point). Every choice leads to the same results. The obvious exceptions being the quest dialogues where you can choose to accept the quest or decline. If you decline, you won't activate the quest at that time, but you can come back again later to accept it. There is NO REASON why you should ever decline to accept a quest as soon as you can, none of them are on timers. I just think that in any game, if you give players an option to say something different then that choice should have some kind of effect (even if it simply provokes a different response from the NPC for humor purposes or something like that). This game they setup choices for the player to make... but those choices don't actually affect the game in ANY way whatsoever. In my opinion they should have just had a linear set story in these cases rather than giving players FAKE CHOICES THAT DON'T MATTER. But whatever. Like I said, the story is flimsy but the rest of the game is fun.
Game Mechanics - "how to play"
First, I want to describe some of the menus and UI aspects. You'll see the following three elements on screen when you are exploring the world:
Your HEALTH and MANA are in the top left corner.


The top center of the screen shows what day it is, what time it is, the weather, and how much money (Paw Coins) you have.


The bottom left of the screen shows your shortcut hotbar. You can have up to FOUR spells/skills equipped, change them by using the Spell Book at your house or at Alby's house. These are set to the LT, LB, RT, and RB. You can also have up to FOUR items slotted for one-button use. Set these by selecting an item in your backpack and pressing Y to assign a shorcut. These are set to the D-Pad.


The START button opens the main menu where you can change some settings, exit the game, or go back to the title screen.

The SELECT button opens your backpack, where you can view and use whatever you're carrying with you. You can unlock more space here by purchasing the backpack upgrades from the Pineapple Merchant. You can hit RB to view any items you have PINNED, too.

From the backpack menu, hit RT/LT to move to different menus (quest journal, character stats, equipped skills, and a list of controls). Within each menu, use RB/LB to change tabs.

The quest journal keeps track of your active quests, your quest items, and your completed quests.

The Skils page shows the skills you currently have equipped.

The Character Status screen shows your health, mana, attack, defenses, and status-effect resistances. It includes any weapons or gear that you currently have equipped.

In shops, they all have multiple menu tabs. Remember to switch tabs to see everything they have to offer!! When you are viewing an item in the shop, you can PIN the item by hitting the Y button. This will add it to your PINNED list in your backpack menu, so you can view the item and its crafting requirements at ANY TIME. This will also add a STAR ICON to any items that are needed to build your pinned items, making it easy to tell at a glance which items are important for your crafting needs, so you don't accidentally sell something that you needed to build your next sword or whatever.

When buying items, use D-Pad left/right (or left-stick L/R) to adjust the amount of item you will buy, then press A to confirm the sale. You can only buy ONE type fo item in each sale, if you move the cursor to another item then you cancel whatever sale you were previously thinking about.

The only way to SELL items is to put them into the trading box next to your house, the one with the coin icon on it. These items will be sold every morning at 07:00

Combat happens IN REAL TIME as you walk around. Use Y to lock onto an enemy, you might have to hit the button again to switch targets if you get the "wrong" one the first time. Pay attention to which enemy has the red cross-hair on it when you are locked-on. Any attack you make will be aimed at that enemy. Then you attack (X button), use skills and spells (LB/RB/LT/RT), move (L-stick), and dodge (B button). The enemy attacks will usually produce a red targeting area just before they attack you, giving you a second to get out of the way. It is possible to have several enemies targeting you and actively fighting you at once.

When you find a wood crate, hit it (X button) to break it open, some of them have coins or items inside.

When you find a TREASURE CHEST (or other interesting thing), press A to open it. The A button is also used for talking to NPCs. If an NPC has a shop, you can open their shopping menu by either pressing A on their shop display or by pressing X when facing them directly.

Remember to EQUIP your weapons and armor!! Your pickaxe and woodcutting axe do ZERO DAMAGE to enemies. Putting a weapon or armor on your shortcut hotbar will equip it when you hit the D-pad button assigned to it. Same for tools. Food on the hotbar will be eaten when you hit the assigned button.

DO NOT upgrade your Watering Can to Gold until you finish the SIDE QUEST to show the Silver Watering Can to Kiki first. Farming tools (sickle, hoe, watering can, pickaxe, and woodcutting axe) can NEVER be sold or discarded, so if you buy a second set of tools from Pumpkin Merchant then you'll be stuck with the extras forever - they just take up space in your storage chests. But if you accidentally upgraded your watering can too early, buying a new one from Pumpkin is an option that will let you complete the quest.

You won't know how much an item is worth until you sell at least one of them at your trade box. After you sell one, anytime you look at the item in your backpack or in a shop, the item's description will show the price you'll get if you decide to sell it again.

Status-effect resistance in this game is pretty broken, it does not seem to work AT ALL. So when comparing helmets and wings, just ignore those resistance numbers. Some of the other buffs work though: magic defense, physical defense, lifesteal, increased elemental magic damage, critical hit chance, critical hit damage.

A character with a notepad icon that has a RED EXCLAMATION POINT "!" will either start a quest or continue a quest if you talk to them. A notecard with a GREEN CHECK-MARK indicates someone who is ready to complete their quest. A character with a notepad icon that has NO "!" OR CHECK ON IT has an active quest that you are still trying to complete. Blue notepad icons indicate a MAIN STORY mission; tan notepad icons indicate a SIDE QUEST mission, but really there doesn't seem to be any difference between the two.

Paw Coins are the main currency "money" in this game. They are used for almost everything: buying food, crafting new weapons and gear, buying metal ingots, buying treasure keys. So you want to end up with a lot of those Paw Coins.

Vengeful Souls (the dark-blue crystals) can drop from any enemy when it dies, but certain ones drop them more often than others. These are used to purchase Elemental Magic Spheres, which you will need if you want to unlock new magic spells. If you've bought all the spheres that you want, you can just sell the souls for cash. The profit is better just selling souls than it is converting them to spheres and selling the extra spheres: $50 per soul or $500 (10 souls) required to make a sphere vs. $400 to sell a sphere. So by converting souls to spheres, you're losing $100 of potential profit.

Other than souls/spheres, ingredients used in weapons and armor are also usually more valuable than the finished product in terms of sale profits. Amber, Moonstone, and Sunstone each sell for $1000, but some equipment items need 2 of them (worth $2000) and the finished product will only sell for a few hundred Paw Coins. So weapons and armor are not worth selling; just build them for use in combat.

FOOD items will all become more valuable if used as ingredients though. So instead of selling plain pineapples, you make more money by selling pineapple tarts, for example. It won't be a lot more, but it will be a bit more - and every bit counts in this game because it feels like you always need more money.
Advice for Your Farm
  • Each day starts at 07:00 sharp. Whatever happens before that is assigned to the PREVIOUS day even if it's after midnight or after sunrise. Whatever happens after 07:00 is assigned to that day.
  • Pay attention to how many days it will take each crop to grow, it's listed in the item description for the seeds. Some take 2 or 3 days, some take 4 or even 5 days. Time your farming and other activities based around that.
  • Before you can plant any seeds you have to buy the seeds - duh.
  • Before you can plant your seeds you need to use a hoe to clear a patch of dirt where it will grow.
  • Before you can plant your seeds you need to EQUIP it in your weapon hand. Then the GREEN area shows where you will plant the seeds. RED area shows you can reach that but for some reason that spot is NOT ALLOWED to plant on (either you didn't plow that spot yet, or there is already another crop growing there).
  • Upgraded hoes will clear larger areas in a single click. The best one can do a 3 x 3 area at a time.
  • You have to water your crops EVERY DAY if you expect them to grow. No water = that day doesn't count towards the total days needed for the crop to grow.
  • Rainy days you don't need to water your crops, the rain does it for you.
  • You can water your crops at ANY TIME prior to 06:59 and it will count for that day, since the date does not change until 07:00 (rather than midnight 24:00 = 00:00 like in real life).
  • You must EQUIP your watering can in order to water your crops. You also must have it EQUIPPED and then use the well next to your farm in order to refill the watering can.
  • Upgraded watering cans can water a bigger area and hold more water. The biggest upgrade can water a 3 x 3 area in a single click, and if your aim is careful then you can water your ENTIRE FARM before you need to refill it.
  • Your crops will SPARKLE when they are ready for harvest. You can either click on them one at a time to harvest with your bare hands, or equip a SICKLE to harvest a few crops at once.
  • There is a box beside your house with a big coin icon on it, anything you place in that box will be sold at 07:00 the next day.
  • Food from the shops is more profitable than plain veggies from your garden, with a few exceptions like eggs and croissant that you will LOSE money by selling them. Anything that does not require you to use INGREDIENTS will sell for less than it costs to buy the thing.
  • There are three storage chests on your farm. The first one is initially locked but you will unlock it as part of the main story. The other two you will need components (70 logs, 30 stone, and 15 charcoal for EACH chest) to repair them before you can use them.
  • The only way to find STONE is to use a PICKAXE on the sparkling grey rocks that randomly spawn on your farm and at the north side of the village. Stone respawns VERY SLOWLY, after 48 days I still needed six more stone for the final storage chest.
  • The only way to find LOGS is to use an AXE on the sparkling trees in the north and east sides of the village as well as the twigs and branches that randomly spawn on your farm. Only the SPARKLY trees can be chopped for logs. They respawn almost as slowly as the stone rocks do.
  • Upgrading your axe and pickaxe will increase the damage they do, so it takes fewer chops to harvest your logs and stone.
  • The "best profit" farm items are the pumpkin and sunflower, but those seeds don't unlock in the shop until very late in the game. Until you can use those, the best profit for raw veggies will be from Pineapples and Bell Peppers.
  • If you take your veggies to the restaurants, you can trade them for BETTER FOOD that typically gives MORE PROFIT than just selling plain veggies. The best foods to sell are the Herbal Tea and Nighttime Drink, but both require honey (made from honeycombs which are a rare drop from bee enemies). If you're not relying on enemy drop items, the best food to sell is Onion Rings, since you can grow both corn and onion in 3 days and you get access to the recipe fairly early in the game.
  • Storage will be VERY LIMITED at first, but veggies and food items will hold up to 9,999 (possibly more) in a single stack as long as it's all the same item.
  • Once you unlock more than just a few types of seeds, I recommend keeping one chest assigned only for seeds and veggies, and stack the veggies right above their seeds in the chest so it's easy to tell what kind of seeds are in each little sack. The pictures on the seed sack labels are pretty small, hard to see sometimes.
Tips for Combat and Exploration
  • LEARN... TO... DODGE !!!
  • When you die, you wake up in your bed at the farm (or in the inn if that's the last place you slept).
  • Time will have moved forward, too, if you die early in the morning you wake up at 16:30; if you die in the afternoon it will be 19:00; if you die at night you will wake up at 07:00 the next morning.
  • You can "PIN" items to your menu from the shops. This lets you see the recipe so you can always check what you need to craft the item, even if you're far from the shop. It's on the second tab of your backpack inventory menu (RB). This also puts a STAR on each item that you need to craft the item. Press the "PIN" button again while in the shop to un-pin the item and remove star icons from the ingredients.
  • Kids go inside when it rains, so you can't talk to them on rainy days.
  • Magic spells and weapon skills cost mana (those diamonds under your health bar) to cast them.
  • Regular weapon attacks restore mana, roughly 2/3 of a diamond per hit.
  • There are two types of weapons: swords and bows.
  • Swords do GREAT damage. And your magic spell damage is based on your weapon damage, so swords are good for using strong magic spells, too.
  • Bows can attack from far away, but the damage is about half as much as the sword at the same level. This also affects your magic damage, so using a bow nerfs your magic spells, too.
  • Sword skills can only be used if you have a sword equipped.
  • Bow skills can only be used if you have a bow equipped.
  • Magic skills can be used no matter what weapon is equipped.
  • The axe, pickaxe, farming tools, seeds, etc. do ZERO DAMAGE while you have them equipped.
  • This also affects your magic damage, so your spells will also do ZERO DAMAGE unless you have a "real weapon" equipped.
  • If you notice your attacks don't seem to be affecting the enemies at all, make sure you don't still have your pickaxe or watering can equipped!!
  • Some enemies will have special conditions on them. These are indicated by little icons on their nametags & a colored aura: yellow = higher physical resistance so magic will be more effective than weapons against it; red = "thorns" so any time you hit it with a sword you will also take a bit of damage. blue = higher magical resistance so weapons will be more effective against it than magic.
  • There are physical attacks (sword and bow) and magical attacks (fire, earth, water, wind). There are no "elemental" weaknesses in this game; all the magic spells will do the same damage every time, depending on the enemy's magic defense stat. But there is no such thing as "fire resistance" or "earth resistance" and no element is stronger than any other.
  • Some of the status effects can be a real problem if they hit you. Some enemies have stun attacks (ring of stars over your head) and you could be stun-locked until they kill you and you CANNOT MOVE OR ATTACK OR ANYTHING until it wears off. Some enemies will poison you or set you on fire, causing you to lose some health every second until it wears off. Some will slow you (brown smoke around you) which makes you move, dodge, and attack much slower than usual.
  • There are helmets that can give you minor resistance to some status effects... but in my opinion the resistance is SO SMALL that it just does not even matter. So when choosing a helmet, pick one that looks nice or that has a high "physical defense" or "magical defense" rating.
  • There are two types of body armor. Hard armor increases your physical defense (against claws, stingers, etc.) while the shirts and robes increase your magical defense (against fireballs, poison gas, and such). The two strongest hard armors will reduce your movement speed, the cloth armors will not do that.
  • There are training dummies near your farm. If you are low on mana, you can hit them with regular weapon attacks to restore some mana. Or you can try out your new spells and weapon skills on them to see which ones you like the best.
  • Most of the food from the shop not only restores health but also adds some kind of buff. I find the most useful buffs to be: Lifesteal and Critical Hit Chance, but you are allowed to disagree with me if you find a better buff that works for your style.
  • You can only have FOUR skills or magic spells equipped. You can change your skills by using the skillbook at your farm or at Sage Alby's house. You can buy new magic spells only at the cauldron in Sage Alby's house.
  • You can only have FOUR items in your hotbar. You can change your item shortcuts from your backpack menu screen.
  • I recommend having one hotbar slot assigned to your favorite weapon, the other two or three to your favorite food items.
  • Once in a while there will be some metal ores (copper, silver, and gold) that spawn alongside the stone rocks at the north end of Paw Village. Use your pickaxe on those just like on the regular rocks to obtain the corresponding ore nuggets.
  • Ore nuggets can be turned into metal ingots at the blacksmith shop. Ingots sell for more money than ore, and they are used in upgrades for some of your weapons, armor, and farming tools. They are also used to make keys that will open the big treasure chests scattered around the world.
  • For most of the game there will be NO RELIABLE WAY to get metal ores. After the mountain tunnel opens up (halfway point of the game really) you have three mining sites: one outside the tunnel in the forest, one inside the tunnel, and one just past the little snowy village in the mountains. The ore sites will respawn SLOWLY.
  • You can also buy ores from the traveling merchant, but they are pretty expensive.
  • The traveling merchant named Pumpkin will be at the north end of Paw Village EVERY THIRD NIGHT after 19:00. (day 3, day 6, day 9, day 12, etc.) He also shows up sometimes at night in the inn at the fortress, and very rarely at Canini Beach. If you find him at Canini Beach, he sells fresh vegetables instead of seeds. The other two shops are the same except they sell seeds NOT fresh veggies.
  • There are FOUR kinds of treasure chests. Wooden ones can be opened as soon as you find them. Copper ones need a copper key. Silver ones need a silver key. Gold ones need a gold key. Keys are sometimes dropped by mini-boss enemies, or you can make them at the blacksmith shop. Each key requires FIVE metal ingots and TEN pieces of iron plus some money. Expensive, but there is some GOOD equipment hidden in some of those chests.
  • At night, some areas will have different enemies than during the day.
  • Daytime is from 07:00 to 19:00. Nighttime is from 19:00 to 07:00. At night, all the shops except Pumpkin's are CLOSED and all the important people will go to bed. So you can only do your shopping and side quests during the day.
  • You do not actually need to sleep; you can keep exploring and killing monsters all through the night if you feel like it.
  • Pumpkin offers two weapons (one bow and one sword) for sale at $75,000 each. They are AWESOME, but the best weapons the blacksmith can build are better... just Pumpkin's weapons are available earlier in the game (assuming you got the ingredient weapons from chests) while your blacksmith weapons are still relatively weak for a while longer.
  • If you're a bit lost, most quests will show the destination on the map as a notecard icon.
  • Minibosses drop rare loot AND possibly keys or magical spheres, respawn daily at 07:00.
  • Magic spheres are used to purchase new magic spells.
  • Vengeful Souls can be traded to Timmy in Paw Village to get some spheres.
  • Certain quests will GIVE you spheres as a reward.
  • My favorite skills: Crimson Meteor, Earth Blades, Tornado, Shock Wave
  • You need a total of 14 copper, 12 silver, and 8 gold keys to open every chest in the game. You should get enough copper and silver keys from killing bosses but you may want to make some gold keys.
Seeds, Vegetables, and Food
Here are some tables showing the cost to purchase as well as profit for selling vegetables and various food items.

Important things to note here:
  • Pumpkins, Tulips, and Sunflowers are only unlocked very late in the game, so you can't rely on them to grow/sell until you're probably working on the final weapon upgrades.
  • In the beginning you only have a few types of seeds available to purchase, and a few basic foods for sale at the restaurants. As you do SIDE QUESTS you will unlock more seeds and more foods. So just be patient.
  • Pineapple, Bell Pepper, and Pumpkin seeds are only available for purchase AT NIGHT (after 19:00) at the Pumpkin Merchant's shop. Every third day he shows up at the north side of Paw Village, and once in a while he shows up in the Rivero Fort inn at night, too.
  • If you ever find the Pumpkin Merchant at Canini Beach, he sells fresh vegetables instead of seeds.
  • Pumpkin seeds are unlocked after a Side Quest where you need to give a Pearl (won by defeating the Snowmonster miniboss) to the Pumpkin Merchant in exchange for a fresh Pumpkin.
  • All the other seeds are unlocked by doing various Side Quests for the people of Paw Village.
  • The restaurant menus are unlocked by doing Side Quests all over the world.
  • Follow the Walkthrough for specific information about when each quest is available and how to complete it.
  • The best items to sell in early game (before reaching Rivero Fort) are: (From 300 down to about 100 Paw Coins of PROFIT)... Miracle Berry (King Gooey miniboss), Big Mushroom (Menacing Shroom miniboss), Cookie (turn four wheat into two flour then add an egg), and Pineapple (buy seeds from Pumpkin Merchant and grow it on your farm).
  • The best items to sell in mid game are: (from 1000 down to 100 Paw Coins of PROFIT)... Amber (rare drop from "fat guy" enemies in Forest Sanctuary and East Forest Field zones), Sunstone (Orc Warrior miniboss), Moonstone (Freddy O'Lantern miniboss), Honey (get 2 honeycomb from bee enemies), Onion Rings (turn two Corn into oil and combine with two Onions), Pineapple Tart (turn four wheat into two flour, add a pineapple), Miracle Berry (King Gooey miniboss), Huge Leaf (dropped by pixie/fairy enemies at Blue Moon Lake), Withered Flower (dropped by rotten onions near Rivero Fort as well as various bugs in Freshwater Swamp zones), Pineapple (grow on your farm), and Bell Pepper (grow on your farm).
  • The best items to sell later in the game are: (from 3000 down to 345 Paw Coins of PROFIT)... Pearl (Snowmonster miniboss), Coin Pouch (Greed miniboss), Rainbow Scale (King Cobra miniboss), Amber (rare drop from Treant Guardian enemies in Forest Sanctuary and East Forest Field zones), Sunstone (Orc Warrior miniboss), Moonstone (Freddy O'Lantern miniboss), Tiara (Crystal Guardian miniboss), Evil Bone Wing (Dracuffy miniboss), Fairy Wing (Chompy miniboss), Herbal Tea (Honey + Tulip), Onion Rings (turn 2 Corn into Oil then add 2 Onions), and Pumpkin Stew (1 each: Pumpkin, Potato, Carrot).

As you may notice, the best profit for almost the whole game (that does not require you to hunt minibosses or bees) comes from growing equal amounts of Corn and Onions on your farm in order to make Onion Rings. Take the Corn to Timmy's shop and trade it for Oil, then take the Oil and Onions to Ms. Apple.

In my opinion, and by all means feel free to disagree, the best food to EAT is the Shish Kebab. It's made by Pickle in Rivero Fort, you need Bell Pepper and Raw Meat to make it. It heals some HP right away, and a decent amount at that. But it also gives you LIFESTEAL for sixty seconds, meaning you can effectively replace the Evil Black WIngs with Shish Kebab so you can wear your speedy Banana Leaf wings or something like that instead. Point is: remember to grow crops to make food you can EAT to restore health and give you combat buffs in addition to stuff you can sell for profit.
Seeds, Veggies, and Food - Growing, Cooking, and Selling
Here I'll provide some tables for you to look at regarding farming veggies and cooked meals.

This first table shows how much seeds cost, how long each veggie takes to grow, and how much you can sell it for... plus how much profit you can get from selling it (subtract the cost of seeds from the sale price).

VEGGIE FARMING TABLES

This second table shows similar information for cooked foods. How much gold you have to pay at the shop, cost of seeds (or other ingredients like Eggs and Milk), how many days it will take to grow each veggie needed as an ingredient, how much it sells for, and how much profit you get from selling it.

RESTAURANT TABLES

There is a term I invented, call it the "Profit Per Growth Day" or PPG. This is simply the total profit of a veggie or cooked food, divided by the TOTAL number of days you needed to grow ingredients. If a recipe requires 2 onions, for example, each onion takes THREE days to grow so the number of growth days is SIX. (3+3 = 6). For Onion Rings which need two oil and two onions, you need to grow CORN to make the oil, then ONIONS as well. Both veggies take 3 days to grow. And you need two of each kind. So the growth days would be (3+3) for the onions and (3+3) for the corn, add them together to get 12 growth days total. So the PPG takes the profit from selling a plate of Onion Rings (the total sale price, minus the gold cost to make Onion Rings, minus the gold cost to make Oil, minus the cost of 2 Onion Seeds and 2 Corn Seeds) and divide that by 12. I hope that makes sense. This value gives you an idea of how EFFICIENT you can be in terms of making more money for each day that you work on your farm. Even though Pumpkin Stew sells for more money than Onion Rings, the PPG is higher for the Onion Rings because Pumpkins take longer to grow. Anyway, long story short is: you don't need to know the math because I did it for you here. High PPG is what you want, if you are trying to make a lot of money without a lot of days waiting for crops to grow in between item sales.
Weapon Skills and Magic Spells
The weapon skills and magic spells are each unique. Here I will provide a description of each one, so you get an idea of what they can do before you decide which ones are worth buying and equipping.

Magic spells are bought using magic spheres and a few other ingredients at the cauldron in Sage Alby's house. Magic spheres of each element can be purchased for 10 Vindictive Souls at Timmy's shop in Paw Village, on the second tab of his shop menu. The weapon skills are found as rewards as you progress through the main story quests and as loot in treasure chests.


SWORD SKILLS
NOTE: of the physical damage options, sword is the best because it does more damage than the bow, and your magic damage is also based on your equipped weapon damage so sword also lets you fire off very strong magic spells.
  • Rapid Thrust - stabs forward four times in quick succession for low damage.
  • Charge Attack - very strong attack against a single enemy that STUNS them.
  • Whirlwind Swing - spin in a circle, striking all enemies near you FIVE times, the final hit knocks them back. Each attack does low damage, but there are five attacks and it can hit multiple enemies.
  • Shockwave - send a long-distance energy wave that hits multiple times for medium damage and pushes enemies back. Most effective if you hit an enemy UP CLOSE from an angle where he can be pushed back pretty far without hitting any obstacles. One of my favorite skills.
  • Ultimate Slash - strike an enemy several times, then send a short energy wave through it and any nearby enemies that pushes them back. Each hit does medium damage.


BOW SKILLS
NOTE: of the physical damage options, the bows are less attractive because they do about half as much damage as a similar-level sword. This also cuts your magic damage in half so it will take twice as many spells to kill an enemy. But it does let you shoot arrows from halfway across the screen, so if you find you have trouble learning how to dodge when up close with enemies, feel free to try the bow instead.
  • Triple Shot - fire THREE arrows quickly at a single enemy for low damage each.
  • Charge Arrow - fire a big arrow at a single enemy for medium damage.
  • Phantom Thrust - fire a big arrow straight ahead, it hits all enemies in its path for big damage and pushes them back. My favorite of the bow skills.
  • Arrow Shower - hits a big area of multiple enemies, multiple times, but each hit only does minor damage. Not very useful.
  • Ultimate Shot - shoots five flaming arrows in a row at a single enemy for high damage, can set the enemy on fire.


A note about magic: there is NO elemental weakness system in this game. If an enemy has a blue glow, they have a magic shield that reduces damage they take from magic spells, that is all. A fire spell and earth spell that have the same listed damage numbers will do equal damage to ANY un-shielded enemies. Nothing is weak to fire but strong against water, or something like that.

FIRE SPELLS
  • Fireball - fire 3 fireballs directly at an enemy, each with a chance to set the enemy on fire. Damage is pretty low though.
  • Flame Wall - create a short wall of fire a few feet in front of you. Does medium damage, but only if an enemy steps in it.
  • Flame Vortex - hits a big area around a targeted enemy multiple times for medium damage and sets them on fire.
  • Searing Crown - hits all enemies around YOU several times for medium damage and sets them on fire.
  • Crimson Meteor - drop a big flaming meteor on an enemy, causing several hits of damage AND chance to be set on fire to that enemy and anything within a large radius. For when you absolutely must kill that miniboss in just one or two hits. My favorite spell.


WATER SPELLS
  • Ice Diver - fire three shots in a spread pattern in front of you that deal low damage and freeze one enemy. If two shots hit the same enemy, it will freeze and then the second shot unfreezes it!!
  • Frost Nova - hits a big area around YOU one time for low damage, drags enemies to the center of it, and freezes them. Useful if you have a sword so you can drag enemies right to you and hit them with your sword while they're frozen.
  • Frost Wave - fires a cone of ice in front of you that freezes enemies. Hits several times for low damage. Not very useful.
  • Frost Vortex - hits a big area around an enemy target TWELVE times for medium damage, drags enemies together, and freezes them. The best water spell.
  • Blizzard - hits a big area around an enemy target ONCE for medium damage and freezes several enemies. Not particularly useful because of low damage.

WIND SPELLS
  • Grasping Gale - hits a narrow cone in front of you ONCE for medium damage, drags enemies towards you.
  • Tornado - fire four giant tornadoes in different directions, that will repeatedly damage enemies as it pushes them away from you. Quite deadly against most regular enemies. My second favorite spell behind Crimson Meteor.
  • Howling Wind - hits a wide radius around YOU five times for medium damage, and drags enemies towards you.
  • Healing Wind - heals a quarter of your HP. Not very useful because food does the same thing without wasting a skill slot.
  • Eye of the Storm - hits a big area around a target enemy EIGHT times for medium damage on each it.

EARTH SPELLS
  • Comet Strike - hits SIX (not five) times with heat-seaking balls for LOW damage each, has a chance to STUN the enemy for a few seconds.
  • Earth Blades - fire a spinning wheel straight ahead that cuts through any enemies in its path, doing medium damage with each hit and pushing them back. Quite useful if you have a few enemies standing in a line.
  • Seismic Impact - jump a few feet ahead and land with a BOOM, dealing LOW damage to surrounding enemies eight times. Stuns enemies for three seconds.
  • Earth Shield - makes a dome around you that stays active for several seconds. Does low damage with each hit, hits once per second anything that touches the dome. You can do sword or bow attacks while the dome is active to recharge your mana, too.
  • Heaven's Drive - hits a big area around a target enemy EIGHT TIMES for medium damage each time, and stuns them for three seconds. Costs 5 MP, so the damage is too low to make it worth using this one.


My favorite spell & skill loadout
  • Shockwave (sword) or Phantom Thrust (bow)
  • Crimson Meteor
  • Tornado
  • Earth Blades
The World Map
The map is pretty big, lots of locations. So rather than condense it all down into a single image I've split it into three sections: the central area where you'll spend the first half of the game, then the southern area, and finally the northern area. The pink paths show connections between each zone. The numbers on the first line in each location show how many treasure chests are in each zone: BROWN for wooden, GREEN for copper, GREY for silver, YELLOW for gold. I've also marked areas that have minibosses. Remember minibosses can only be defeated once per day, and they will respawn at 07:00. Also remember that chest keys are made from three metal ingots plus 10 Ironstone plus a few paw coins for each key. The metal ingots are each made from five metal ores. Ingots and keys can be made at the blacksmith's shop. Since you'll be killing all the minibosses repeatedly to get enough materials to upgrade your weapons, armor, and spells... you should get enough (or almost enough) copper and silver keys from them. Probably the only keys you will want to make at the blacksmith will be a few gold ones. And without further ado, here is THE WORLD MAP...


Here is the central part of the map, where you'll spend the first half of the game.
.
.
This one is the southern area, the desert and beach, where you're going after you repair the broken bridge.
.
.
And finally the northern area, the mountains, where you'll spend the final part of the game - after you unlock the Mountain Tunnel and revive Basil with a medicinal potion.


I'm not going to post pictures of each area or each treasure location, you'll have to do some exploring on your own. Each zone also has WOODEN CRATES in addition to the treasure chests. Crates can be broken by attacking them with your weapons or magic, and sometimes enemies will break them for you. They usually contain a few Paw Coins, though some are empty and a couple of them have food items inside.

TOTAL TREASURE KEYS NEEDED:
Copper - 15
Silver - 11
Gold - 8


The Walkthrough section of the guide will be interspersed with some lists of treasure and other interesting things for each new region as you reach them; this chapter is just to introduce the map in general.
Fast Travel - Die or Teleport
There is no item that lets you warp around the world from just anywhere. You don't get to ride a dragon or magical Manbearpig mount. There is no spell to teleport yourself across the map. But there are three ways to travel long distances in this game.

The first way is the obvious one: WALK, yeah like on your own two feet. Just hoof it all the way there. This takes a long time if you're going all the way across the continent though, and you'll run into a lot of enemies along the way.

One way to "fast travel" in this game is to get yourself killed and you'll wake up at home a few hours later (16:30 if you die before noon, 19:00 if you die between noon and I think 17:00, 07:00 next morning if you die after that.)

Or, go find one of the "teleport checkpoints" - in most RPG's you would assume the big blue glowing things are SAVE POINTS but in THIS game they just add that place to your list of teleporters. When you touch it, they ask if you want to SAVE, but this will not save your game. It only saves this location to your list of teleport locations. Teleporters in this game are ONE-WAY ONLY, some of them let you warp OUT to another location on your list, some of them let you warp IN from somewhere else, but no single platform will do both. Kinda stupid system I think. Usually if you find one teleport, the next screen will have one that goes in the opposite direction - USUALLY. But not the one in the Freshwater Swamp, nor the ones in/near the River Dungeon.


.
These are places you can teleport OUT from (i.e. to get back to town), they look like big blue wings:
  • Paw Village - near the west exit
  • Rivero Fort - one near the west exit, one near the southeast exit
  • East Freshwater Swamp - you have to enter from South Freshwater Swamp to reach it
  • Canini Beach - near the northeast exit
  • River Dungeon - the boss room where you fought Wicked Shroom
  • Mountain Tunnel Entrance - just outside the tunnel door
  • Mountain Fields - in the little village near the south exit

.
.

.
Places that let you teleport IN from somewhere else, but not OUT to somewhere else, they look like a big blue orb or a plain grey circular platform:
  • Paw Village - grey platform across from the blue wing
  • Rivero Fort - grey platform in front of the inn
  • West Paw Fields - blue orb outside of the River Dungeon cave
  • Forest Sanctuary - blue orb near the eastern exit
  • South Sand Dunes - blue orb near the southern exit
  • East Karst Fields - blue orb near the northeast exit

.
.

.
Certain locations have one OUTBOUND teleporter (blue wing) and an INBOUND teleporter (grey platform) nearby each other. I'm not sure if the developer just forgot to put the blue orb artwork on the receiver platform, or if there was some other reason they decided not to include it, but the grey platforms work just like the ones that have blue orbs on them.


Minibosses
WARNING: SPOILER ALERT! This section contains information about where to find all the minibosses, what items they drop, how they fight, and how to kill them.


Wicked Shroom - River Dungeon 4F (cave north from King Gooey)
drops Big Shroom. rare drop: Copper Key
Weakest of the bunch, just avoid his poison gas shot and keep hitting him until he dies.

King Gooey - West Paw Field
drops Miracle Berry. rare drop: Crown, Copper Key
Uses some stun attacks. Kill him with whatever you have available, might require a sword upgrade or two.

Orc Warrior - Forest Plantation, in the orc camp
drops Sunstone. rare drop: Fire sphere, Copper Key
Uses strong sword attacks mostly. Kill it with magic spells.

Freddy O'Lantern - Fort Outer Wall, only appears at night
drops Moonstone. rare drop: Earth sphere, Silver Key
Uses mid-level magic attacks. Load up on HP and magic defense, and learn to DODGE his big area attacks. Not too tough really, especially if you clear out the little enemies before you attack this guy.

Giant Turtle Soldier - Blue Moon Lake, middle of the lake
drops Turtle Shell. rare drop: Water Sphere, Copper Key
Physical Defense buff. Strong stunning attacks, learn to dodge. Magic works well, swords and bows do not work so well.

Dracuffy - Mountain Tunnel
drops Evil Bone WIngs. rare drop: silver key, Fire Sphere
Kill all the smaller enemies in the area first, the little bats like to use stun attacks. Dracuffy has both Magic Defense buff and Physical Defense buff. Uses a mixture of physical attacks and magic spells, his magic has a STUN effect and cannot be dodged.

Snowmonster - East Karst Hills
drops Pearl. rare drop: Wind sphere, Gold Key
Magic Defense buff. Watch out for his stun and freeze attacks. Crimson Meteor is your best friend for this, or use Ultimate Slash instead.

King Cobra - West Sand Dune
drops Rainbow Scale. rare drop: WInd sphere, Silver key
Magic Defense buff. Uses really strong wind magic for the most part. Do not attempt this without the Sniper Vest and a really good sword.

Greed - Sea Cove at the west end of Canini Beach
drops Coin Pouch. rare drop: gold key
Crimson Meteor or Tornado and Ultimate Slash work pretty well.

Chompy - Downstream River, northwest end
drops Fairy Wings. rare drop: Earth sphere
Magic Defense buff, uses poison and strong magic attacks. Do not attempt this without the Sniper Vest and a strong sword. Ultimate Slash and Crimson Meteor work well against it.

Crystal Guardian - west end of Crystal Cave 1F
drops Tiara. rare drop: Water sphere, Silver Key
Physical defense buff. Uses a wide variety of high level magic spells, come prepared with high HP and magic defense.


---------------------------------------------------------------------------------------

The following bosses are STORY QUEST bosses, can only be defeated ONCE - if you lose, you wake up in bed and have to try again but if you win they are gone forever.


Giant Turtle Soldier (again) - after leaving Sea Cove with the relic
drops NOTHING, STORY boss not able to repeat this fight
same as the regular miniboss.

Captain Hazel - after exiting Crystal Cave
drops NOTHING, STORY boss not able to repeat this fight
uses a TON of ultra-level physical attacks. If you have the Metal Alloy Armor, now is a good time to wear that.

Chompy (again) - Forgotten Shrine 1F
drops NOTHING, STORY boss not able to repeat this fight
just like the original miniboss, but he's surrounded by about a dozen little enemies that use poison and slow attacks.

Dracuffy (again) - Forgotten Shrine 2F
drops NOTHING, STORY boss not able to repeat this fight
just like the original miniboss, but he's surrounded by about a dozen little bat enemies.

Final Boss Sage Alby - Forgotten Shrine 3F
drops NOTHING. STORY boss not able to repeat this fight
Uses a TON of ultra-level magic attacks. If you have the Sniper Coat and Crown (or Tiara), now is a good time to wear them.
Regular Enemy Locations and Item Drops
  • Green Gooey - Green Mucus, rare drop: coal
  • Blue Gooey - Blue Mucus, rare drop: snowflake or coal
  • Dark Gooey - rare drop: coal or Cotton Flower
  • Carroo (looks like a turnip) - Vine, rare drop: Cotton Flower
  • Forest Bees - Bee Stinger, rare drop: Honeycomb
  • Fluffy (bat) - Bat Wing, rare drop: Apple
  • Shroomie - Toadstool, rare drop: Portabello
  • Orc Soldier & Gunner - Orc Coin or Ironstone, rare drop: Coal or Raw Meat
  • Rotten Onion - Clover, rare drop: Vine
  • Specter - Cotton Flower, rare drop: Candy
  • Man-Eating Flower - Wilted Flower, rare drop: Talisman
  • Shield Bug - Hard Shell, rare drop: Insect Wing or Wilted Flower
  • Katapila - Insect Wing, rare drop: Wilted Flower
  • Flower Pixie - Huge Leaf, rare drop: Insect Wing or Amber
  • Treant Guardian - Sap, rare drop: Amber
  • Forest Golem (physical defense buff, swords and bows do less damage against it) - Ironstone, Clay, Coal
  • Venom Treant - Sap
  • Arnewt (red lizardmen) - Obsidian, rare drop: Talisman
  • Hyena Archer & Warrior - Hyena Token, rare drop: Raw Meat, Fang
  • Treasure Goblin - Copper Ingot or Silver Ingot, rare drop: Gold Ingot
  • Ice Golem (physical defense buff, swords and bows do less damage against it) - Snowflake, Clay, Coal
  • Fluffice (snow bats) - Bat Wing, rare drop: Snowflake
  • Stone Fiend (THORNY buff, you take damage if you hit it with a sword) - Snowflake, rare drop: Coal

The fields near Paw Village are home to:
Green Gooey, Carroo, Forest Bees, and at night there are Fluffy; & King Gooey miniboss.

The fields near Rivero Fort are home to:
Green Goo, Fluffy, Specter (at night only), Fluffy (at night only), Man-Eating Flower, and Rotten Onion; & Freddy O'Lantern miniboss, & Chompy miniboss

The River Dungeon is home to:
Fluffy and Shroomie, & Wicked Shroom miniboss

The forest in the middle of the map is home to:
Orc Warrior and Shooter, Venom Treant, Treant Guardian, Forest Golem, Forest Bees, and one patch of Fluffy at night only; & Orc Warrior miniboss

The swamps are home to:
Shield Bug and Katapila

Blue Moon Lake is home to:
Green Gooey and Flower Pixie, & Giant Turtle Soldier miniboss

The southern desert is home to:
Hyena Archer and Warrior, Arnewt, & King Cobra miniboss

The Sea Cove is home to:
Fluffy, Shield Bug, Treasure Goblin, & Greed miniboss

The Mountain Tunnel is home to:
Fluffy, Shield Bug, Dark Gooey, Venom Treant, & Dracuffy miniboss

The snowy mountains are home to:
Ice Golem, Blue Gooey, Stone Fiend, and Fluffice; & Snowmonster miniboss

The Crystal Cave is home to:
Dark Gooey, Fluffice, & Crystal Golem miniboss

The Forgotten Shrine is home to:
Corrupted Bug (re-skin of Shield Bug), Corrupted Flower (re-skin of Man-Eating Flower), Fluffice; Corrupted Chompy miniboss, Corrupted Dracuffy miniboss, & FINAL BOSS
Shops
I'm not going to list prices here, if you want to see a price you can visit the shop and then PIN the item. To see the price at any time after that, hit RB in the backpack menu to open the pinned item screen. A star on a shop list indicates you have the item pinned. A star on an item in your backpack or in a storage chest means that item is an ingredient for something on your pinned item list. You can un-pin the item if you don't need to see that information anymore.

BLACKSMITHS

There are several types of equipment in this game, and three NPC shops that sell it, if you include Pumpkin's basic farm tools as equipment. Armor, Robes, Swords, and Bows all require the previous one as an ingredient in the recipe (except a couple of swords and bows that you find in treasure chests). There are also a couple of hats and wings that use previous ones as ingredients, but just a few of those.

Shamrock - bear blacksmith in Paw Village
  • Copper, Silver, and Gold Ingots & Keys
  • Silver and Gold upgrades for farming tools (hoe, watering can, sickle, axe, pickaxe).
  • Swords
  • Bows

Rufus - bear blacksmith in Rivero Fort
  • Copper, Silver, and Gold Ingots & Keys
  • Armor (typically gives increased physical defense and more HP)
  • Robes (typically gives increased magic defense and slightly increased HP)
  • Hats and Helmets (effects vary)
  • WIngs (effects vary, but mostly speed increase, damage penetration, or lifesteal)

GROCERIES and RESTAURANTS

Food is made from ingredients, with a few exceptions that only require some paw pennies. There are two general stores that sell ingredients, and two restaurants that sell complete meals, and one farmer who sells seeds for you to grow veggies on your farm - then you can sell the veggies or use them as ingredients in the restaurants.

Kiki - farmer near the wheat field in Paw Village, daytime only
  • Seeds only: Wheat, Potato, Carrot, Cabbage, Onion, Corn, Tomato, Strawberry, Grape, Kale, Tulip, and Sunflower

Timmy - Paw Village, center of town, daytime only
  • Eggs, Flour, Milk, Oil
  • Magic Spheres: Fire, Water, Earth, Wind (10 Vengeful Souls for each one)

Kelly - Rivero Village, north of the inn, daytime only
  • Mik, Eggs, Honey

Ms. Apple - Paw Village, daytime only
  • Cooked Meals: Croissant, Apple Pie, Monster Pudding, Vegetable Soup, Onion Rings, Kale Salad, Pumpkin Stew, Herbal Tea, Nighttime Drink

Pickle - Rivero Fort, west of the inn, daytime only
  • Cooked Meals: Omelette, Pineapple Tart, Sandwiches, Hamburger, Mushroom Stirfry, Pizza, Shish Kebab, Sweet Potion, Berry Drink

SECRET MERCHANT

There is also a special traveling merchant who sells a couple of things that you can't find at the normal shops. His name is "Pumpkin" and he wears a pumpkin on his head (or maybe his head IS a pumpkin???). He bounces from town to town and has a couple of different shopping lists depending where you find him. I only ever found him ONCE in Canini Beach, and NEVER in the Mountain Fields village.

Pumpkin Merchant - Paw Village, 19:00 - 07:00 on days divisible by 3 ONLY
  • Copper, Silver, and Gold Ores
  • Turtle Shell (also drops from Giant Turtle Soldier miniboss)
  • Kale, Bell Pepper, Pineapple, and Pumpkin Seeds
  • Rusty Sword (garbage weapon, total rip-off, DO NOT BUY THIS unless you have too much money)
  • Immortal Sword (second-best sword in the game)
  • Falcon's Eye Bow (second-best bow in the game)
  • All the basic farming and mining tools: axe, pickaxe, watering can, hoe, and scythe
  • Backpack Upgrades

Pumpkin Merchant - inside the inn at Rivero Fort, uncertain of the schedule
same as in Paw Village

Pumpkin Merchant - east side of Canini Beach
  • Copper, Silver, and Gold Ores
  • Turtle Shell (also drops from Giant Turtle Soldier miniboss)
  • Sunstone (also drops from Orc Warrior miniboss)
  • Moonstone (also drops from Freddy O'Lantern miniboss)
  • Kale, Bell Pepper, Pineapple, and Pumpkin vegetables - not seeds

Pumpkin Merchant - in the village in the mountains, uncertain of the schedule
I never found him in the mountains, but some people in the discussion forums say they have.
Best Way to Make Money
You will need 31 Amber, 100 Obsidian, 50 Huge Leaf, 75 Wilted Flowers, 100 Coal, 30 Hard Shells, and 10 Talismans (plus some other items that are not worth much money) from regular enemies to do all the blacksmithing and buy all the spells in the game. If you have any extras of these items, sell them since they're all worth 50pp or more. Honeycomb is also worth a lot, but it's worth even more after you turn it into honey at Rivero Fort. You will need just 1 Honey for a quest, you can safely sell the rest.

From minibosses you will need 4 Miracle Fruit, 2 Big Shroom, 8 Sunstone, 6 Moonstone, 6 Rainbow Scale, 7 Pearl, 8 Turtle Shell, and 5 Coin Purse if you intend to make all the equipment in the game. The Chompy, Dracuffy, and Crystal Guardian all drop equipment (worth 500 paw pennies each I think) instead of crafting ingredients. Once you collect more than that, you can sell any extras.

You can also grow vegetables on your farm and sell them raw, or else take them to one of the restaurants and turn them into cooked food and sell that.

The "best" way to earn income is to use a combined method. Collect those miniboss drops every day (except the Wicked Shroom, Chompy, Dracuffy, and Gooey King because their drops aren't worth much), collect honeycomb from bees and turn it into honey, and then do some farming, too.

Other than miniboss drops, HONEY is a great way to earn because it's 315pp of PROFIT each. But if you plan to rely on honey anyway, combine it with a Tulip to make some Herbal Tea and sell that instead for even more profit. If you find that you have too many Raw Meat, combine it with a Green Pepper and sell some Shish Kebabs - their profit is pretty good, too.

But if you want a money-maker that does not rely on enemy drops AT ALL, then you want the Onion Rings. Grow TWO CORN and turn them into oil at Timmy's shop, combine with TWO ONIONS at Ms. Apple's shop, and that's it. In terms of "Profit per Crop-Growth-Day" (crop growth day = days it takes for ONE crop to grow, then add up all the crops needed for that recipe) the onion rings give 40.833pp. The Pineapple Tart gives 36.25, so if you don't have Onion Seeds unlocked yet you could grow some Pineapples and Wheat instead and make tarts later (or sell raw Pineapples now), but the Pumpkin Stew only gives 31.833pp and raw Pumpkins are just 36pp because Pumpkins take so long to grow.

If you're going to run a farm, remember to upgrade your tools. Each upgrade increases the size of the tool's area of effect. Basic gives you just ONE SQUARE. Silver hits a 2x2 block. Gold hits a 3x3 block. Hitting 9 squares at once makes watering and harvesting your veggies go MUCH faster than doing it one at a time.

So yeah... every morning go out and plant/water/harvest your corn and onions (or tulips, or pineapples and wheat), turn them into onion rings. Then do a boss run around the world to collect their expensive items. Then sell the onion rings and any extra boss items, amber, and obsidian etc..
What You "Need" To Succeed
If you want a quick reference of HOW MANY OF EACH ITEM you will need to collect for all the quests, side-quests, weapon/armor crafting, tool upgrades, and learning new magic spells... then this list is for you. I've broken it down into sections for you. It shows the number you need for QUESTS, then for CRAFTING, then a combined total for QUESTS AND CRAFTING, then I give an ESTIMATE of how many you might want to cook some "good food" at the restaurant shops. THIS NUMBER IS ONLY AN ESTIMATE AND YOU CAN FEEL FREE TO DO MORE OR LESS IF YOU PREFER. Basically, my two favorite cooked foods in the game are Shish Kebab (good HP recovery PLUS it gives you Lifesteal to absorb 10% of your weapon damage as MORE HP RECOVERY for 60 seconds); and the Onion Rings, which give you +10% chance to do CRITICAL HITS which means you do more damage with your magic and your weapons until it wears off. Notice I also listed all the enemies that drop each item, where to find that enemy or where to buy the item. Another thing to note here is some items have "ALL" listed in the "TOTAL NEEDED" column. This is because you'll need as many of those item as you can get - either for SELLING the item directly, or as an ingredient in something else that you will eat or sell a ton of it. In these cases, as long as you have enough to cover the "QUESTS + CRAFTING" number, then technically you don't need any more than that. But more is better - it helps restore your HP or else it helps you make money faster.

Here is a list of VEGGIES, FOOD, MAGIC SPHERES, TOOLS, and TREASURE KEYS that you will need. PLEASE TAKE NOTE: You will likely find plenty of copper and silver keys just by killing minibosses, so you don't have to waste quite so much Ironstone and Metal Ingots on buying keys from the blacksmith. And the number of Spheres assumes that you want to buy EVERY magic spell there is. If you buy fewer spells, then you'll need fewer spheres.

This one shows metal ingots and the regular enemy drop items that you'll need to find during the first half of the game. When it comes to the Honeycomb, you want to turn ALL of it into Honey. You'll need JUST ONE jar of honey for a quest. The rest of it, you can sell it immediately for profit, or eat it for HP recovery... or you can save it until almost the end of the game until you can combine it with Tulips to make Herbal Tea - more HP restoration and it sells for SO MUCH MONEY!!! For the Ironstone and Metal Ingots, you might not need quite that many - this is the number assuming you want to have the blacksmith make ALL of the keys to open all the treasure chests... but you'll find some keys just by killing minibosses a few times. And as for the Vengeful Souls, remember if you don't want to buy EVERY magic spell then you won't need as many of these to spend on Timmy's Magic Spheres.

This one shows ALL of the miniboss items, plus the regular enemy drops from the second half of the game. Nothing special to note here, except that the minibosses only spawn once per day so you can only get ONE of their signature item drops per day. If you do a lap and kill EVERY miniboss each day, you'll need about a week to collect all the items you'll need from them... but then you may want to kill them a few more times after that to see if you can get any free treasure keys or magic spheres.
Treasure Chests - sorted by USEFULNESS
SPOILER WARNING: This entire chapter is kind of a spoiler, since I list all the treasure chest contents and locations. If you prefer to find them by yourself, skip this chapter.

Some treasure chests just have ingots or money in them. Some just have some food you can sell or eat. But others have nice weapons or attack skills or something like that. Here I'll sort the chests in order of "usefulness" based on what they contain, rather than by location, to make it easier for you to decide how many keys you need to bring with you. I will put some other chapters in the middle of the walkthrough that will list the chests (and other interesting things) by location so you can use it as a sort of checklist to mark off what you find as you go through the game one location at a time. :) This list here will not include wooden chests since they mostly contain a bit of money or some junk items, and you don't need keys to open them. But they will be included in the checklist for each location later in the walkthrough.

You really shouldn't need to make any copper or silver keys yourself, the minibosses drop them often enough and you'll be killing them several times to get items needed for equipment upgrades anyway. Gold keys are less common though so you might want to make a few of those. If you wan to open ALL the treasure chests, you will need this many keys in total:
  • Copper - 15
  • Silver - 11
  • Gold - 8


Weapons, Skills, Spheres, and BIG MONEY
Gold chest - in the Mountain Tunnel, eastern side of the map - Forest Guard Sword
Gold Chest - Canini Beach, peninsula near the Sea Cove exit - sword skill Ultimate Slash
Gold chest - Crystal Cave, north of the relic - Dragon Slayer sword
Silver chest - in the Rivero inn - sword skill Charge Attack
Gold chest - Sea Cove, northeast corner near the east exit - Elven Bow
Gold chest - East Freshwater Swamp, near warp checkpoint - Noble Hunter Bow
Silver chest - behind the wheat field in Paw Village - bow skill Charge Arrow
Gold chest - Mountain Field, path wraps around east from village - bow skill Ultimate Shoot
Copper chest - Mountain Tunnel Entrance, northwest corner - 3000 Paw Pennies
Copper chest - down southwest alley in Rivero Fort - 1500 Paw Pennies
Wooden chest - behind Rivero Fort blacksmith - 1 Earth Sphere
Silver chest - River Dungeon 3F northwest path - 1 Water Sphere
Silver chest - East Sand Dunes, near south exit - 1 Earth Sphere
Silver chest - East Karst Hills, northwest from central clearing - 1 Wind Sphere

Hats, Helmets, and Wings
Copper chest - in Sage Alby's house - Mage Hat
Copper chest - southeast corner of orc camp - Viking Helmet
Silver Chest - Sea Cove, southwest wall hidden by bad camera angle - Dark Wings
Gold chest - Forest Sanctuary north of the east exit - Bachelor Hat
Silver chest - Canini Beach, eastern end of the beach - Shark Hat
Silver chest - Blue Moon Lake, north shore - Demonic Bane (wings)
Silver chest - Crystal Cave, alcove south of east exit - Black Dragon Wings

Ingots and Junk
Copper chest - South Freshwater Swamp, western end - 2 Gold Ingots
Copper chest - Sea Cove, northwest corner in alcove north of the west exit - 3 Gold Ingots
Wooden chest - East Sand Dunes, east side of the map on the ground floor - 2 Gold Ingots
Copper chest - Icy Mountain, northwest corner, under the suspension bridge - 2 Gold Ingots
Copper chest - Crystal Cave, north wall not far from the east exit - 2 Gold Ingots
Wooden chest - Forest Sanctuary, up the stairs - 1 Amber
Copper chest - East Freshwater Swamp, far west, then turn south path - 3 Silver Ingots
Copper chest - West Sand Dunes, west wall - 3 Silver Ingots
Copper chest - northwest end of Downstream River zone near Chompy - 3 Silver Ingots
Copper chest - next to Chief Oliver's house in Paw Village - 3 Silver Ingots
Silver chest - west of the Rivero Fort exit in Outer Fortress Gate - 5 Copper Ingots
Copper chest - South Sand Dunes, southwest corner up on the hill - 5 Copper Ingots
Copper chest - West Karst Hills, eastern wall by south entrance - 5 Copper Ingots
Gold chest - Crystal Cave, alcove south of west exit - 5 Copper Ingots
Wooden chest - West Sand Dunes, northern wall - 2 Copper Ingots
Silver chest - Forgotten Shrine, path east from Corrupted Chompy miniboss - 4 Herbal Teas
Copper chest - East Sand Dunes, east side up on the little hill - 100 Paw Pennies
Walkthrough Chapter 1: The Beginning
I have never tried the "Local Co-Op" mode, so let's assume we're all playing a NEW single player game here. :)

The opening cut-scene teaches you three things:
1. This land is called "Canoidera." But this is the ONLY time you'll see or hear that name so feel free to forget it immediately.
2. There was a time in the past when monsters went on a crazy rampage, but they were stopped by some legendary heroes.
3. The monsters are starting to rampage again, but all the heroes are gone.

Then you have a chat with a pink berry-creature ??? named Macaron. He's your partner. You're the cat-person. You're both soldiers from the empire's capital city, sent out to guard a small village from the rampaging monsters. After the chat, you find yourself in West Paw Field. You can walk a little ways to the LEFT (WEST), but the exit to the next zone there is locked (red dotted line). Or you can go north and cross the little bridge, but the exit to the River Dungeon there is also locked. However, there are TWO wooden chests across the bridge there. The one to the RIGHT has a Croissant (HP recovery food). The one on the LEFT by the tent has Paw Pennies (that's $20 money). Press the A button to open the chests. The glowing blue thing is a checkpoint, if you find these and activate them then you can warp back here from town later. But you cannot warp out from here, it's a one-way teleport system. Then go EAST and cross the other bridge, where you'll talk to Macaron again.

Aparently you're a little bit lost... and you don't have a weapon equipped. Good thing there are no enemies on this map! Next time you come here though, the enemies will show up. So open your backpack, select the sword, and hit the X button to equip it. If you are UNARMED, you cannot attack anything. If you have a TOOL equipped instead of a weapon, you will do ZERO damage - both with the tool and with any magic spells!! So be sure to always have a weapon equipped unless you are actually using the tool for something else. Anyway... equip the sword, then talk to Macaron again and he runs to the next zone. The exit line will turn BLUE, meaning it's unlocked so you can go that way now.

Now you see a kid getting attacked by three Green Gooey monsters. Kill them all, they're really weak. Notice how their attacks have a RED FLASHING INDICATOR before they swing, try to dodge out of the way by walking or roll with B button to avoid getting hit. DODGING MATTERS IN THIS GAME!! Also use the Y button to lock onto a target so you don't accidentally go swinging your sword at thin air. Make sure the enemy you want to hit has the RED CROSSHAIR on it, if not then hit Y again to change target. The X button is a regular attack, and you have a sword skill on LB by default. Pick up any green mucus that they might drop, it's used in a cooking recipe later. Talk to Macaron again.

You meet the rabbit kid's grandfather... she is a bunny rabbit but he is a goat!?!?!?!? HOOOWWW? This won't be the last time different "species" are in the same family, the game literally has dialogue that says "Yeah, we're different species, but so what?" LOL. So you get your uncle's farm. Your uncle was Payne Thunderbunn, one of the legendary heroes that fought monsters last time they went on a rampage. Apparently he was a rabbit, but you - his grandchild - are a cat. Ugh. This game is for FURRIES. Makes my brain hurt. But whatever... moving on.

The box with the paw coin painted on it is your trading box. Anything you put in there will be SOLD for money the following morning at 07:00. Go put your croissant and the mucus in the box, you'll need the money. Keep the milk though, you'll need that as a cooking ingredient later. And definitely keep the sword - without it you can't damage any enemies! Now there is NOTHING ELSE you can do except go swing the sword at the training dummies, and it's getting late anyway. 19:00 (7:00 pm - yeah this game uses a 24-hour clock system) is the start of NIGHT TIME. People go inside at night, and in a few zones different monsters appear only at night. So go in the house. Notice the clock at the top of the screen - the RED OUTLINE means time is paused. When you are INDOORS, time freezes. When you are looking in a storage chest or in your backpack menu, time is also frozen. BUT if there are monsters nearby they can still move and attack you while you are in your backpack menu!! When you are outdoors and not looking at a menu UI screen, time is ALWAYS moving forward.

There are three things to notice in your house. First, the MIRROR lets you change your look. Some of the DLC has cosmetic items that will show up here if you pay REAL MONEY for it. The base game only has a few different colors for your fur. Then the JOURNAL BOOK lets you save your game. And the BED lets you sleep to recover your HP and mana, and move time forward to 7:00am the next morning.

Day Two. Timmy lost his bag while being attacked by some Orcs. We'll deal with that soon. First: there is a wooden chest behind the houses at the northeast end of town, it has $200 inside! There is a Copper Chest by Oliver's house but you need a key to open it. There is a Silver Chest down south by the wheat field, but you need a key to open it. I'll list metal chest contents in a separate section of the guide. There are some sparkly trees around town that can be cut down - if only you had an axe. There are some sparkly rocks around town that can be mined - if only you had a pickaxe. There is a chest behind Timmy's shop that is YOURS TO USE AS STORAGE, and it has 2 Croissants for free, plus Timmy just gave you five more Croissants. Before you leave town, go put the Croissants in the trading box at your farm (go south past the wheat field to reach your farm). You'll need the money more than the HP I think. Also notice, since you sold some Croissant last night now the item description for Croissants shows how much money you will get if you sell another one. Also notice how Timmy has a blue notecard icon over his head, this means he is waiting for you to complete a MAIN STORY quest for him. Side quest icons will be similar but tan colored instead of blue. If a notecard has a RED "!" MARK on it, that person will start a new quest for you, while a RED CHECK MARK will continue/finish the quest you are currently on.

Check the teleport (blue wing at the northwest end of town), notice the checkpoint you found in the field is now listed here so you can warp to it from town. But not right now, instead just walk west through the exit. Go west to Upriver Field, there is a wooden chest just north from the entrance that has 2 Apples in it. There are Green gooey monsters you can kill to collect Mucus and possibly some Vengeful Souls (they will be spent on buying magic spheres later). But they are PASSIVE so they don't attack unless you hit them first. North is the exit to Forest Entrance, and by the exit you should find another wooden chest with $20 inside, and some Carroo monsters that drop Vines. There is nothing interesting to the north right now, though we'll be back that way later. For now, head WEST to the next zone.

If you DIE out here, no big deal you just wake up at home. If you die before noon you'll wake up at 16:30. If you die after noon it will be 19:00 when you wake up. If you die at night, it will be 07:00 when you wake up. But still, dying is annoying so try to get used to avoiding or dodging enemy attacks. You don't have much HP yet, and you are too poor to afford any healing items right now!

In West Paw field you'll find monsters this time. Green Gooeys, some Carroo (they do a DOUBLE PUNCH attack that will hit you twice, and they drop Vines), and a big miniboss King Gooey. Stay away from the king for now, you need a better weapon before you take him on. Go west to the next zone.
Walkthrough Chapter 2: Timmy's Bag, Magic Spells, and a Relic
As you run around these fields, you might want to start collecting some items for quests and equipment upgrades later: 20 mucus, 15 vines, 10 bee stingers, 100 coal, 4 miracle fruit, and as much honeycomb as you can carry (to trade it for honey, which you can sell to earn a decent amount of money O). But ANYTIME you see a list like this, you can always come back for more later, or just wait until you need it and then do some "item farming" instead of stockpiling things early. Your choice. :)

In Byriver Field, go south through the area and kill THREE orcs. The game doesn't tell you this, but you have your first sword skill unlocked already, it's on the LB button by default. It hits four times in a quick strike, but it needs a few seconds to cool down between uses. Skills cost mana to use, hitting enemies with regular attacks will restore some mana if you run low. To the east is a wooden chest with $20. To the west is another wooden chest (and Timmy's bag). Once you have the bag, no more orcs will appear here, it will be easier monsters next time instead. It will be a little while before you have access to more Orcs; if you want to collect all 15 Orc Tokens & 5 Ironstones you need for a sword upgrade now... kill the Orcs then leave to the north WITHOUT picking up the bag, then return and fight orcs again. Back to town and return to Timmy.

Timmy asks you to see Sage Alby. Leave town by the west exit, then take the next exit to the north. Alby's house is on the east side of that zone, in Forest Entrance. There is a Wooden Chest there, near the north exit past Alby's house, that has a piece of Coal in it. And there are some boxes outside that you can break to find more money. Sage Alby is rude and cranky, but he gives you a Spellbook when you drop your uncle's name. Note that Alby's house has a silver chest, but you need a key to open it. Go show the book to Timmy, and he suggests that you just read the book and figure it out yourself. So just go home and sleep.

Now you can use MAGIC SPELLS. They work just like sword skills, by default your new Fireball is on the LT button. Walk over to your training dummies, hit Y to lock onto one of them, and try your new magic. Then hit it with your sword to recover the mana you spent. Magic does damage based on the damage of your equipped weapon. So having a stronger weapon equipped will also increase your magic spell damage. This is why I don't like bows; they have low attack power compared to swords, reduces the attack power of your magic spells, and only hits ONE enemy per shot

Go visit Sage Alby, who tells you that you need to collect some ancient relics to stop the monsters from rampaging. First stop is the River Dungeon. go back to West Paw Field, north across the bridge to the cave entrance that was closed when you first started the game. It's open now. In the first room you'll find a bunch of Fluffy bats. Go around to the east to find a chest containing some apples. Then after killing all the monsters, go north to the next room. More bats, and maybe a Shroomie - they drop two kinds of mushroom items.

In the third room there is a wooden chest on the southwest path that has $50. The northeast path also has a wooden chest with 3 Portabellos. The northwest path has another wooden chest with $100 AND a Silver Chest that needs a key. After killing the enemies, go north to the final room. Before the boss, there is a teleport that will let you WARP OUT back to town, but it will not let you warp back in here. So if you leave before fighting the boss, you have to fight your way back here the long way again. This is the Wicked Shroom miniboss. Killing it gives you a Big Shroom item, which you need to build your first bow (assuming you want to build a bow). The miniboss outside the cave, King Gooey, will drop a Miracle Berry item. The wooden chest behind the boss room contains a COPPER KEY to open a Copper Chest. You need to collect the relic from the pedestal in order to leave. While you're in here, you might want to collect a few items for quests and equipment upgrades that will come up later: 2 big shrooms, 10 portabello (optional 60 more for cooking mushroom stirfry food), 40 toadstool, 45 bat wing, and 10 apples. Again I want to emphasize that you don't need all of these right this minute, you can come back later if you want to.

Go show the relic to Sage Alby at his house. The village chief stops by to say hello, too, and he warns you about the dangers of accidentally selling an item that you needed for equipment upgrades or cooking food. Luckily I'll give you a list of things you should save!! After this you will start getting some side quests from the villagers. Go to sleep, and in the morning a soldier comes by to say that the fort across the river has been reopened. By the way, minibosses will respawn every morning at 07:00, so you can only kill them once per day, but you can come back several days to collect more items from them.

By now I'm sure you've noticed that there is NO XP SYSTEM in this game. Your character does not actually levelup from combat. Your stats are totally dictated by the equipment you have equipped, and you learn new skills and magic spells as you progress through the game. So if you want to get stronger, go collect the right ingredients to build a better sword or stronger armor.

Back in Paw Village, every third day (day 3, 6, 9, etc.) the Pumpkin Merchant comes to town but only at night. The first chance you get, you should take a look at his inventory. The sword and bow he sells are both the second-best weapons in the game. And he sells two upgrades for your backpack for $3000 and $10,000 - this is the only way to increase the size of your backpack. You don't actually need to buy anything from him right now, I know it's tempting to buy an axe or something but you'll get a complete set of farming tools for free pretty soon. Once you have your basic farming tools, this guy sells some seeds for Pineapples and Bell Peppers. Pineapples are REALLY GOOD for selling in the early part of the game. And peppers are used for making some of the best healing foods in the game - Shish Kebab. These and the pumpkin seeds (currently locked until you finish a certain side quest) are NOT AVAILABLE TO BUY at Kiki's seed shop, but the Kale Seeds are. So if you need money and you are able to start farming, consider planting a ton of Pineapple seeds. He shows up occasionally at night at the inn in Rivero Fort with the same shopping list. But his shop during the day in Canini Beach (I don't know when) has slightly different items for sale.

Timmy should have a tan notecard with a red "!" symbol, so talk to him to start the "Magical Magic" side quest. He wants 10 Bee Stingers. Go kill some forest bee enemies until you have enough.

Kiki has a quest icon, too, so go talk to her to start the "Farming Trial" side quest. AT LAST you have access to the storage chest at your farm! Go open it and notice you have a set of basic farming tools. Take them out. Equip the HOE and clear enough land to plant the seeds you currently own. Equip the SEEDS and plant them. Equip the Watering Can and water them. Remember to water your crops ONCE EVERY DAY or they will not grow. Then you can put those three tools back into storage. Equip your axe to chop down SPARKLING trees and pick up branches to get logs. Equip your pickaxe to mine at SPARKLING rocks and ore deposits to get stone and metal ores. Rocks and trees take quite a long time to respawn, so collecting enough to fix your other two storage chests will be a SLOW process. It will take a few days for the crops to grow. When they are ready, they will be SPARKLING, equip the scythe to harvest your crops.

DO NOT upgrade your Watering Can to Gold until you finish the SIDE QUEST to show the Silver Watering Can to Kiki first! Will be a while before then.
Treasures and Points of Interest, part 1
Minibosses are BIGGER than normal enemies, and usually have a glowing aura around them. Some of them are docile until you hit them first, others will attack you on sight. They all drop rare materials for crafting OR special accessory items. They also have a small chance to drop a key for a chest, and a tiny chance to drop a magical sphere.

There are four kinds of treasure chests. Wooden ones don't need any key. Copper, Silver, and Gold each require a key of the corresponding metal type to open them. Keys are made from THREE metal ingots (requiring FIFTEEN metal ores) and TEN iron nuggets each, plus a few Paw Coins, at the blacksmith shop. Keys are sometimes dropped by minibosses, too.

Dungeon keys are quest items and are only available to pickup while you have an active quest to find the key and enter the dungeon. Dungeons (River Dungeon, Sea Cove, Crystal Cave, and Forgotten Shrine) are all DOORS LEADING INTO CAVES; they do NOT appear on the world map as separate zones, so you just have to remember which zone the entrances are in (or check my world map in the previous section of the guide).

Paw Village and Rivero Fortress are the only locations where you can sleep and save your game (in your house at the farm, and in the inn). These are also the only two places that have shops (blacksmith, restaurant, and item shops). Most of the sidequests will start and end with NPC's in one of these two towns. Later in the game you will open two more small villages with NPC's who offer (or participate in) more side quests.

This chapter covers about half of the map, where you will spend the first third of the game or so. The next section (part 2) covers the other half of the map where you will spend the rest of the game, but you'll be back tracking through some of these areas pretty often - mostly to kill minibosses and collect items you need for upgrading your weapons and armor.

WARNING: spoilers ahead, including locations of treasure chests and minibosses. Hover your mouse over the black boxes to display the list. Also, I will highlight in bold text those chests that are particularly useful (i.e. they contain weapons, skills, or ingots).


Thunderbunn Farm:
no treasure, just your house , your sales box, your storage boxes, your training dummies, and your farm.
Sparkly twigs and rocks give logs and stone when mined. Respawn SLOWLY.

Paw Village:
Copper chest next to the cief's house - 3x Silver Ingots
Silver chest behind the wheat field - bow skill Charge Arrow

Wooden Chest behind houses on the north side of town - 200 Paw Pennies
Sparkly trees and rocks give logs, stone, and metal ores when mined. Respawn SLOWLY.
Ms. Apple's restaurant (food)
Timmy's item shop (flour, egg, milk, oil, and magic spheres)
Shamrock's Blacksmith shop (swords, bows, farm tools, metal ingots, and treasure keys)
Kiki's Seed Shop (seeds for farming, DOES NOT SELL Pineapple, Green Pepper, or Pumpkin seeds)

Upriver Field:
Wooden chest near eastern exit - 2 Apples
Wooden chest near northern exit - 20 Paw Pennies

Forest Entrance
east - Sage Alby's house
Copper chest - in Sage Alby's house - Mage Hat (+15% magic defense, +10% reflect magic)
Wooden chest - near north exit - 1 Coal

East Forest Field
west end behind a tree - Wooden chest - 1 Ironstone

Forest Plantation
Wooden chest southwest corner of orc camp - I don't remember what was in it
Copper chest southeast corner of orc camp - Viking Helmet (+10% physical defense)
Wooden Chest northeast corner of the camp - 100 Paw Pennies
Wooden chest behind tree northwest of orc camp - 1 Ironstone
Orc Warrior miniboss


West Paw Field:
Wooden chest near tent site - 20 coins
Wooden chest east of cave exit - 1 Croissant
King Gooey miniboss
North exit to River Dungeon

River Dungeon
1F, west side Wooden chest - 3 Apples
2F - nothing special
3F northeast path Wooden chest - 3 Portabello
3F southwest path Wooden chest - 50 Paw Coins
3F northwest path Wooden chest - 100 Paw Coins
3F northwest path Silver chest - 1 Water Sphere
4F Wicked Shroom miniboss & Relic of Power
4F Wooden chest - Copper Key

Byriver Field
Wooden chest east end - 20 Paw Pennies
Wooden chest near west exit - 2 Apples

Fort Outer Wall
Silver chest west of fortress gate - 5 Copper Ingots
Wooden chest outside cemetery - 3 Candy
Wooden chest inside cemetery - 200 Paw Pennies
nighttime only - Freddy O'Lantern miniboss

Rivero Fortress
Wooden chest behind blacksmith - Earth Sphere
Copper chest down southwest alley - 1500 Paw Pennies
Silver chest in the inn - sword skill Charge Attack
Wooden chest upstairs in the inn - 200 Paw Pennies
exit to Selene's Inn - sleep and save your game here
Commander Hazel - point of interest for several story quests
Kelly's Item Shop (egg, milk, honey)
Pickle's Restaurant (food)
Rufus's Blacksmith (armor, robes, helmets, wings, metal ingots, treasure keys)

Downstream River
Wooden chest near east exit - 2 Honeycomb
Copper chest northwest end near Chompy - 3 Silver Ingots
Chompy miniboss at northwest end

River Bridge
nothing special here until a quest to speak with Commander Hazel.


Treasure keys needed for first third of the game:
Copper - 5
Silver - 4
Gold - 0
Walthrough Chapter 3: First Side Quests
So you're growing your first crops now. You have access to magic spells (but no elemental magic Spheres to buy new spells yet - you can buy those from Timmy's shop when you want a new spell.) And you have accepted your first two side quests. Hooray, now it's like you're really playing the game instead of some crazy tutorial.

Remember to equip your sword when you're done playing with your farming and mining tools. Now you need TEN Bee Stingers for Timmy and FOUR carrots for Kiki. The bees are found in two locations: during the day they are found at the southern end of Byriver Field. And day or night they can be found north of Alby's house, in the East Forest Field. That location also has some Treant Guardians that sometimes drop Amber which sells for $1000. They also drop Sap, which you need for some equipment upgrades later. While you're killing bees, also try to stock up on Honeycomb so you can turn it into Honey which sells for a lot of money, too, or stockpile Honey until you unlock Tulips at the end of the game to make Herbal Tea with it. And there is a wooden chest in East Forest Field with an Ironstone inside.

In the area between the two zones with bees, the Forest Plantation, you will find an Orc camp. This is the place to be if you want to collect some Orc Tokens and Ironstone. Just beware of the Orc Warrior miniboss, he is too strong for you until you get some weapon upgrades and maybe some new armor, too. There is a Copper Chest in the southeast corner of the orc camp that needs a key, a Wooden Chest in the southwest corner that has something in it, a Wooden Chest at the northeast corner of the camp with $100, and another Wooden Chest on the northwest side behind a tree with an Ironstone. Orcs drop some nice items. Later, you'll want these for quests and equipment upgrades: 8 Sunstones (from the Orc Warrior miniboss), 15 Orc Tokens, 15 Raw Meat (plus another 40 for cooking Shish Kebab food), 100 Coal, and roughly 200 Ironstone (just for making treasure keys) - plus another 10 Ironstone for a quest and 25 more for equipment upgrades.

Give Timmy his Bee Stingers and he says he'll have a present for you tomorrow. Alright, we have to wait for the carrots to grow anyway so go spend the day (and night) killing some monsters, maybe get some Orc Tokens to upgrade your sword. Then come back and Timmy gives you a Water Sphere and tells you to show it to Alby at his house, for the side quest "Unusual Experiment.". Alby rambles on about something or other. And now you can create new spells using his cauldron, and you can buy magic Spheres from Timmy to feed the cauldron.

Still waiting for those carrots to grow for Kiki's quest. Meanwhile, you could kill a few orcs for tokens to upgrade your sword, or you could do more farming and buy the first backpack upgrade from the Pumpkin Merchant. Or you can continue the story a bit, so let's go do that. Head to Byriver Field (where you fought your first orcs and got Timmy's bag), and head SOUTH to the Fortress Outer Gate.

At night, there will be Furry bats and Specter ghosts here, plus the miniboss Freddy O'Lantern will show up. During the day you'll find some Green Gooey, Forest Bees, and a new enemy - Rotten Onion. The miniboss is too difficult for you to fight right now, you need more power and a better robe (more magic defense). But when you do kill him he drops a Moonstone which is used in a spell or two as well as a couple of equipment upgrades, and it sells for $1000. During this quest ONLY, the door to the fortress will be closed if you get here after dark, you must be here during the day to enter the fort. After this quest, it will always be open for you. West of the exit there is a Silver Chest that needs a key. To the south there is a cemetery with two Wooden Chests. The one outside the fence has 3 Candy in it, the one inside the fence has $200. While you're here, you can try to pickup some items to use in quests and upgrades later: 1 or 2 candy, 15 cotton flowers, adn 6 moonstones (from the night-time Freddy O'Lantern miniboss). The clovers are basically useless so you can sell them.

Enter the northwest gate to reach Rivero Fort. This is a "big city" like Paw Village, one of only four zones that have NPC residents and only those two places have shops. Talk to Hazel, she's easy to find because she's a bright red tiger. She has a side quest for you, too, to bring a package to her aunt - Ms. Apple in Paw Village. We'll be heading back there soon anyway. Rufus the bear is a blacksmith, behind his shop is a wooden chest with an Earth Sphere. While you're here, see what he has for sale. At the northeast side of town is Kelly's shop, and behind that you can break a few boxes. In the center of town is the Inn. Selene is inside, you can sleep and save your game here, there is a Silver Chest that needs a key on the first floor, and there is a Wooden Chest with $200 upstairs. Pickle runs a restaurant just northwest of the inn. And in the southwest corner of town there is a Copper Chest that needs a key. And there is a storage chest beside the inn that you can use for your own stuff, it gives you two free Omlettes. The West exit will take you to Downstream River, but we're not going there yet. The East exit goes back the way you entered. For now, warp back to Paw Village and drop off the package for Ms. Apple (she runs the restaurant there).

Ms Apple rewards you with an Apple Pie for yourself, plus a package she wants you to deliver to Hazel in Rivero Fort; go do that now. Then Hazel will ask you to see if you can help fix the bridge to the west. Start by speaking with the blacksmith Rufus right here in the fort, then go out the west exit. That path is dangerous, Man-Eating Flowers and the Chompy miniboss await you over there (but there is also a Copper Chest that needs a key, and a Wooden Chest with 2 Honeycomb inside) so just RUN through the zone without fighting anything for now. The Man-Eating Flowers have thorns, meaning if you hit them with a sword you will take some damage. Chompy has buffs to his physical AND magical defenses, so he is very hard to kill. Both use poisonous attacks that are hard to dodge, too, and Chompy will probably kill you in a single hit. So just RUN AWAY for now LOL. Head out the southwest exit. In the next zone, talk to the guard by the broken bridge. He asks for several items brought to him one after the other.
  1. 20 Stone
  2. 10 Ironstone
  3. 10 Clay
  4. 10 Hard Shell

Bear in mind that the only way to get stone is to use your pickaxe on the plain grey rocks that spawn randomly on your farm and at the north end of Paw Village. They respawn VERY SLOWLY so it takes a long time to get stone. And you also need another 30 stone to repair the second storage chest on your farm, plus another 30 for the third storage chest. So gathering enough stone for all of that is pretty annoying - but by now you probably have enough for the first phase of this quest. Even so, it's easier if you just get ALL the items for this quest before you return to the broken bridge. So save the bridge for after you have everything. Ironstone is dropped by Orcs rarely, and sometimes by Forest Golems. Clay is dropped by the Forest Golems. Hard Shell is dropped by Shield Bugs in the freshwater swamp zones. For now, go back to Paw Village area and do some monster hunting and farming until you can get the second or third sword and some better armor, maybe also a helmet and some nice wings. Meanwhile, work on finding the materials you need for the bridge.

By now your carrots should be done. Show them to Kiki, get a reward, and then you still have the carrots so go sell them. Then Ms. Apple has another quest for you - she needs 9 Flour to make some cookies. This means you'll need to buy 18 Wheat Seeds from Kiki and plant them, they will grow in two days. While you wait for that, go murder more monsters.
Walkthrough Chapter 4: First Equipment Upgrades
Hopefully soon you will have made enough money *selling Pineapples* to afford the first backpack upgrade (from the Pumpkin Merchant), one or two sword upgrades, and some new armor. DO NOT venture into the Mountain Tunnel or the southern desert areas yet! We'll get there later.

Once your wheat finishes, go to Timmy's shop to turn it into 9 Flour. Bring that to Ms. Apple and she gives you a cookie, and you can now buy cookies from her. The next day, Ms. Apple will ask you for 20 Mucus. As a reward, you get a Monster Pudding and you can now buy that item from her shop.

Also go see Kiki, she starts another farming quest. This time she wants NINE each of three different vegetables. Might as well grow them all at once: potato, onion, corn. By the time you get the onions, Ms. Apple will have another quest, she also wants nine onions. But hey, you can bring her the SAME onions that you are growing for Kiki's quest because Kiki doesn't take them from you, she just wants to see them as proof that you know how to use the farm. Just turn in Kiki's quest before Ms. Apple's because Ms. Apple will take the onions - then you can buy Onion Rings from her. Ms. Apple also gives you a FIRE ORB for bringing the onions. When you accept the quest, Kiki gives you the potato seeds, but you have to buy the other seeds from her. You will keep all the veggies after you turn in the quest though, so you can cook them or sell them and make some money in the end.

There are a lot of items in this game. Looking slightly ahead, now that you've finished the "tutorial" section of the game and all the features and most of the locations are open to you, I want to give you an idea of what you will need for "early-game to mid-game" crafting and quest items. You only need the following items at this stage of the game, any extras can be sold for cash (though you might need to find more of them later):
  • Keep ALL of your wood, stone, coal, metal Ingots, and Ironstone. Never sell those.
  • Turn any copper, silver, and gold ore into ingots, then save the ingots to make weapons, armor, and keys from them later.
  • Turn any Honeycomb into Honey at the shop in Rivero Fort, then sell all but one of the honey.
  • Save up to 40 Raw Meat, 40 Bell Peppers, 40 Onions, and 40 Portabello for cooking with later.
  • Save ALL of your Vengeful Souls to buy magic spheres, which you can trade for magic spells.
  • You will need 5 Pineapples for a quest later, but the rest can be sold - at this point Pineapple will be your biggest profit item to sell.
  • As you unlock more seeds, you will want FIVE of each of these for various quests later: Pineapple, Kale, Strawberry, Grapes, Tomato. Keep that in mind while you're working on your farm.
  • You need 15 Orc Tokens and 5 Ironstone for your sword upgrade.
  • You need 25 Sap and 3 Copper Ingots for your next sword upgrade.
  • IF you're building bows, you want a big shroom and ten logs for the first one.
  • Then 15 vines and a miracle fruit for the second bow upgrade.
  • Then 20 clay and 3 Copper Ingots for the third bow upgrade.
  • For armor, you want 10 logs, 10 toadstools, 20 Ironstone, and 30 Clay.
  • For robes, you want 10 Bat Wings, 5 Cotton Flowers, 20 Hard Shells, and 30 Sap.
  • For hats you want 15 Toadstools, 30 Coal, 25 Wilted Flowers, 20 Huge Leaf,
  • For wings you want 35 Bat Wings, 60 Insect Wings, 30 Huge Leaf, 15 Amber, and 25 Wilted Flowers.
  • For magic spells, you'll want to save up: 10 Talisman, 10 Amber, 10 Clay.
  • You will need 2 Candy (well, only one but have an extra in case you fail the quest you can retry it).
  • You will need 10 Cotton Flowers for another quest, too, along with 10 Coal and a Turtle Shell.
  • You'll also want to keep about 8 of each item dropped by minibosses (Miracle Fruit, Sunstone, Moonstone, Turtle Shell, Pearl, Rainbow Scale, Coin Purse) for various things.

That list of "ingredients" covers pretty much everything you'll need up to the point where you have access to the Desert in the south and the Mountains to the north. When those areas open up, you'll have access to items like Snow, Blue Mucus, Hyena Token, and Obsidian. But it will be a while, so for now you should just focus on saving up those things I listed in the previous paragraph.

Meanwhile, keep growing Pineapple. Sell those, Honey, and any extra Amber that you find. They will make decent money for you. Eventually you'll unlock Pineapple Tarts at the restaurant in Rivero Fort, those sell for more money than plain Pineapples so switch over to those when you can. Onion Rings also sell for an okay profit, but first you need to grow Corn and Onions, then turn all the Corn into Oil. Pineapple Tart is better. You can also defeat the minibosses once per day once you have some better equipment. Amber (Forest Treants), Sunstone (Orc Warrior), and Moonstone (Freddy O'Lantern) will all sell for a ton of money, and they will continue to be high-profit items until the end of the game.

As you run around farming and doing side quests, you're trying to gradually upgrade your equipment at the Blacksmith shops. The weapons and armors each require the previous one as an ingredient in the upgrade recipe, the hats and wings do not (not usually). So you have to build the first bow before you can build the second bow, which you need before you can build the third bow, and so on. Before you cross the bridge that you need items to fix, and before you go through the Mountain Tunnel, you should have the following items ready:
  • Veteran's Sword or Gladiator's Sword
  • Squire's Bow or Composite Bow (OPTIONAL because bows have terrible attack power)
  • Iron Armor
  • Leather Vest
  • Mushroom Hat and then use it as an ingredient in Hunter's Hat
  • Miner's Helmet (later will be used as an ingredient in the Gold Hemet)
  • Flower Crown (OPTIONAL - the Hunter's Hat is better)
  • Evil Wings (Lifesteal is VERY NICE - you get a few HP back every time you hit an enemy.)
  • FOUR copies of the Dragonfly Wings (it's used as an ingredient in some better wings later)
  • Butterfly Wings
  • Banana Leaf (uses Butterfly Wings as an ingredient)
  • Also take a look at the spells in Alby's cauldron, decide which ones you want to buy and equip because the Fireball spell is greatly outclassed by some of the other spells.

When it comes to Wings and Hats, I find that the status effect resistances in this game are TOO SMALL TO NOTICE. So go for the LIfesteal, increased penetration (attacks ignore the enemy's armor), or increased defense instead of worrying about status resistances. No matter what equipment you wear, you're still going to get stunned, set on fire, frozen, and slowed very frequently if you don't know how to dodge.

So yeah, now you have some GOALS to work towards while we do some farming and finish some side quests. Nice.
Treasures and Points of Interest, part 2
See part 1 for the first third of the game, this is for the mid game, part 3 for the late game. Continuing on where that section left off, discussing points of interest at each location (including minibosses, treasures, and dungeon areas). SPOILER ALERT is still in effect.


Forest Sanctuary
north of east entrance - Gold chest - Bachelor Hat (+20% magic defense, +10% resist burn)
up the stairs - Wooden chest - 1 Amber

south of the staircase - Wooden chest - 2 Clay
top of staircase - exit to Forgotten Shrine (final dungeon)

East Freshwater Swamp
Wooden chest - southern east path - 2 Withered Flowers
Wooden chest - southern center path - 2 Eggs
Copper chest - southern west path - 3 Silver Ingots
Wooden chest - northwest path - 2 Honey
Gold chest - accessed from South Freshwater Swamp - Noble Hunter Bow

West Freshwater Swamp
Wooden chest - near southern exit - 100 Paw Pennies

South Freshwater Swamp
Wooden chest - southern end - 1 Cookie
Copper chest - western end - 2 Gold Ingots

Blue Moon Lake
Silver chest - go north around the lake - Demonic Bane (wings) (+15% Physical Penetration)Wooden chest - go west along the southern shore - 50 Paw Pennies
Giant Turtle Soldier miniboss - island in the center of the lake
Moonlight Flowers (quest item) - island in center of the lake

Mountain Tunnel Entrance
Copper chest - northwest corner - 3000 Paw Penniesore mining - scattered around in front of the tunnel entrance

Mountain Tunnel Passage
ore mining - inside the roped area, and a few spots on the east side
Wooden chest - inside the roped area - Paw Pennies
Dracuffy miniboss - north of the roped area
Wooden chest - southeastern wall - 2 Sandwiches
Gold chest - north of that Wooden chest - Forest Guard Sword


Treasure keys needed for the forest and swamp areas:
3 Copper, 1 Silver, 3 Gold


And now we continue into the southern desert areas:


East Sand Dune
go east to the upper level - Copper chest - 100 Paw Pennies
east side of main level - Wooden chest - 2 Gold Ingots
near south exit - Silver chest - 1 Earth Sphere


West Sand Dune
north wall - Wooden chest - 2 Copper Ingots
west wall - Copper chest - 3 Silver Ingots

south side - King Cobra miniboss
south side - key to Sea Cove (during quest to find the key ONLY)

South Sand Dune
west side, middle level - Wooden chest - 2 Talismans
southwest, upper level - Copper chest - 5 Copper Ingotseast end of the lake - Wooden chest - 50 Paw Pennies

Canini Beach
east end - Silver chest - Shark Hat (Physical Defense +15%, Resist Freeze +10%)
docks, under the canvas roof - Wooden chest - 5 Pineapple Seeds
west end on a little peninsula - Gold Chest - sword skill Ultimate Slash

west end - exit to Sea Cove

Sea Cove
1F east corner, north of the entrance - Gold chest - Elven Bow
1F northern wall - Copper chest - 3 Gold Ingots
1F - Greed miniboss
1F - Southwestern wall, hidden in an alcove - Silver Chest - Dark Wings (Speed +20%)
2F - Relic of Truth


Treasure keys needed for the desert area:
4 Copper, 3 Silver, 2 Gold
Walkthrough Chapter 5: Hunting Golems, and Entering the Swamp
A quick note before we continue. The Man-Eating Flower behind Rivero Fort tends to drop Wilted Flowers and Talismans, you will want 10 Talismans and 75 Wilted Flowers later but you can find them from other places where the enemies are easier to kill. Also, the Chompy miniboss is basically the hardest miniboss in the game, and he drops the Fairy Wings equipment, which provides 20% resistance to all status effects - the most useless item in the game. But it sells for $500.

So, now we enter the Forest Sanctuary zone in search of materials to fix the bridge south of Rivero Fortress. Just a reminder, we require:
20 Stone (found by mining around your farm and the north end of Paw Village)
10 Ironstone (dropped by Orcs and Golems)
10 Clay (dropped by Golems)
10 Hard Shells (dropped by Shield Bugs in the swamp zones)

We also need NINE each of the follwing vegetables if you're still working on Kiki's quests:
9 Potatoes
9 Corn
9 Onions
And remember, when you get those onions show them to Kiki BEFORE you give them to Ms. Apple for her other side quest.

And you can work on growing these vegetables now, too, and put them in storage for some quests later. Not all of these seeds are unlocked yet, but they will be before too much longer:
5 Strawberries
5 Tomatoes
5 Pineapple
5 Grapes
5 Kale

So, head into the Forest Sanctuary, it is WEST from the Forest Plantation where the orc camp is. There is a checkpoint here so you can activate that, then warp back here from town next time instead of walking the whole way. North of the entrance is a GOLD CHEST that needs a key. Halfway up the staircase, to the left, is a WOODEN CHEST with some Amber. At the top of the stairs is the entrance to the final dungeon, the Forgotten Shrine. It's currently locked. Just west of the bottom of the stairs is another WOODEN CHEST containing 2 Clay. To the Northeast is the exit to the Mountain Tunnel, but we can't go there yet. To the Northwest is an exit to the swamps, we'll have to go there soon to get some Hard Shell from some bug enemies, but not yet. First, we deal with a bunch of poisonous tree stumps, Treant Guardians who sometimes drop Amber, and a bunch of Golems that drop Coal, Clay, and Ironstone. You'll be farming this zone for a little while. When you have all the Stone, Ironstone, and Clay needed for the bridge quest, go turn in all three sets of items to the guard at the broken bridge. Be warned: the Golems have a buff to their defense, so magic is more effective than regular weapons. And they also hit VERY HARD so new armor is a MUST here. And on top of that, they will heal the other monsters while you're trying to fight them all. But they drop Clay and Ironstone, and you'll want a metric ton of Ironstone for making treasure keys later.

Go through the Northwest exit of the Forest Sanctuary to enter the East Freshwater Swamp. There is an exit in the northwest corner but we're not going there just yet. In this area, you want to collect 60 Insect Wings - just to build some WIng equipment for yourself, and you want 10 Hard Shells for the bridge quest, and another 20 Hard Shells for making armor upgrades. You might also consider getting 75 Wilted Flowers for helmet and wing upgrades, but you can always come back to get more of those later. This map has the following chests: Wood Chest on the southeast side (2 Withered Flowers), Wooden Chest in the center (2 Eggs), Wooden Chest on the northern end (2 Honey), and Silver Chest on the southwest side that needs a key. You can also see a warp checkpoint and a Gold Chest across the water to the west, but you have to go around through the next zone to reach it, so we'll go there later. The next two zones in the swamp will have the same kinds of enemies.

The West Freshwater Swamp has three exits - the east side where you entered, the south exit to more swamp, and the west exit goes to the lake. The southern path has a Wooden Chest with $100 just before the exit.

The South Freshwater Swamp is very small, full of bugs. The wooden chest has a Cookie, and there is a Copper Chest that needs a key. Go east to reach a checkpoint that lets you warp OUT but not back in, and a Gold Chest htat needs a key.

The west exit to the lake leads to Blue Moon Lake. In here you'll meet more gooeys, Flower Pixies, and a turtle miniboss. The Pixies are dangerous in groups because their attacks are FAST and will stun you for several seconds. So you might dodge the first one, but the second pixie will hit you and then the third, fourth, and fifth get free critical hits while you can't move. So be careful, try to fight them one at a time. While you're here, try to pickup some items to use later: 50 Huge Leaf from the Pixies, and 8 Turtle Shells from the miniboss... but you might need better equipment to kill the turtle. There is a Wooden Chest with $50 on the south side of the lake, There is a Silver Chest that needs a key on the north side of the lake. And the turtle miniboss has a defense buff so magic works better than weapons against him, he has a ton of HP, and his attacks are devastating.
Walkthrough Chapter 6: Intermission, second armor upgrade
Back in Paw Village, when you finish Kiki's three-veggie side quest the chief will have another request for you. He wants you to talk to his granddaughter and convince her to stop playing in the woods. Go talk to her, she says she wants to collect some Blueberries to make a pudding for Oliver's birthday present. Believe it or not, you don't have to grow Blueberries on your farm. Go to the Forest Plantation and look for three SPARKLING bushes, these are the blueberries. Each one will take a few seconds to harvest, meanwhile you'll have to be careful not to get killed by the orcs. Bring the blueberries to Erin. Then go talk to chief Oliver, and you have a choice to lie and say she was studying plants, or tell the truth to ruin the surprise.

Meanwhile... you're probably finished collecting materials for the broken bridge now, so bring them to the guard by the bridge. Then go tell Rufus the blacksmith that you got the materials so he can start work on the bridge. Come back the next day and the bridge will be completed. Now you have to report to Hazel (the tiger in Rivero Fort), she'll ask you to deliver a message to Canini Beach, which is through the southern deserts across the bridge you just fixed. We'll go there soon.

With the blueberry quest done, if you have a piece of candy in your backpack and you walk around Paw Village in the afternoon, when all three kids are hanging out together in the area behind Ms. Apple's shop, you can talk to Car to start another little side quest. He wants candy. If you give it to him, the quest ends... but if you have another piece of candy you can talk to him again to restart the quest. If you tell him "no" then he gets sad but Ms. Apple will have another request for you. She'll thank you for not spoiling the kids, and then she'll ask for some help making them a more nutritious snack. go kill 20 Rotten Onions, you don't need any items for this one, then come back. She asks you to give juice to Caramel. Do that, and then report back. Now you can buy Vegetable Juice from Ms. Apple, and she gives you a Wind Sphere.

With the bridge built, Shamrock the blacksmith has a job for you. He left his hammer in the woods and wants you to go get it. It's just outside the entrance of the Mountain Tunnel, which is the northeast exit from Forest Sanctuary, it used to be closed off but not it's available to you. Bring your PICKAXES, there are some ore deposits there. There is also a Copper Chest that needs a key. Grab the ore, get the hammer, and report back to Shamrock. Then go talk to Oliver about the blocked tunnel entrance. He tells you to ask Shamrock for more details. Go talk to Shamrock again, and he asks you to gather some materials: 10 Cotton Flower, 10 Coal, and 1 Turtle Shell. Before fighting the turtle miniboss at Blue Moon Lake, you will want at least the Gladiator Sword and Iron Armor crafted and equipped. He hits hard and has a ton of HP.... or you could spend $5000 to buy a Turtle Shell from the Pumpkin Merchant.

Now go talk to Kiki, she has another test for you. She gives you some Silver Ore and asks you to go to Shamrock and upgrade your Watering Can. You don't need to talk to Shamrock for this, only use his shop. Turn the Silver Ore into Silver Ingots, then upgrade your old watering can to silver, then go back to Kiki and show it to her. You get paid AND she replaces the Silver Ingots you used for your watering can. This is the only quest that asks you to upgrade anything, so it is now safe to upgrade your tools to SIlver and then Gold whenever you feel like it. NOTE: if you already upgraded your watering can to GOLD and so you no longer have access to the silver one, you can buy another basic one from the Pumpkin Merchant. But then you'll be stuck with an extra watering can FOREVER since you can't drop it or sell it.

At this point, if you can buy and equip the Leather Vest, Gladiator Sword, and the Tornado magic spell then you can also go fight the Freddy O'Lantern miniboss in the field outside the Rivero Fort at night. He drops Moonstone, which is worth $1000 and you'll need to save six of them if you want all the equipment upgrades and magic spells. You can also defeat the King Goo, Turtle Soldier, and the Orc Warrior, but for them you want the Iron Armor equipped instead of the leather vest. You'll want to save up 8 Sunstones, 8 Turtle Shells, and 4 Miracle Fruits (including the ones needed for things you might have already bought). After that, you can sell any extras. What I'm saying is, this is a good time to make sure you know how to hunt minibosses. :)

When you are strong enough to defeat the turtle miniboss without too much trouble, bring the Turtle Shell back to Shamrock and he'll give you a Silver Key as a reward. Now return to the Mountain Tunnel Entrance with the dynamite you got from Shamrock. Put it in front of the blocked entrance... and you'll have a cool little boss fight. If you're lucky, it will drop a Copper Key... the Copper Chest nearby has $3000 in it. Warp back to Paw Village and tell Oliver that the tunnel is open. After this, the tunnel will open so you can use it. You will not yet be allowed to exit the other end of the tunnel, but if you go in there are a few points of interest:
  • A big fenced-in area with a lot of ore deposits you can mine with a Pickaxe in the center.
  • The Dracuffy miniboss (come equipped with your best Magic Defense items and maybe Stun Resistance), who dropps the Evil Bone Wings that add 10% Lifesteal to your normal attacks!! He's usually just north of the ore mining area.
  • A wooden chest inside the fenced mining area, has some money in it.
  • A wooden chest on the southeast wall, a ways past the mining area, has 2 sandwiches.
  • A golden chest just north of that wooden chest.
  • An unconsious man on the ground, we'll come back to rescue him as part of a quest.
  • The south exit goes back to the forest. The north exit leads to East Karst Field, aka the snowy mountain area... but it's currently locked.

Be sure you talk to the unconscious man near the north exit! You need to finish his potion quest before you can leave through that exit. Since you can't continue through the tunnel yet, once you have some ore stockpiled and you get the wings from Dracuffy (From now on you can either wear these wings, or bring lots of food to restore your HP, you don't need both.) you need to go back to Rivero Fort.
Walkthrough Chapter 7: Race up the mountain
The next morning after you opened the tunnel, Hazel shows up at the tunnel entrance. Then you get a message from Oliver that Alby wants to see you.

Talk to Kelly in Rivero Fort about the unconscious man in the tunnel. She knows a remedy but you need to kill 20 Katapila bugs in the swamp first. Just kill them, no need to pickup the items for this.
When you finish killing Katapilas, go back to Kelly. She gives you a potion recipe, take it to Pickle and he'll make the potion for you. You need ONE of each of the potions for the unconscious guy (it's in your Quest Items bag), and there is one for you to keep (sell it). Now go visit Alby in his house and tell him about the tunnel, he'll ask you to go north to the mountans.

Ok, head back into the tunnel and give the potions to Basil. The north exit will then open up for you. I promise you, we will come back this way later for a complete exploration of the snowy mountains. But for now, your equipment is too weak for this, you will die if you try to fight the enemies here. So we're just going to RUN up the mountain as quickly as you can. Don't bother opening any treasure chests or breaking any crates for now, that's how you die. Just KEEP MOVING. Eventually you'll reach a warp checkpoint, go ahead and activate it. The next zone north of that is a small village. The lady there asks you to bring her some food. This zone is safe, the only enemies in the village are the blue gooeys and they are peaceful unless you attack them first. There's a small mining area north of the village, I hope you brought your pickaxe. While you're here, you can collect the 20 Blue Mucus that you will need if you want to make a certain helmet later. Then if you just want to complete your world map, you can go north to the next zone... but don't stay there, just come right back into the village.

As I said, this area is pretty tough and if you're upgrading your weapons and armor we don't need any items from the mountains until AFTER we go through the desert down south. So at this point we're going to switch our focus to the south.

Back in Paw Village, be sure to talk with Timmy. He asks you to take 5 Pineapples to Kelly in Rivero Fort, and he even gives you the money to buy 5 Pineapple Seeds. remember they're sold by the Pumpkin Merchant who shows up at night. If you already have 5 Pineapples, grab them. If not, grow some now. You will also need a Miracle Fruit, which you can get by killing the King Gooey miniboss in the West Paw Field, so get one of those now. Then head to the Fort.

Okay now you will be doing a bit of running back and forth, for some fetch/deliver quests. Everyone will want you to see Pickle for something, so save Pickle for last just to reduce the running back and forth.
  1. Give those Pineapples to Kelly, she sends you to Pickle. While you are here, buy 2 eggs that you'll need in about three minutes for another quest. Also go ahead and turn all your beehives into Honey, since you're already here, you can sell it later.
  2. Now go outside the gate to the east, a guard forgot his lunchbox.
  3. Go to the inn, talk to the guard at the first table (he has a name) about the lunchbox. He sends you to see Pickle, and pays for the lunch since he ate it already.
  4. Talk to Selene in the inn about getting some food for the mountain village. She sends you to Pickle.
  5. Go talk to Pickle and he asks for a Miracle Fruit, so give that to him now.
  6. Talk to him a second time to give him the Pineapple Tart recipe, and now you can purchase Pineapple Tarts from him. If you've been stockpiling Pineapples waiting for this recipe, now is the time!
  7. Talk to Pickle again (about the guard's lunch) and he'll ask for two eggs. You should already have them, so...
  8. Talk to Pickle AGAIN and give him the eggs, and he'll give you a sandwich for the guard.
  9. Go talk to Kelly again to complete that quest.
  10. Go back outside and give the guard his Sandwich.
  11. Then turn around and talk to Hazel about sending guards up the mountain.
  12. Then go back to Paw Village and talk to Ms. Apple about food for the mountain village. She needs a Pumpkin, which you can trade to the Pumpkin Merchant... but you need a Pearl to do it. So we'll get that later.
  13. For all this running around, you end up with a Pineapple Tart (sell it) and an Earth Sphere. You can also now purchase Pizza, Sweet Potion, and Berry Burst Juice from Pickle.
  14. In Paw Village, on a night where the date is a multiple of THREE, find the Pumpkin Merchant and talk to him about pumpkins... but first, SEE THE NOTE BELOW.
  15. At night, feel free to kill Freddy O'Lantern again to get another Moonstone if you need it, then go to the upstairs room of the Inn at Rivero Fort to meet with Hazel.

WARNING: Missable Side Quest and Achievements
FAIR WARNING: When you talk to the Pumpkin Merchant about the pumpkin quest, there are options and picking the wrong one could lock you out of a side quest and TWO achievements. During the dialogue, you accept the deal and then you just accept his price: one pearl for one pumpkin. This will unlock the next side quest AND an achievement will pop when you complete the pumpkin quest, and since you finished this hidden side quest you also should qualify for the achievement they give you for completing ALL the side quests. However, if you are not concerned about achievements, you can haggle with the merchant to get extra pumpkins. If you tell him the price is not fair, he goes up to TWO pumpkins for a pearl. You could take this deal, but if you again tell him it's not good enough, then he'll offer THREE pumpkins for one pearl. If you want extra cash rewards (from selling your two extra pumpkins) but you don't care about achievements, you can take the extra pumpkins. But if you are hunting for all achievements, just take the first deal as offered.
Walkthrough Chapter 8: The Southern Desert
From Rivero Fort, take the west exit and go across the bridge that you fixed a little while ago. This path leads you to the desert, and eventually all the way to Canini Beach.

New enemies! There are Hyenas (archers and soldeirs) that will drop Hyena Tokens, Fangs, and Raw Meat. And there are Arnewts (red lizard-men) who are passive as long as you don't hit them first. Those drop Obsidian and Talismans. They hit hard and are hard to kill so be careful. The obsidian sells for $200 so you'll want to collect a lot of it.

If you are trying to get all the equipment upgrades, you will need 100 Obsidian, 50 Hyena Tokens (plus 10 more for a side quest), and 45 Fangs - in addition to the other things you've been collecting so far. The King Cobra miniboss in the western area drops Rainbow Scale, and you will need 6 of those to buy all the equipment and spells. But I think you are still too weak to fight the big snake. When you finish the desert zone, you will find another miniboss inside the Sea Cove cave, west of Canini Beach. He drops the Coin Pouch that is worth $2500 if you sell it, but you need FIVE of them for equipment and spells, but the door to the cave will be locked when you get there.

You start off in the Eastern Sand Dunes. There are a few points of interest here.
  • If you take the little trail around to the east and up the hill, there is a Copper Chest up there, it needs a key.
  • Just south of that, on the main ground level, is a Wooden Chest.
  • Then there is a Silver Chest that needs a key just west of the southern exit.
  • The east exit goes back towards the fort.
  • The south exit goes to South Sand Dunes, then continue towards Canini Beach.
  • The west exit goes to West Sand Dunes, where you can fight the King Cobra miniboss.
Just to complete the map, take the WEST exit.

The Western Sand Dunes has a few points of interest:
  • King Cobra miniboss - stay away from him for now, he will kill you with his crazy magic spells.
  • Lots of crates to smash for some free pennies.
  • In the eastern area is where you will find the key to Sea Cove - but it only appears later when you are on the quest to open the cave.
  • The north wall has a Wooden Chest.
  • The west wall has a Copper Chest that needs a key.
  • New enemies: Treasure Goblin, they drop metal ingots.
When you're done exploring here, go back to the East Sand Dunes, then take the southern exit from there.

The South Sand Dunes looks pretty similar to the other two desert areas. Same enemies, too.
  • The eastern wall has a Wooden Chest.
  • If you go to the northwest corner and climb up the ramp onto the little hill, there is another Wooden Chest there.
  • Go south along the top of the hill to find a Silver Chest that needs a key.
  • Remember to activate the Warp Checkpoint before you leave.
  • The south exit leads to Canini Beach.
Let's go to Canini Beach now.

Talk to the innkeeper to deliver Hazel's message about the soldiers. ... Somehow the soldiers got here before us so I guess the message was pointless. Sometimes (I haven't figured out the schedule yet) the Pumpkin Merchant will show up in town in the afternoon. He sells fresh veggies instead of seeds, and his list of ores for sale includes Moonstone and Sunstone in addition to Turtle Shell and all three metal ores. If you go east past the dock, there is a Silver Chest that needs a key. And on the dock there is a Wooden Chest hiding under the canopy roof, it has 5 Pineapple Seeds. If you go all the way to the west corner and up a little hill, you'll find a locked door. That will eventually lead to the Sea Cove.

Time for some more fetch/deliver quests!
  1. Talk to the lady at the beach, she mentions the nearby cave but wants help making the area more attractive to tourists.
  2. Go see Kelly in Rivero Fort. She sends you to Pickle.
  3. Before you see Pickle, get FIVE tomatoes and FIVE grapes. Then talk to Pickle and give him the tomatoes Talk to him again and give him the grapes. He'll give you a Silver Key, and some food for the beach.
  4. Return to Canini Beach and talk to Sunny. Her dialogue suggests you should talk to Capri, but nope...
  5. Your next stop will be Sage Alby's house again.
  6. The key is located at the east end of the West Sand Dunes zone.

WARNING: before you continue, be sure you have THIS equipped:
  • Gladiator Sword
  • Hunter's Vest
  • Gold Helmet
  • Wings - either the Evil Bone Wings or the Banana Leaf
  • Recommended Spells - Tornado, Earth Blades, and Ultimate Slash if you found it already.

Once you have the the key, come back to Canini Beach and enter the cave on the west, to the Sea Cove. If you go around the lake to the northeast corner, there is a Gold Chest. There is also a Copper Chest on the northern wall just east of the exit to the next room. The southwestern wall hides a Silver Chest, you can barely see it because of the camera angle. You will also find the miniboss Greed, who drops Coin Pouch items. You have to kill ALL the enemies including Greed to open the exits. The next room only has one thing in it: the Relic of Nature.

Clear all the small enemies out of the Sea Cove first, try not to get Greed mad at you until they are all dead. Before you fight Greed, but after you kill all the little enemies, equip the Elven Bow (you find the bow in the Sea Cove in a Gold Chest) and Hunter's Hat because his magic attacks are kind of insane. When Greed is dead, put the Gold Helmet and Chain Mail on, but keep the Bow until you upgrade your sword again. WIth this equipment, you can survive in the mountains later, too.

When you exit the cave, you'll have a conversation with Jet and then you'll face a boss fight - it's the same giant turtle as the miniboss in Blue Moon Lake, but this one doesn't drop anything (maybe a Copper Key) when you kill it. Win the fight and you get the bow skill. Warp back to Paw Village, take a minute to organize your items in storage and sell whatever you don't need, upgrade your equipment if you feel like it. Then go see Sage Alby at his house to tell him what happened at the Sea Cove.

NOTE ABOUT EQUIPMENT
What you have now will do fine until you collect enough materials to upgrade your sword and armor again. In the mountain area, just like the desert, the small enemies mostly use physical attacks so you want physical defense. If you fight Greed or King Cobra, you want MAGIC DEFENSE all the way, they have INSANE magic attacks. If you fight the Snowmonster, use a Magic Defense robe paired with the Gold Helmet because he mixes nasty magic with some big physical attacks. For the Crystal Guardian coming up later, he's all physical attacks so stack your physical defense.
Treasures and Points of Interest, part 3

West Karst Hills
Crystal Cave key (ONLY during the quest to find the key) - path west of southern entrance
Wooden chest - between two trees, north of the south entrance - 1 Cookie
Copper chest - eastern wall by south entrance - 5 Copper Ingots

East Karst Hills
Wooden chest - northeast of the wooden bridge - 222 Paw Pennies
Wooden chest - in the central clearing - 1 Talisman
Silver chest - northwest from central clearing - 1 Wind Sphere
Snowmonster miniboss - central clearing

Mountain Field
Wooden chest - under a tree on west side of village - 5 Kale Seeds
Gold chest - path wraps around east, then south, from village - bow skill Ultimate Shoot
Ore mining - north of the village

Icy Mountain
Wooden chest - west wall at the intersection - 1 Copper Ingot
Copper chest - northwest corner, under the suspension bridge - 2 Gold Ingots
Wooden chest - north of Crystal Cave exit - 5 Tulip Seeds

Exit to Crystal Cave - northwest across the suspension bridge

Crystal Cave
1F, Copper chest - north wall not far from the east exit - 2 Gold Ingots
1F, Silver chest - alcove south of east exit - Black Dragon Wings (15% Magic Penetration)
1F, Gold chest - alcove south of west exit - 5 Copper Ingots

1F, Crystal Guardian miniboss - west end, near exit to 2F
2F, relic - central platform
2F Gold chest - north of the relic - Dragon Slayer sword

Forgotten Shrine
1F, end of eastern path - Silver chest - 4 Herbal Teas
1F, central intersection: Chompy miniboss, no drops
2F, Dracuffy miniboss, no drops
3F - Final Boss Fight


Treasure keys needed for the tunnel, mountain, and shrine zones:
3 Copper, 3 Silver, 3 Gold
Walkthrough Chapter 9: Exploring the Mountains
Return to Paw Village, around noon, and Caramel will ask you to take him with you. But the other kids talk him out of it, and he asks for a foreign dessert instead. Go see Pickle and bring him FIVE Strawberries. Now you can purchase Parfaits here. Go back and give the thing to Caramel.

Now head to the East Karst Hills. We've been here before so the warp checkpoint is unlocked. We're on a mission to check out a cave that is on top of the mountain to the north, so we're going to rush up to that and inspect the cave FIRST, then explore the area kind of in reverse as we come back down the mountain. First things first: you WANT to use a bow in this area. The Stone Fiend enemies have Thorns so you take damage if you use a sword on them. And the miniboss Snowmonster uses HUGE area spells and it's hard to get within melee range on him without getting killed. So this is the only point in the game where a bow is better than a sword. And hey, you've got a bow that - at this level - does just as much damage as your best available sword (the Elven Bow = the Gladiator's Sword but with long range and more critical hits).

So from the teleport, go north into the village, there is a Gold Chest with a bow skill Ultimate Shooter down a path to the east, and a Wooden Chest hiding under a tree on the west side, near the houses. Now that we're here, we can't actually DO anything until we finish that Pumpkin quest from waaaay long ago back in Paw Village. So go south to the next zone, where the warp checkpoint is. If you continue west from there, you'll meet up with a miniboss - the Snowmonster. He hits SO HARD with his claws, has some crazy ice and wind magic for freezing and stunning, and he's basically a beast. Plus all the Stone Fiends running around will try to stun you all the time, too. But you have to kill the miniboss to get a pearl. So the spells "Crimson Meteor" and "Tornado" will be your best friends in this fight. Just near Snowmonster is a Wooden Chest with a Talisman inside. To the northwest is a Silver Chest with a Wind Sphere. A little further south is another Wooden Chest with $222 in it. Grab all the chests since you're here, then go back to the teleporter by the village. (We'll do the southern path later, on our way back down the mountain after investigating the cave on top.)

Then, on a night where the date is a multiple of 3, go back to Paw Village and give the Pearl to the Pumpkin Merchant in exchange for however many pumpkins (1 to 3) you negotiated for earlier. Then give the Pumpkin to Ms. Apple the following morning when her shop is open, she only wants one so if you got extra pumpkins you can sell them. You'll now be able to make Pumpkin Stew here, and you get an Earth Sphere.

Back in the mountain village now... give the stew to Frosty. Now that Basil has some hot stew in his belly, he'll tell you a legend about a dragon and the eternal winter, and you learn that the dragon's cave is at the top of the mountain. That's where you need to go next. So go past the little mining area north of the village to the next zone, the Icy Mountain. After a little scene, you find yourself just outside the cave and you need to find the key. North of the cave is a Wooden Chest with some Tulip Seeds. Cross the rope bridge, on the other side is a strange red orb/portal sort of thing there, but it serves no purpose, just background art. As you go down the trail, there is a Wooden Chest with a Copper Ingot on the west wall. Go under the suspension bridge and find a Copper Chest with some gold Ingot against the wall on the southwest side of the little field.

Now hoof it all the way down the mountain. Go past the village. Go past where you fought Snowmonster for the pearl. Try to kill him again if you can, you'll need a few pearls for weapons and spells. Cross the wooden bridge to the south, and enter the West Karst Hills zone, which is the one right outside of the mountain tunnel exit. There is a Wooden Chest with a Cookie between two trees due north from the tunnel's exit, and a Copper Chest hiding in a corner under a tree (totally invisible, you have to walk right up to it until you see the "Open" prompt). The enemies in this zone are "friendly" unless you attack first, so you can take your time here. On the southwest corner is a little alley that leads to the key for the Crystal Caverns. Grab the key.

TIME OUT - before we go into the cave it's time to do more side quests and upgrade our weapons and armor.
Go back to Paw Village and go to bed. In the morning, Kiki has a request for you. Bring FIVE Kale and ONE Honey to Ms. Apple. Ms. Apple will turn that into a Kale Salad. Bring it back to Kiki. You can eat or sell the one that's left in your backpack. Now you can make Kale Salad at Ms. Apple's restaurant.

Then head to the mountain village again. Frosty will ask you to bring something hot to drink for the guards. While you're here, grab 10 Snowflakes for this quest. Go back to Ms. Apple. Talk to her once to ask about the drinks, and again to give her Snowflakes. Now bring the drinks to BOTH of the guards in the mountain village. You'll get a Wind Sphere for finishing the quest, and now Ms. Apple can sell you some Herbal Tea. While you're here, go ahead and kill Snowmonster again for another Pearl.

Head to Rivero Fort, talk to Selene at the Inn. Go get 10 Raw Meat and 10 Portabello mushrooms, then talk to Pickle. Give him all the ingredients and he'll give you food for Selene's sisters AND extras for you (eat them or sell them). Now just hop back over to the Mountain Village and give one to Frosty. Then go to Canini Beach and give the other one to Sunny. You get a Fire Sphere and now Pickle will sell you his Hamburger and Mushroom Stirfry. While you're in the desert, you can try killing Greed and the King Cobra to earn some rare items for upgrading your equipment. And make sure to get 10 Hyena Tokens for the next quest.

Go to bed. Next day (it MIGHT need to be the next RAINY day), do your boss run and then go to Canini Beach. Talk to Capri, he sends you to Pickle in Rivero Fort. Try to give Pickle the Hyena Tokens but he doesn't want them, go give them to Rufus instead. Then go see Pickle again. Now he'll sell Shish Kebabs whenever you want some. Take the package back to Capri at the beach, get a Silver Key from him.
Walkthrough Chapter 10: Best Equipment, Crystal Caverns, and Fight a Friend
You'll need to fight some minibosses. At this point, if you've been careful about keeping your weapons and armor all upgraded so far, you will probably still need a few of the Coin Pouch, Pearl, and Rainbow Scale items to get those last few equipment upgrades and magic spells. And it gets pretty expensive in terms of Paw Pennies, too, so you'll have to do some farming and sell those Onion Rings like crazy for a few days to get it all.

The Pumpkin Merchant sells two upgrades for weapons you should have found in Gold Chests (one in East Freshwater Swamp, one in the Mountain Tunnel Passageway). Those weapons are PHENOMENAL - basically the second-best weapons in the game. But they are VERY EXPENSIVE at $75,000 EACH!!! So I leave it up to you whether you want to buy those or keep upgrading your normal weapons. The final upgrade from Shamrock is actually stronger than the weapons from Pumpkin, and cheaper. But you'll have to fight the hardest minibosses a few times to get enough items to get Shamrock's weapons done. Also make sure to get your armor and robes done. From this point on, we'll be fighting some ridiculously tough enemies. I'll wait while you get your equipment up to spec.
...
...
Okay, ready to roll? Nice. First thing, this is TOTALLY OPTIONAL. There is a miniboss named Chompy who we skipped previously. He lives next to the river, behind the Rivero Fort. He has very strong magic attacks, plus an incredibly deadly poison shot attack. But with the best robe in the game, and a helmet with a lot of magic defense, you can take him down now. He drops the Fairy WIngs, which offer 20% resistance to all status effects. Personally, I find this item to be cute, but functionally useless. What you should be doing for wings is: in combat, run with the Evil Bone Wing for its Life Steal. That way you never need to eat or sleep again, MWAHAHAHAHAA. When you're not in combat, i.e. just running around town or trying to get through an area in a hurry, use the Banana Leaf for its 30% speed boost. Man, after wearing the banana leaf for five minutes, everything else just feels SSSSLLLLLOOOOWWW. Am I right? Alternatively, set the Shish Kebab to a hotkey. It heals your HP but also gives you Lifesteal for a minute. Then you can run around with the Banana Leaf wings and still feed off your enemies.

Alright, when you're fully equipped, head to the top the mountain, across the rope bridge, and into the cave. Right beside the entrance is a Copper Chest (2 Gold Ingots). Then to the south is a Silver Chest (Black Dragon Wings). On the west side of the room, in little alcove south of the exit, is a Gold Chest with some Copper Ingots. Then of course there is the Crystal Guardian miniboss. This guy primarily uses physical attacks, and has a buff to physical defense. So magic kills him faster than your sword, and wear an outfit with high PHYSICAL defense. Keep that outfit on after you kill him for the next boss fight, too. This guy will drop a Tiara and sometimes a Silver Key.

You have to kill ALL the enemies here to open the exits. Proceed to the next room to the west. In there, you'll find a Gold Chest behind the relic pedestal, make sure to get the chest before you touch the relic. This chest has the Dragon Slayer sword, which would have been GREAT except you probably already have a better sword equipped. So sell the thing. Then get the relic and leave.

Something invisible steals the relic (I think the programmers forgot to add the animation of Jet jumping out at you LOL.) Leave the cave and you'll immediately have to fight Hazel to keep her from taking the relic. She uses PHYSICAL attacks with STUN effects, has a Physical defense buff, and is VERY strong. Just drop a Crimson Meteor followed by a Tornado and she'll drop like a ton of bricks though. If you lose this fight, you have to come back and try again. When you win this fight, you get the ultimate sword skill: Shock Wave. Equip this before you do anything else!!

Now head to Sage Alby's house and give him the final relic. ... Except he doesn't seem to be home. You'll find him wandering around the entrance of the Mountain Tunnel, I guess he's investigating what's left of the big golem. He'll tell you to come see him in the morning, but he won't be home then either. If it's getting late, just go home for the night.

Jet shows up at your house, just to talk this time. And he asks you to come to the inn at Rivero Fort and speak with Hazel again. So let's go do that now. Once you get there, she'll ask you to meet her outside at the waterfall, which is just outside the WEST exit from Rivero Fort, the area where Chompy lives.
Walkthrough Chapter 11: Final Battle
Go to the waterfall at Downstream River (use the WEST EXIT from Rivero Fort) and talk to Commander Hazel. The sky turns RED... this is how you know it's time for the final dungeon. The NPCs will have new dialogue, they all are disturbed and a little afraid of the red sky.

BUT... if you want to finish all the side quests and unlock the final seeds and recipes, there is one quest line left. Some folks say you need to wait for the day AFTER a rainy day for this, but I don't think so - I've gotten it 2 or even 3 days after the rain. But I've only seen the quest happen DURING the red sky so possibly you might miss the quest if you just go beat the game without finishing the quest first. Anyway, be in Paw Village just before noon, talk to the chief and he wants you to ask Ms. Apple if she has a remedy for sore throat. She sends you to the Blue Moon Lake. There are three SPARKLING bushes on the island in the middle of the lake. You'll probably have to kill the giant turtle to get to them. Grab the flowers there, give them to Timmy back in Paw Village. After he checks them, give it to Ms. Apple and she will brew a tea from it. Give the tea to Oliver. For your efforts, you get a Water Sphere and a Wind Sphere, plus you can now buy Tulip Seeds, Sunflower Seeds, and Herbal Tea here in Paw Village.

If you have any side quests remaining, or any more crafting updates you need, or any spells you want to buy, DO IT NOW. Make sure you're prepared for some big crazy fights! Bring lots of healthy food, too!

Go to the Forest Sanctuary. Talk to Hazel and Jet again. Climb up the stairs. WARNING - POINT OF NO RETURN - ONCE YOU ENTER THE DUNGEON YOU CANNOT EXIT UNTIL YOU FINISH IT!!! Of course, if you die in there you wake up in your bed so that's one way to leave, I suppose. But once you walk in, you can't walk back out until it's over. Talk to Jet one more time to open the gate to the Forgotten Shrine.

The first floor has a bunch of bugs and bats, as well as those nasty plants that throw poison bombs. In the middle of the room is another Chompy, but it doesn't drop anything when you kill it. Practically everything in here has Thorns and will do damage when you hit it with a sword (but not ranged attacks with a bow or magic). Fortunately, your sword is so strong that if you have LIfesteal you will heal more than the damage from Thorns. But there are SO MANY monsters you'll probably die once or twice before you get through here. Go east from where Chompy is, follow the path all the way to the end to find a Silver chest with some Herbal Tea inside. This stuff is nice, gives you a buff to magic defense. This is the LAST treasure chest in the game!! Back where Chompy is, kill him. Then go north.

The second floor has a lot of Fluffice (strong bats) enemies. It also has a Dracuffy you need to kill, but he doesn't drop anything. Keep going north. Equip yourself for Magic Defense and Lifesteal, and bring your strongest Sword.

The third floor is just the FINAL BOSS FIGHT. Sage Alby will use a ton of powerful magic spells to try to kill you. When the fight starts, drink an Herbal Tea, maybe also eat a Shish Kebab. Then unload on him with Crimson Meteor and Tornado spells and some strong sword skills until you defeat him.

Back outside, Alby says goodbye to Hazel and says he needs some "alone time" so he leaves. Hazel and Jet thank you. And that's it. Then the credits roll, they're not too long.

You can keep playing. If you need any side quests, or if you missed a crafting upgrade, or if you want to kill 3000 enemies for the achievement, or whatever... you can just keep playing. But technically this is the end of the game.

I hope you had fun!! Bye!!
Final Thoughts
If you've done all the quests, bought all the spells and equipment, killed 3000 enemies, and unlocked all the Achievements, then technically you're all done. Yay, you beat the game! But you can keep playing. Do some more boss runs, or just spend your days farming only to see how much money you can collect. If you feel like it. LOL.


Well, that's all I have for you. This thing was LONG, but I wanted to be thorough. Feel free to leave questions or comments... but please bear in mind these two things:
  1. I am NOT involved with the team that developed this game, just a player.
  2. I just beat it three times to make this guide, so I might not go back and play it anymore... thinking about uninstalling it now.


  3. Hope you enjoyed the game, hope I gave you enough help to figure things out if you got stuck. Happy gaming!
20 条留言
8matchii 2 月 23 日 上午 1:13 
Thank you for the extremely detailed, thorough guide! :pleased: :inloveprism:

I'm certain it took a lot of effort and time to put all this information together. That's really appreciated!
Grillbrick 2024 年 3 月 1 日 上午 10:17 
I actually finished the last sidequest BEFORE talking to Hazel. I needed to wait for nightfall anyway and it was around 1300.
repeat2400 2023 年 11 月 13 日 下午 11:49 
You can cheese Chompy with the bow by standing so he's just at the top of your screen. The arrows will clip through the walls, still hitting him
KAIIRU 2023 年 10 月 31 日 上午 4:15 
The lake pixies may be more profit than honey. I was having relatively bad honeycomb drop rates, maybe 2 per clear. But the huge leaf is a guaranteed drop for about half the profit of honey but 5-6 per clear + chance of amber (1k) + insect wings are double profit of bee stingers. And you can grab a turtle shell per day while there.
Mr. Moyer  [作者] 2023 年 7 月 1 日 上午 9:40 
Oh I see it now... I was looking at the entry for it in the walkthrough section. Fixed it. Thanks.
ninglor03 2023 年 6 月 29 日 下午 8:10 
Huh, that's weird. It's the first line under "hats, helmet and wings" and says it's a silver chest. At least it's says so for me :lunar2020thinkingtiger:
Mr. Moyer  [作者] 2023 年 6 月 29 日 下午 7:01 
Wait... no... I already have it listed as a copper chest. I think you were just reading the wrong line?
Mr. Moyer  [作者] 2023 年 6 月 29 日 下午 7:00 
Oh thx. I'll see about fixing it in the guide.
ninglor03 2023 年 6 月 29 日 下午 12:03 
Silver chest - in Sage Alby's house - Mage Hat

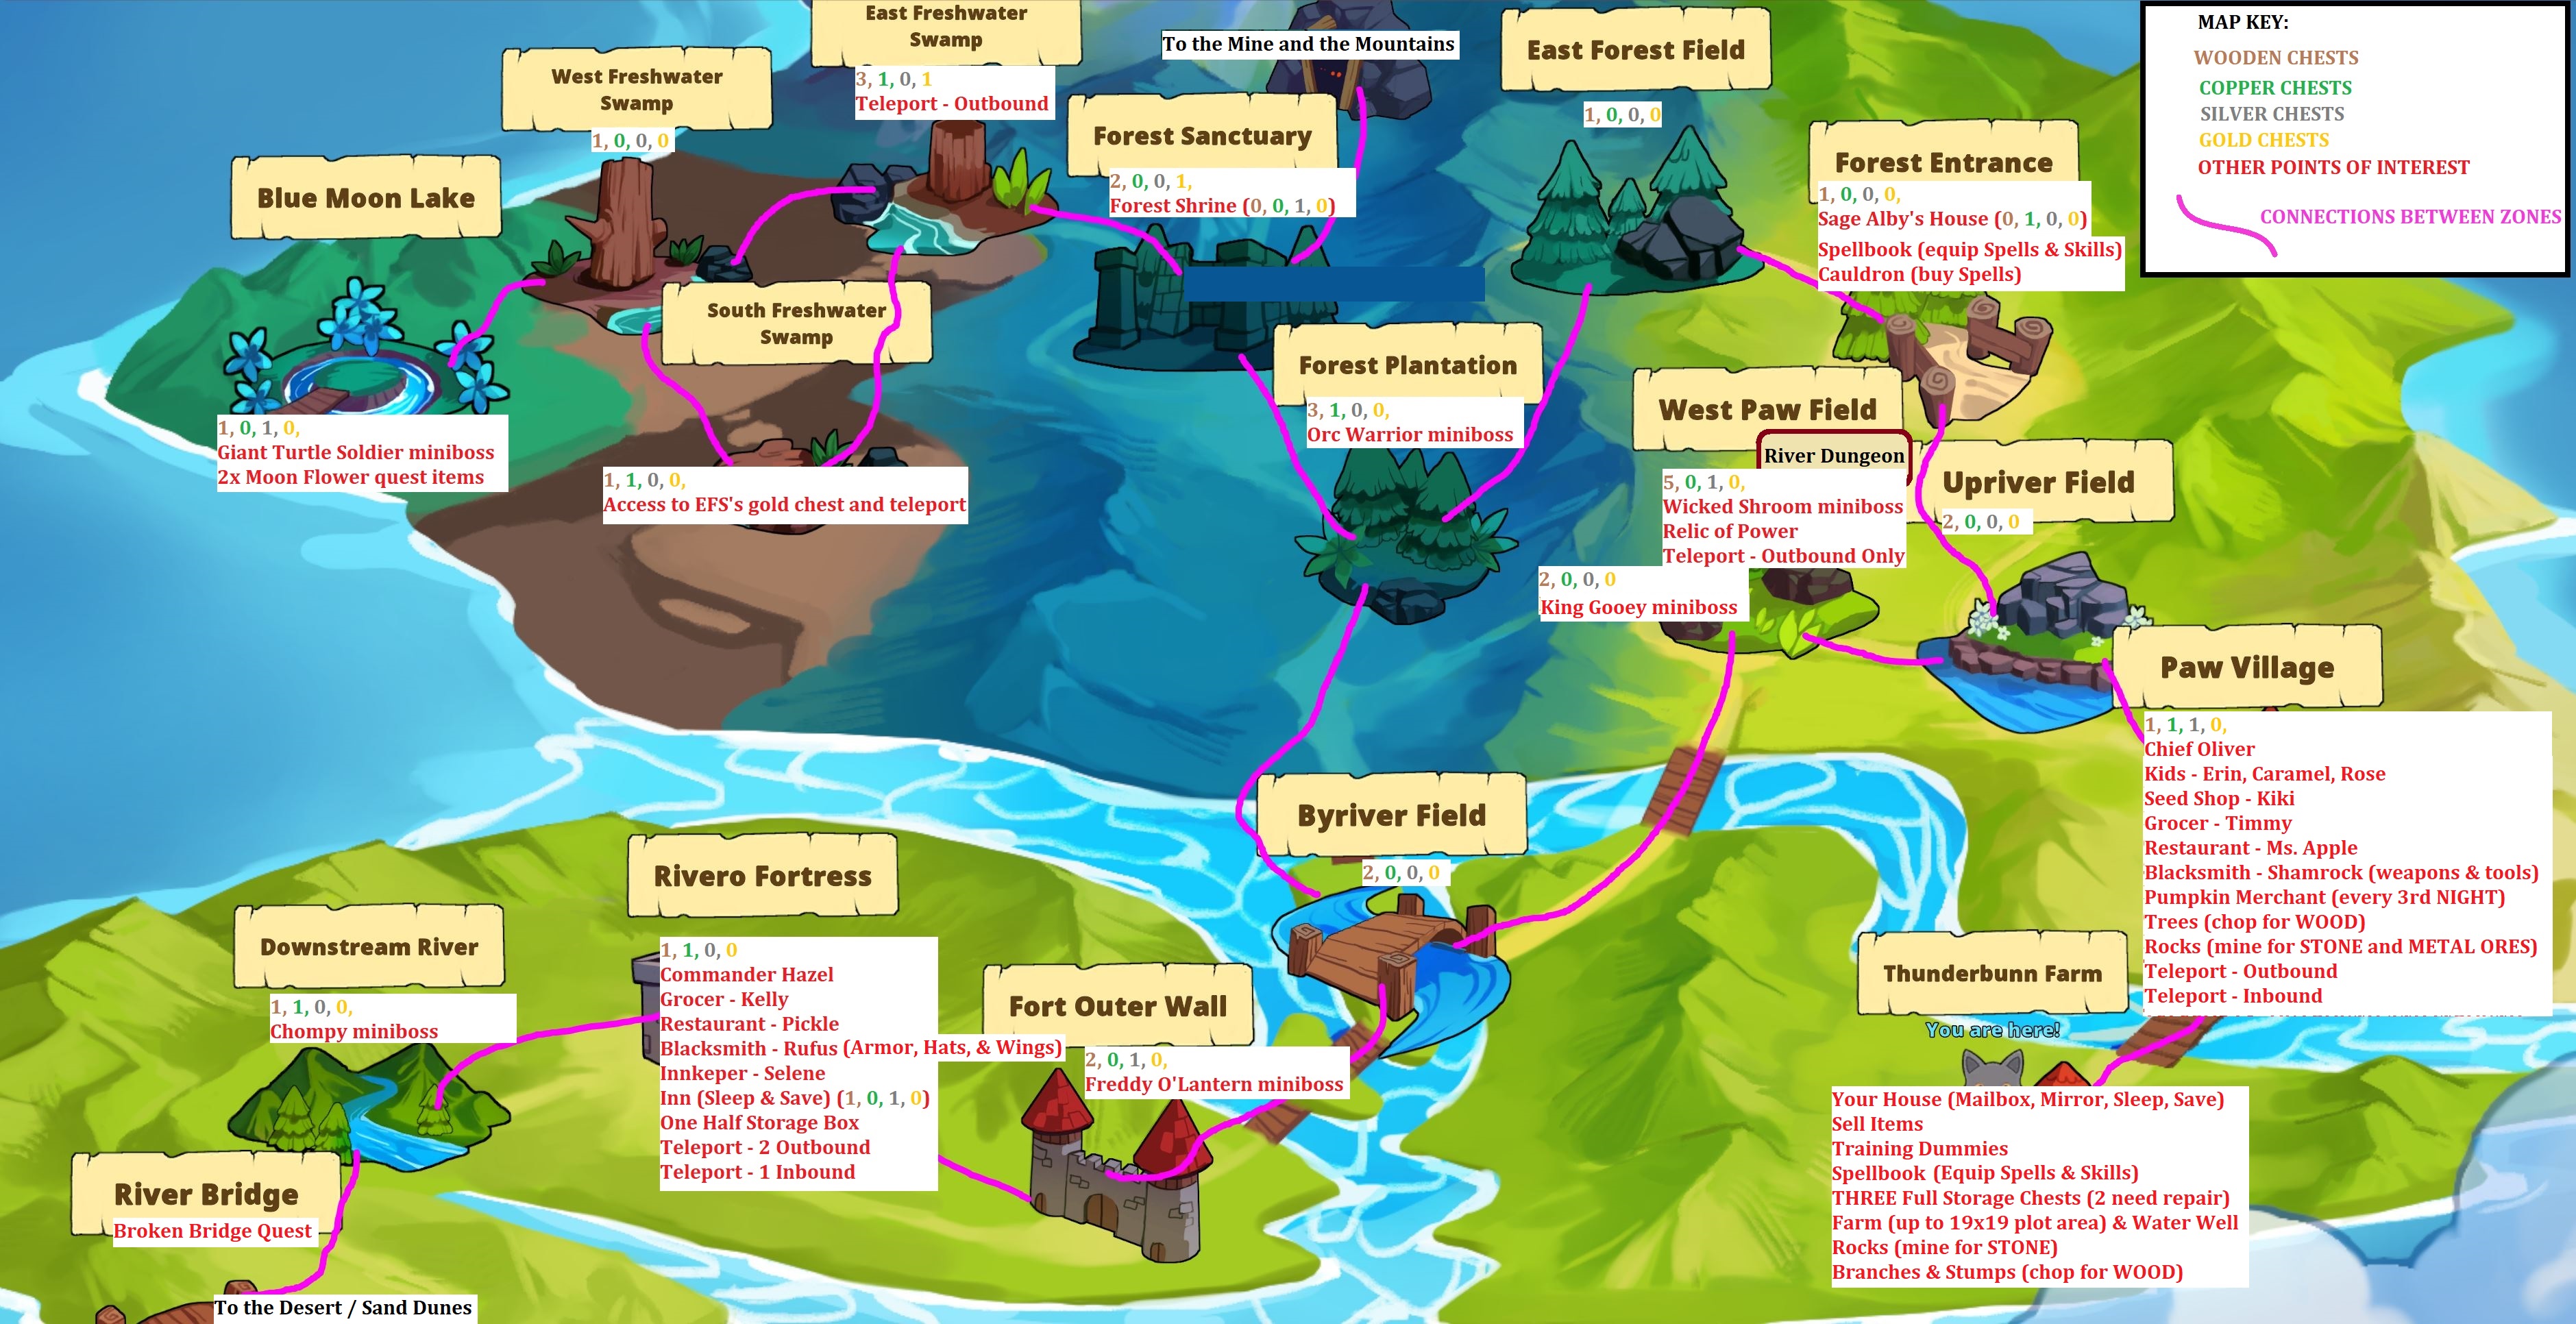
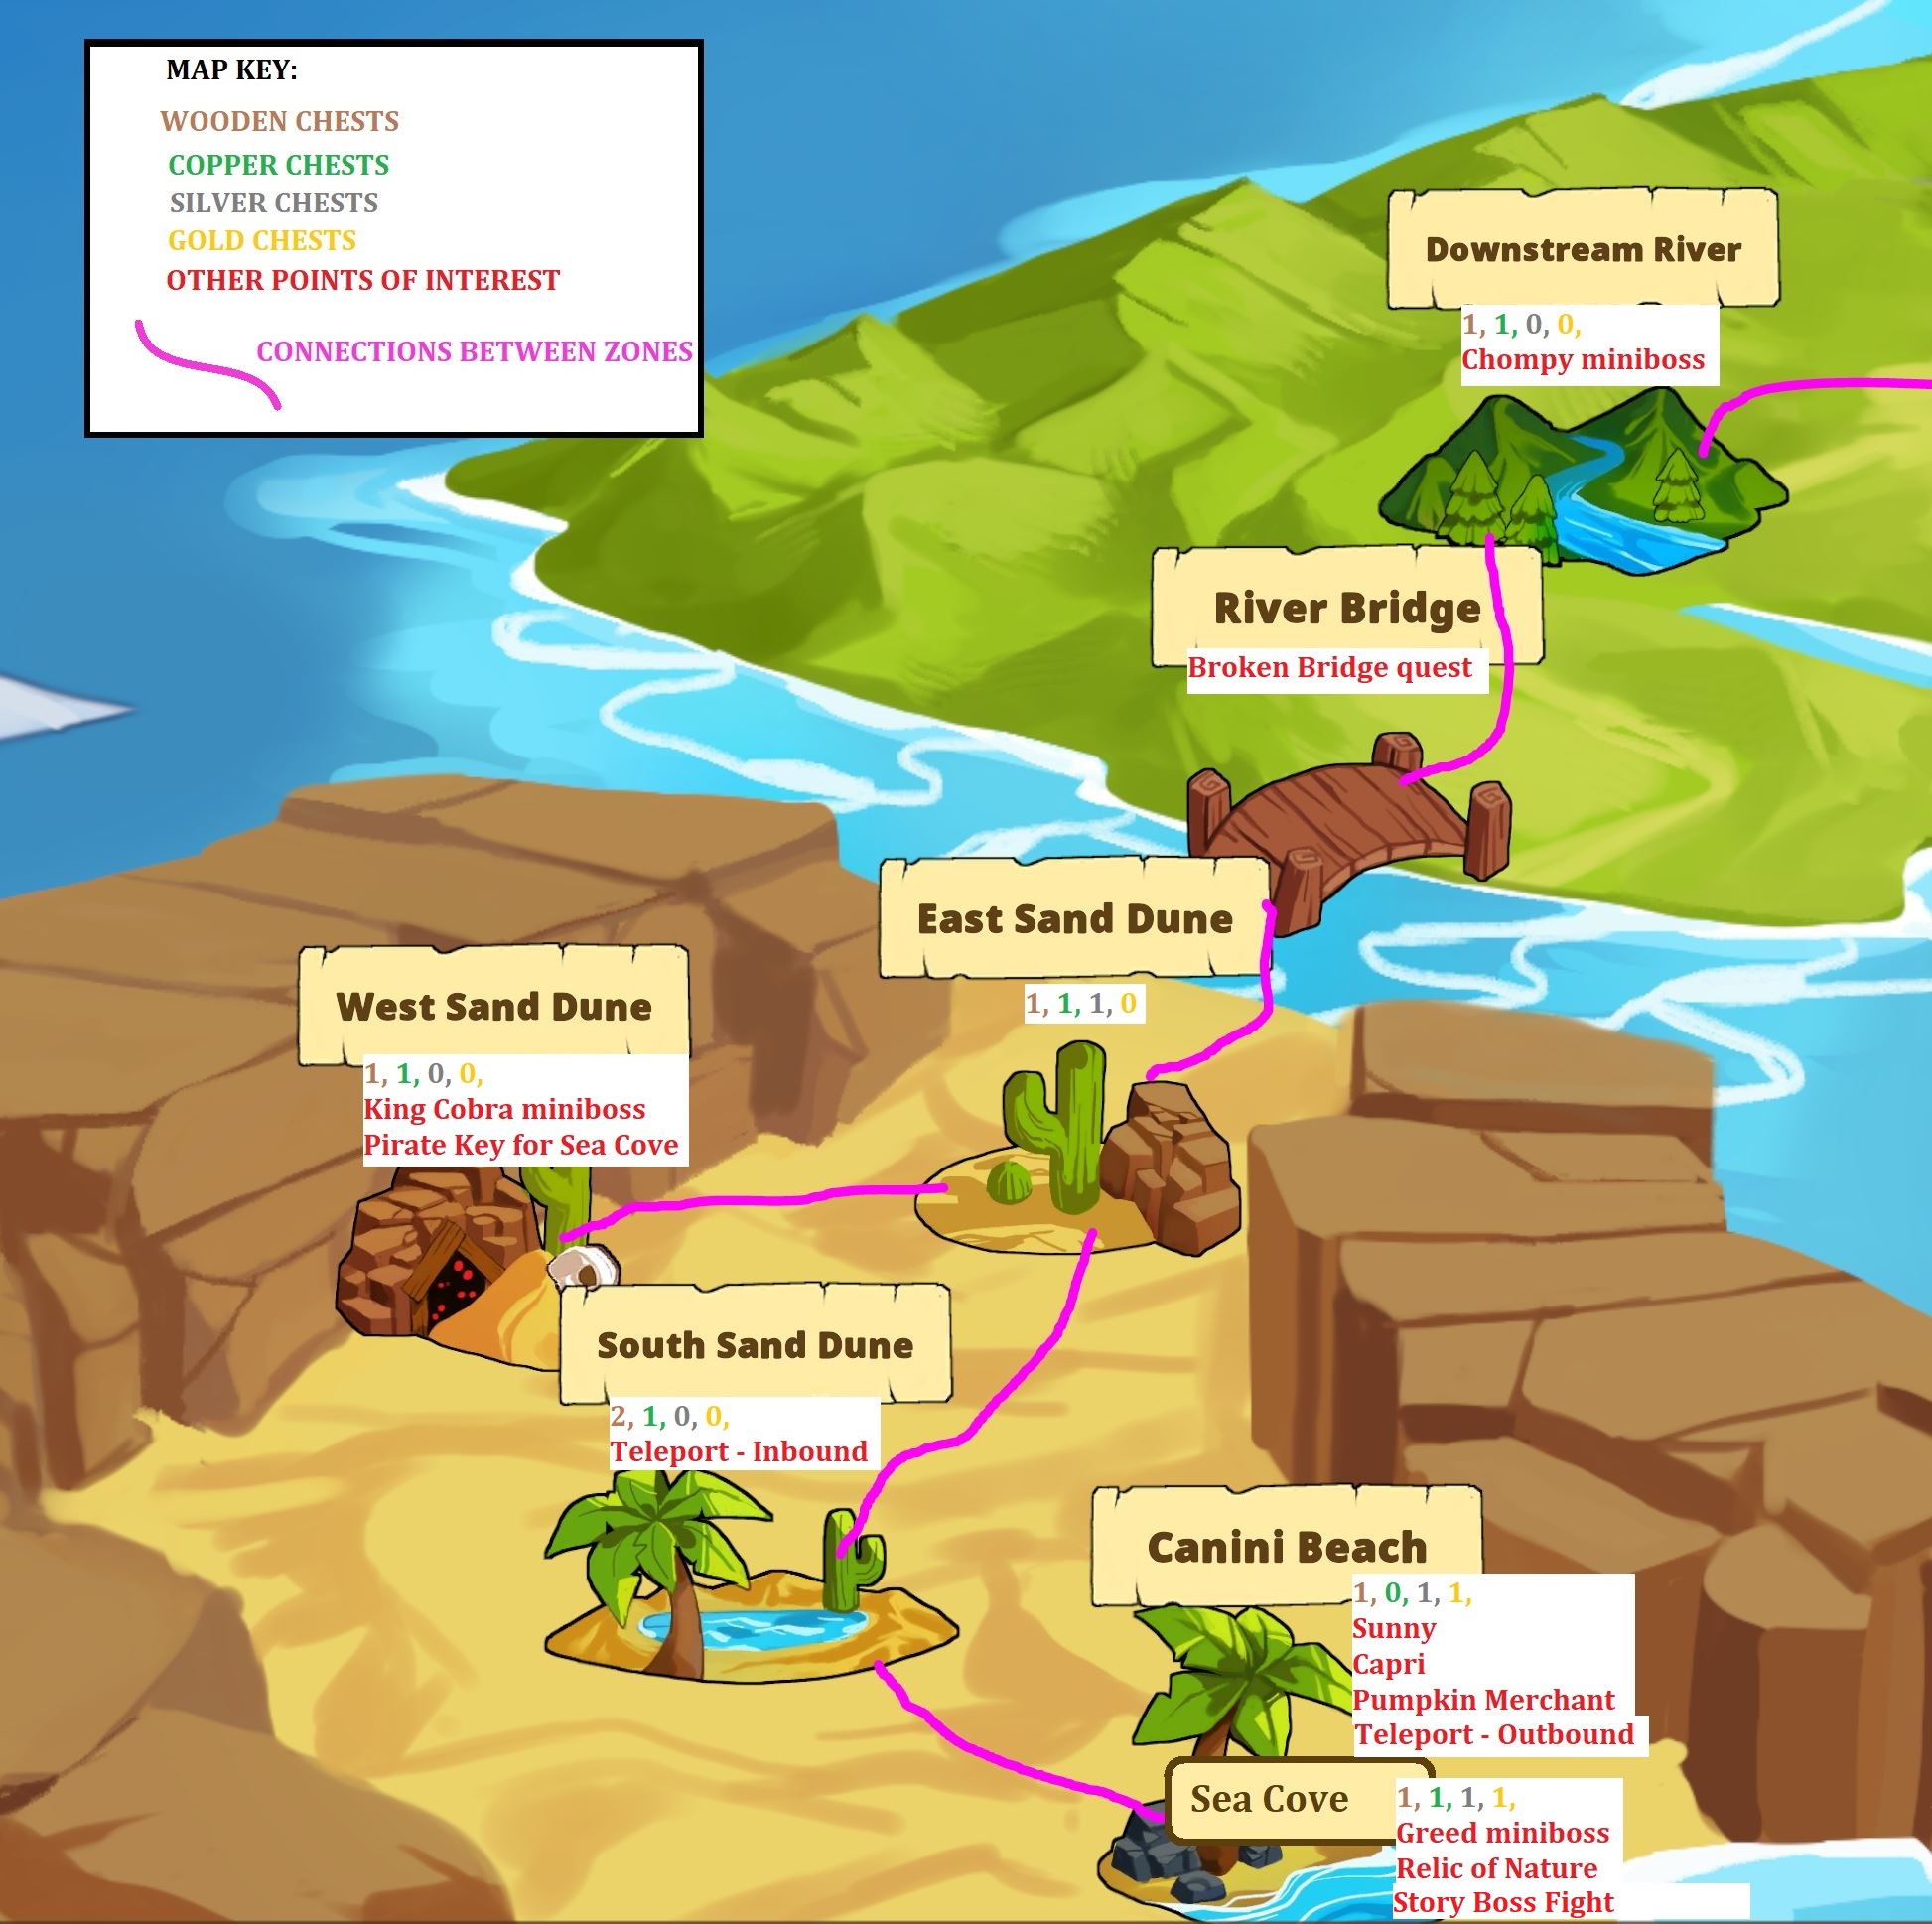
It's actually a copper chest :3
Mr. Moyer  [作者] 2023 年 6 月 15 日 下午 10:29 
@Ninja_gecko7

I haven't played the game in about a year. But this is the first I've heard of this "glitch." My theory is one of two possibilities:
1. You accidentally clicked the "Delete" button instead of the "Save" button. Or you accidentally deleted your save file out of the game folder. No shame, man, it happens to the best of us once in a while, hit Ctrl-X when you meant Ctrl-C or whatever.
2. It's not an issue with the game itself, but with your PC. Some kind of corruption on your storage device. Try running Scan Disk and maybe Defragmenter on your hard drive.

If you don't like that answer, go ask on the forums and they might have more info for you. Good luck.