Sunless Sea

Sunless Sea

76 个评价
Beginners Guide & Important Knowledge
由 aloejelly 制作
Basic aspects of the game explained with some added personal advice.
2
9
3
   
奖励
收藏
已收藏
取消收藏
The Setting
First a really quick explanation of the setting of Sunless Sea, so that you have an easier time understanding some of the text.

London was stolen by bats and now exists underground in a huge cavern called the Neath. This cavern is flooded by a body of water known as the Unterzee or the Zee. London is not the first city to be stolen in this manner; the Khanate is another society and a major rival to London's Admiralty. Hell also exists somewhere in the Neath, inhabited by devils of course. The 'Surface Nations' of Europe continue to exist above ground, notably Italy and Austria.
The UI

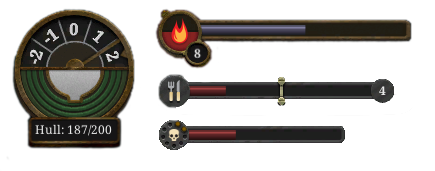
The speed dial, hull (your ship's HP), fuel, hunger (supplies are consumed when it fills up to the gold bar) and terror (the small circles signify a point of terror being gained).


Your Officers, stats and captain portrait with the number of crew underneath.


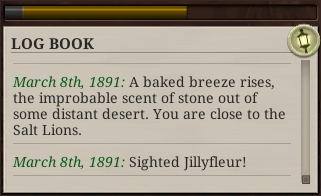
The log book, with the fragments bar above and SAY lantern icon.


The toolbar: pause the game (or just hit space), toggle the ship's lights, your Zeebat, repair the ship's hull (consumes supplies and can only be done when above 50% hull), burn the engines, the Gazetteer, the Chart (map), settings.


The battle toolbar. This is brought up when you press E, are spotted by an enemy, or click on an enemy. It contains: your Deck weapon, your Forward weapon, your Aft weapon and any combat items you might have.
The Gazetteer
Press G to open the Gazetteer, which is your inventory, quest log and everything else. It's organised into six tabs which I'll explain here.

Story Tab
Only available when docked at a port, the Story tab shows you the various interactions you have to progress the story on the right page, with a relevant image on the left page.

Hold Tab
On the left page of the Hold tab is your ship's equipment and weapon statistics. For each weapon you can see the Ship Damage (damage to pirate ships), Life Damage (damage to Zee-Creatures), and Crew Damage (direct damage to an enemy ship's crew count). The 6 slots beside the ship diagram are where you equip ship equipment, and the boxes at the bottom contain any items that can be used in combat.

On the right page of the Hold tab is your inventory, split into 2 sections: Cargo and Curiosities. The major difference is that Cargo is subject to the capacity of your ship, whereas you can carry an infinite number of Curiosities. The red box at the top right allows you to jettison (throw away) Cargo to make room.

Journal Tab
The left page of the Journal tab displays some of your captain's accomplishments, and the right page is effectively your quest log and other data about your captain. It doesn't really function as a quest log in the way of telling you what to do, rather it's more of a short note to say that you've started this quest and are this far through with it.

Officers Tab
Displays all your Officers, and allows you to swap them around as needed. You can also right click on them to speak to them.

Shops Tab
Unsurprisingly, the Shops tab is where you buy and sell items when docked at a port. Some locations don't have any shops though.

Shipyard Tab
Only available when docked in London or Whither, the Shipyard tab is where you buy new ships or simply browse the options. The left page shows you the statistics of your current ship, if you need to know them for some reason. When buying a ship, you'll notice that you don't pay the full price for a ship as it's listed, since half the value of your current ship counts towards the sale.
Stats
Your captain has five stats in Sunless Sea:
  • Iron: Increases the damage you do with your weapons.
  • Mirrors: Increases the speed at which you can fire your weapons.
  • Veils: Decreases the distance at which enemies spot you.
  • Pages: Increases the speed at which you turn Fragments into Secrets.
  • Hearts: No direct effect.
Each stat increases your chances of succeeding in certain interactions (stat checks). For example, whenever there's an option to fight someone in the story, your success will be determined by your Iron stat. Whenever there's an option to do something sneaky, your success will be determined by your Veils stat, and so on.
Backgrounds
Each background gives your captain a bonus of +25 to a single stat, as follows:
  • A street urchin: +25 Veils
  • A poet!: +25 Pages
  • A Veteran of the Campaign of '68: +25 Iron
  • An ordained priest: +25 Hearts
  • A natural philosopher: +25 Mirrors
The highest valued stats by players are typically Veils, Mirrors and Iron, so therefore the Urchin, Philosopher and Veteran are all good choices. A poet! is also not such a bad pick if you know you will need a lot of Secrets, because of how hard it is to raise your Pages stat otherwise.

It's also an option to not chose a background and remain mysterious. The benefits being that you get an extra achievement for beating the game (albeit through harder means), and the possibility of gaining an extra Legacy Item somewhere down the line. You can also speak to an Officer and 'Reveal your Past', to gain one of the +25 bonuses at a later occasion.

Backgrounds will change which starting Officer you receive and play a role in a small number of interactions. As a whole, backgrounds are really not that important.
Ambitions
The ambition you choose at the very beginning determines what you must do in order to complete the game. Here's a quick rundown on the ambitions:
  • Your Father's Bones: A lengthy collection quest.
  • Fulfilment: Write a book requiring a huge amount of 'Knowledge Curiosity' items.
  • Wealth: Purchase the Mansion for 10,000 Echoes, then gather 30,000 Echoes savings.
  • Immortality: A long, multi-staged collection quest (requires the Zubmariner DLC).
  • A Private Kingdom: Colonise an island - a long grind for resources.
  • Uttermost East: A real challenge, recommended for veteran players.
The last 2 ambitions here are secret ones that can be started regardless of which ambition you originally chose.

Once you have the Elegant Townhouse, you can also retire at any stage by going to Your Lodgings, allowing you to start again with another captain and a different ambition. Retiring is effectively like dying and you will lose everything apart from the items discussed in the Future-proofing section of this guide.
Fuel & Supplies
Running out of fuel and supplies is a very easy way to end your captain's run. If you completely run out of both, you're as good as dead. If you still have some supplies but no fuel, you can convert the supplies into fuel as a last resort. In the event that somehow you run out of fuel around the dock in London, someone will offer to tow your ship for a few hundred Echoes.

How much to carry
The amount of fuel and supplies you need to buy depends on your ship's fuel consumption, how many crew you have, and where you are planning to go. For supplies, a number of half the number of your crew is a safe amount. For fuel, typically double the amount of supplies. So fuel and supplies in a 2:1 ratio is ideal.

Where to buy from
The best places to buy fuel are the Iron Republic in the south west and Mt Palmerston in the north. Buying fuel in bulk here will save you money. The best place to buy supplies in bulk is on the Surface, but you need a lot of fuel to get there so it’s only worth it if you’re going there anyway. Other than those places, it’s best to buy fuel and supplies in London, where they’re cheapest.

Places you cannot buy from
Don't try to dock at these places in a fuel and/or supplies emergency! - Frostfound, Chapel of Lights, Avid Horizon, Salt Lions, Godfall, Polythreme, Khan’s Glory, Aestival (you can get supplies with SAY), Hunter's Keep, Abbey Rock, Station III, Pigmote Isle, The Chelonate, The Fathomking's Hold, Mangrove College (you can get supplies with SAY), Grand Geode, Varchas, Kingeater Castle.

Fuel saving tactic
If you’re low on fuel and you’re doubtful you will be able to get to a port, you can turn your ship’s lights off. Travelling with your lights off slows down the amount of fuel you consume, but you will rapidly gain terror. It’s only worth doing in fuel emergencies.
Map Generation
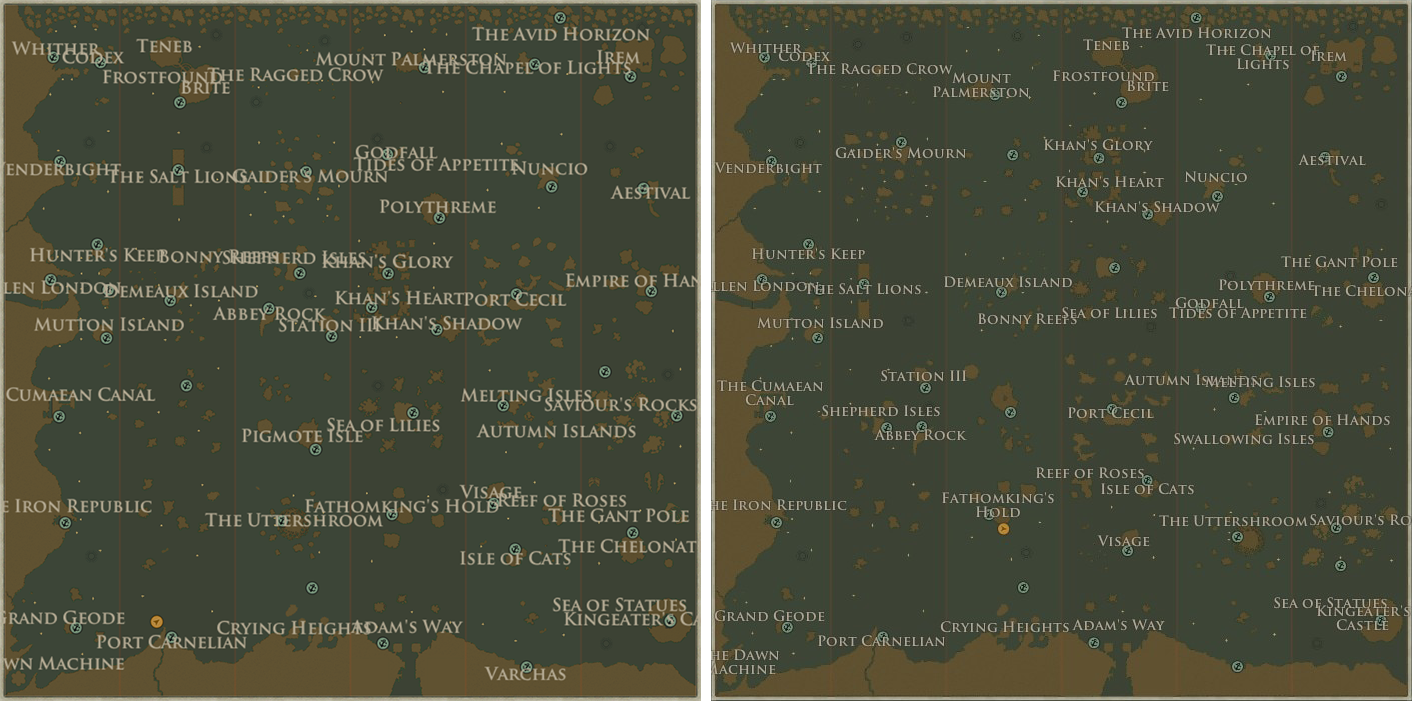
The map in Sunless Sea is randomised for each captain but only to a certain extent. If you visualise the map as a grid, the entire leftmost column will always be the same, as will the lowest row. Irem also has a fixed location in the north east.

Many locations always spawn in the same column/row but at varying points, for example Mt. Palmerston can be found somewhere in the highest row and Empire of Hands is always in the rightmost column.

Some locations spawn in groups and will always be a short distance from each other, for example Visage and Isle of Cats, and Polythreme and Godfall.


My map vs. a map I found on Steam. Right click -> Open Link in New Tab to view.
Crew
Your crew are nameless and expendable in Sunless Sea; they can easily be gained back in London for cheap. There is an optimum number of crew to have however and that is slightly more than half of your overall capacity. The less crew you have, the slower you consume supplies and the less money/cargo space you need to spend on them.

Crew can be lost in combat and in interactions which is especially annoying and even deadly when you go down to below 50% crew capacity. With less than 50% crew (the halfway point is rounded up I believe), your ship can only move at half speed which leaves you vulnerable to enemy attacks that can end your game. To be on the safe side, always have 2-3 or more extra crew over half capacity.
Officers
Equipping an Officer provides a boost to your stats. Officers are separate from your crew and cannot die, unless it’s part of their story. An Officer’s story can be started by right clicking on them, talking to them and choosing to dine with them. Dining with them will always require supplies and usually additional items. Pursuing an Officer’s story will typically lead to a unique item, or an upgraded version of that Officer that provides a larger boost to your stats (but there are some exceptions).

Talking to an Officer and training with them allows you to increase a skill by one point, at the expense of a Secret. This is the main way of increasing your stats up to a certain level but cannot be done for Pages, making it the hardest stat to level.

Officers can be recruited in London by choosing the 'A new recruit!' action and spending a small amount of Echoes, or by finding them at other ports. None of the Officers are missable, if you decide not to recruit them they will remain there until you do so. The Officers in London appear in a random rotation however so make sure to keep checking 'A new recruit!'.

The Officer you start the game with for choosing a past will only provide a +1 boost to a single stat. When speaking to them, they will reveal that they want to be dropped off at a certain location. If you do find yourself at their desired port, it's worth dropping them off because they will reward you with some items more valuable than the measly +1 they provide in your service.
Terror
You gain terror when traveling in the open sea, when travelling with your ship’s lights off, from certain interactions and from certain enemy attacks. Terror is gained much faster by traveling with your lights off and by travelling through fog. Just assume that when you reach 100 terror, you are going to die. If your terror is dangerously high (70+), you will need to take measures to slow down the rate you gain terror, and focus on getting back to London or somewhere you can remove the terror.

Terror is not gained when traveling close to land/rocks or within the light of a buoy, stick close to all of these when traveling with high terror, even if it means taking a longer course.

The best ways to remove terror are as follows:
  • Docking in London with SAY (lowers terror to 50).
  • Spending time with your family (-20 terror)
  • Resting in Your Lodgings (-15 with a Townhouse).
  • Spending 1x Darkdrop Coffee Beans at Irem (-10 or -20 terror).
  • Travelling to the Surface (-25 terror minimum).

You may discover numerous other interactions that remove smaller amounts of terror and are worth remembering. Two notable ones are 'Take tea with the squatters at the dock' in Frostfound, and 'Eat, drink, be merry' at the Mangrove College.
Ship Speed
Your ship should be traveling at 2 on the speed dial at all times to remain efficient. There are no advantages to going slower but it is sometimes useful when making sharp turns to avoid collision damage.

You can also press F to burn your engines and reach maximum speed for a few seconds. This can sometimes result in a fire and you may lose a member of crew and take hull damage. It’s best to only burn the engine in emergencies when you desperately need to escape from combat.
Use Your Zeebat
Pressing Z when you're sailing sends a Zeebat to scout out any undiscovered locations nearby. The Zeebat will mark new locations on your map with a bat icon so you can easily find where to dock. One thing to mention though is that sometimes the Zeebat will mark a location that doesn't actually have a port for you to dock at (for example the Rose Reefs).
Enemies
As a rough rule of thumb, it's not a good idea to be fighting anything with over 100 health until you have a ship with a Forward weapon. An exception could be made for some of the weaker pirate ships shown below which can easily be cheesed with a simple technique discussed in the next section. In this section, I'll list all the lower-tier enemies you will want to be fighting from early-game onwards.


Bat Swarm: Gathering the corpses give you one crate of supplies, or you can dispose of them to relieve a tiny amount of terror.
Auroral Megalops: Butchering it clears your hunger bar, sparing you from using up a crate of supplies.
Jillyfleur: Letting it disperse gives you a Zee-ztory, or scooping it up can sometimes give you a Strange Catch.
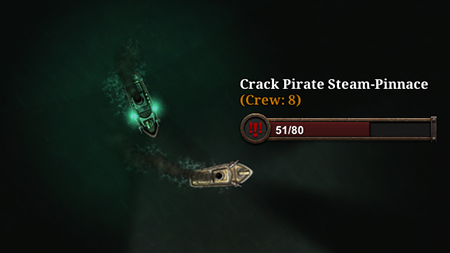
Pirate Steam-Pinnace: Looting it gives you either fuel, supplies or a common trading item. The Crack Pirate Steam-Pinnace is a stronger version that looks identical.


Pirate Frigate: Looting it gives you either fuel, supplies or a common trading item. The Crack Pirate Frigate is a stronger version that looks identical.
Rat-Barge: Looting it gives you either fuel, supplies or a common trading item.
Unfinished Pirates: Looting it gives you either fuel, supplies, a trading item, a Tale of Terror!!, or a Memory of Distant Shores. Unfinished Revolutionaries is a stronger version that looks identical.
Alcaeus-class Corvette: Looks identical to the Steam Pinnace but is faster and has much more health. The Corvette contains the Pirate Poet whom you can rescue for an easy 400 Echoes.
Combat Strategy
Zee-Creatures
For Zee-Creatures, you will want to start shooting them from the furtherest distance your weapons allow, then immediately put your ship in reverse and continue firing. The Zee-Creature will follow you so it stays within range of your guns, and eventually charge towards you, but with luck, it will stop just short. If you haven't killed it before it charges a second time, the second charge may hit you. Zee-Creatures will sometimes submerge themselves for a few seconds, all you need to do is stop your ship and wait, then resume backing up and firing.

Weaker pirate ships
For pirate ships, the best strategy is to get very close to them, tailgate them, sticking to them like glue, and fire away. It's ridiculously easy and you can kill most pirate ships without taking any damage. Don't worry about bumping into them, as there is no collision damage with other ships. Having a Forward weapon helps but it is not required. Note this does not work on the tougher pirate ships which can hit you when you're behind them!


Weaker pirate ships have no Aft weapons to attack you when you're behind them.
Actions in London
Some actions it's good to do every time you dock back in London:
  • Sell off any trade goods you might have accumulated to make space in your hold.
  • Submit your Port Reports to the Admiralty, and ask where he wants you to go specifically.
  • Spend time with your family in Your Lodgings to remove terror (once you have one).
  • Carouse in Wolfstack Docks to remove terror and find a sweetheart (costs 10 Echoes).
  • Read the news in Your Lodgings to get Recent News and sometimes extra supplies.
  • Check A new recruit! for any new Officers.
  • Sell any unwanted items to the Antiquarian.
  • Put your ship in Drydock to repair the hull if needed.
  • Hire crew if needed.
  • Stock up on fuel and supplies for the next journey.
Something Awaits You
Something Awaits You (shortened to SAY) is a state that allows you to access additional interactions at port. SAY is gained by spending 60 seconds at sea without docking, so you will usually get it between every port. When you gain SAY, there is a bell chime and a lantern symbol appears above your event log. SAY can only be used once, but you can gain it again by stalling your ship next to the dock for 60 seconds.


The icon shown on SAY interactions at ports.
Admiralty's Favour
You gain Admiralty's Favour when you submit a Port Report for the first time on each location, or provide some Strategic Information/Vital Intelligence to the Admiral or Diplomat.

At London's Drydock, you can convert one Admiralty's Favour into 2-3 fuel which is an excellent way to save money in the early-game. This is only available if your favour is above four.

At a cost of three Admiralty's Favour and 25 Echoes you can completely repair your ship's hull which is the cheapest option available in London's Drydock.
Fragments & Secrets
Fragments are effectively Sunless Sea's experience points and can be gained when exploring uncharted territory, killing enemies and through making certain interactions. When you reach a certain amount of Fragments, you will gain a Secret (the amount required depends on your Pages stat). The primary use of Secrets is to increase your stats, one Secret for one extra stat point. They are also very valuable items in their own right and are required for certain interactions.


You can see the progress towards getting a new Secret in the bar above the event log.
Early-game Income
Some simple ways of making Echoes that you have access to in the early-game.

Selling the guide book
The guide book you get at the beginning is a fast 50 Echoes.

Port Reports to the Admiralty
Collect a Port Report from any port you stop at and sell it for an easy 20-50 echoes on average, plus some free fuel. This is something you're going to be doing throughout the whole game.

Strategic Information to the Dark-Spectacled Admiral
After submitting two Port Reports, you can speak to the Admiral and he will ask you to pick up some Strategic Information from a random port. You will get 150 Echoes delivering it to him.

Selling items to the Alarming Scholar
You can gain access to the university in London by donating a Secret. From then on, you can do business with the Scholar who loves to buy your Curiosity items. Just have a look at my Valuable Items section to see what you should and shouldn't sell.

Delivery from the Salt Lions
If you have 20 cargo space and 200 Echoes, you can make an easy 300 Echoes profit by transporting Sphinxstone from the Salt Lions to London. This can only be done around five times but is a fantastic way of increasing your capital in the early-game.

Selling Mushroom Wine at Godfall
Buying five wine in London for 105 Echoes and selling it to the monks in Godfall for 150 Echoes makes a nice 45 Echoes profit. With the starter ship, you can carry ten fuel, five supplies and 25 wine, making a profit of 225 Echoes (excluding costs of fuel/supplies). Once you have the Merchant Cruiser, you can carry 15 fuel, 7-10 supplies and 95 wine, making a profit of 855 Echoes per trip.

At a certain point in your captain's career, this opportunity will become unavailable, as the monks will decide they've had too much wine. Specifically, this happens when you reach an Another Day: Time, the Healer score of 200. You can see the current score in the Journal, under the Another Day category. Abuse this very profitable business venture while you still can.

Transporting Clay Men to London
If you're near Polythreme and have six free cargo space, you can carry six Clay Men back to London and receive a reward of 120 Echoes. Since Polythreme spawns next to Godfall, you can fit this in nicely with the selling of wine there.

Ferrying a passenger from the Mangrove College
If you find yourself at the Mangrove College, you can pick up a passenger who will want to be taken to either Gaider's Mourn or Port Cecil. The passenger will take up one cargo space but they will pay you 100-120 Echoes for simply dropping them off.
Future-proofing
Ironclad Will
Once you have a Townhouse (1000 echoes), you can go to Your Lodgings, to the study and write an Ironclad Will for 200 echoes. A will allows you to carry over certain items/stats when your captain dies or retires by choosing a Legacy. You will need to write a will on every captain to continue passing down items. The Townhouse needs only be bought once, all your captains will have access to it, whether you had an Ironclad Will or not.

Legacies
Each Legacy lets you carry over different aspects of your former captain:
  • Rival: 50% of the captain's Iron and one of their weapons.
  • Pupil: 50% of the captain's Mirrors and half of their Echoes.
  • Salvager: 50% of the captain's Veils and half of their Echoes.
  • Shipmate: 50% of the captain's Hearts and one of their Officers.
  • Correspondent: 50% of the captain's Pages and their entire map.
Scion
Having a scion lets you accept two Legacies on your next captain, and all captains after that. A scion can be obtained by meeting a sweetheart in London, continuing the relationship until you have a child, and giving the child items at Your Lodgings until (reaching a Zee Fever score of 25) they head off to Zee.

Heirlooms
Another way to carry over wealth to your next captain is to craft Heirlooms in your Study, provided you have an Ironclad Will. Heirlooms can be made using one Captivating Treasure, or seven Outlandish Artefacts and a few Echoes. Your next captain can sell the Heirlooms for an instant 800-1100 Echoes each. Owning the Townhouse allows you to make 12 Heirlooms, whereas owning the Mansion allows you to make 16.
Ship Upgrades
The question of which ship to upgrade to first is debatable, so I'll just be giving my opinion. For me, there are three good options.

Phorcyd-class Corvette
The Corvette gives you a Forward weapon slot and more HP which allow you to start properly killing Zee-Creatures for some extra income and supplies. It does not have a larger hold and will be slightly more expensive to run, meaning more of your hold is taken up by fuel and supplies.

Caligo-class Merchant Cruiser (with a high-tier engine)
The Merchant Cruiser is ideal for trading because the massive hold allows you to move more units at once, making trading on a small profit margin much more viable. It does not have a Forward weapon so you still can't fight most higher tier enemies. You NEED a very good engine or else it's painfully slow.

Stick with the Steamer (until you can afford the Frigate)
The Frigate is probably the best ship in the game, at least the most balanced for all play-styles. You're not going to be able to afford it for quite a while but sticking with the Steamer will help you save money. The Steamer is fine for 90% of the game, so long as you avoid tough enemies.

I want to mention that you should not upgrade your ship too early; ideally you should have at least 1000 Echoes spare after making the purchase, to be on the safe side. Upgrade to the Merchant Cruiser or Frigate and you will suddenly find yourself having to buy much more fuel and supplies compared to the starter ship. Not to mention, if you plan on trading, you will need spare Echoes as capital to buy trading goods and start generating income again.
Weapon Upgrades
You want weapons with strong Life damage AND strong Ship damage, so you can be comfortable fighting both Zee-creatures and pirate ships. To briefly explain the different types: Deck Weapons fire in a crescent shape in front of the ship, Forward Weapons fire at a narrower angle in front of the ship (but at a longer range), and Aft Weapons fire in a crescent shape behind the ship.

Deck Weapons
The Deck weapons all work in the same manner and do equal Life/Ship damage, so simply choose the best one you can afford. The best out there is the Hellthrasher for 900 Echoes.

Forward Weapons
Many of the Forward weapons are more specialised to Life damage and some of them are torpedo-launchers, meaning that you must buy Torpedo Components, which cost 5 Echoes for each shot (slightly unappealing). My top pick is the Majesty (400 Echoes), which deals strong Life/Ship damage and doesn’t require special ammunition. The best-in-class is undoubtedly the Memento Mori but you must complete the Irrepressible Cannoneer’s storyline to get this.

Aft Weapons
I haven’t found much use in Aft weapons so I wouldn’t really recommend them. The Milebreaker and Suppressor are much more useful items that can go in this slot. Regardless, Aft weapons all do straightforward damage so it’s simply a matter of which you can afford.
Save these Valuable Items
Sunless Sea gives you a lot of items and doesn't explain what they're used for. It can be hard to know whether you should sell them or hang onto them for the future. If you're unsure, I think you can't go wrong by keeping Curiosity items, but selling any Cargo items that you don't know how to use. I'll go into more detail about some of the Curiosity items.


Zee-ztory, Memory of Distant Shores, Tale of Terror!!, Vision of the Surface
These can be useful items, so I recommend keeping at least five of each. You can sell the first two to the Scholar if you want but you will only get 10 Echoes for them. If you chose the Become London's Most Venerated Explorer ambition, you will need to 77 Zee-ztories, 77 Memories of Distant Shores and 77 Tales of Terror!!, so don't even think about selling them!


Outlandish Artefact, Lamentable Relic, Hunting-Trophy, Solacefruit
These items can be useful for certain interactions so it's better to keep a handful of each and sell any beyond that. If you're planning to make Heirlooms, you might as well keep all of your Outlandish Artefacts. Seven Outlandish Artefacts and seven Lamentable Relics are also needed if you picked the Become London's Most Venerated Explorer ambition.


Searing Enigma, Extraordinary Implication, Judgement's Egg
Don't sell these. The Enigmas are among the most valuable items in the game and the Egg is required for 2-3 quest-lines. The Implications can be used to make Enigmas and are therefore also valuable.

Secrets
You'll get a lot of Secrets from exploring the map in the early/mid game. It's good to hoard secrets and not invest all of them in your stats because they become much more valuable later on. Personally, I would try to keep 20 at all times, but if you chose the Become London's Most Venerated Explorer ambition, you will need to accumulate at least 75.
Sell these Items


Intriguing Snippet, Unread Log, Captivating Treasure, Ambiguous Eolith
If you really want to make Heirlooms, keep your Captivating Treasures. One Captivating Treasure is also needed if you picked the Become London's Most Venerated Explorer ambition. Otherwise, the Scholar will give you 1000 Echoes for them, which is why I prefer to sell them. You might want to hold on to a couple of Unread Logs to gain access to a certain place. With all that said, these items can safely be sold to the Scholar.


Strategic Information, Vital Intelligence, Moves in the Great Game, Revelatory Chart
All of these items are best sold to the Admiral or the Diplomat. You can combine two Strategic Information into a Vital Intelligence and sell that to the Diplomat for the maximum Echoes. Selling Vital Intelligence to the Diplomat can increase the supremacy of a certain faction so watch out for that!

Recent News
Recent News can be gained every time you Read the morning papers in Your Lodgings or Carouse in Wolfstack Docks. You can only hold one of these at once so go ahead and spend it at the first opportunity. I like to give mine to the Light-Ship every time I depart from London, which nets you a Zee-ztory.
Keep a List
This is just my preferred way to play and something that helped me, but I find it very beneficial to keep a physical list of my ongoing quests and other errands.

Knowing exactly what I need to bring where, allows me to complete multiple quests/errands on one expedition from London without wasting unnecessary fuel and supplies. If I have a long list of things to do, I'll group them together by their location on the map, and try to complete a handful of ones that are close together in one trip.

This may all sound very obvious, but the act of writing things down really helps you to visualise what you need to be doing, and saves you time in the long run. Also in general, there are too many things going on in this game for you to simply remember in your head.
Avoiding Harbour Checks
Smuggling contraband into London puts you at risk of being caught by the Revenue Men or the Ministry of Public Decency. Fortunately, all you need to do to avoid their searches is dock in London without having SAY.

You can get rid of your SAY by docking at whichever island is directly east of London and spending it there, sailing to the Light-Ship and docking, then finally sailing into London. Docking at the Light-Ship means you're not technically at sea for a full 60 seconds and do not gain SAY back.
Mid-game Income
Here are some Echo-making methods to support you through the mid-game.

Vital Intelligence to the Admiral or Diplomat
If you have two Strategic Information, 30+ Mirrors and a Moves in the Great Game, or 40+ Mirrors and a Zee-ztory or a Memory of Distant Shores, you can right click on the Strategic Information in your inventory, and combine them into a Vital Intelligence. Selling this to the Admiral gives you 350 Echoes and unlocks the Voracious Diplomat.

The Diplomat will buy Vital Intelligence for 500 Echoes each and also give you an Agent in exchange for one Admiralty Favour. An Agent can be taken to Port Carnelian or Khan's Heart to establish an intelligence network. Growing the network by donating items to your spies will increase its score and allow you to 'Seek Intelligence' for a chance to gain a Vital Intelligence (the stronger the network, the greater the chance).

Acquiring items for the Merchant Venturer
The Merchant Venturer will present themselves in London soon after the beginning of the game. They will ask you to collect a bundle of a specific item for which they will pay a very good price, and even tell you roughly where to get it. You can only sell to the Venturer somewhere between 5-10 times, at which point his story will progress.

Selling Darkdrop Coffee to the Surface
I think this is only really worthwhile if you have the Merchant Cruiser or another ship with a large cargo capacity. A shipment of 90 Coffee will require about 3600 Echoes in capital but double your money.

First make sure you have a healthy amount of Crew since you may lose some in this process. Buy Coffee in bulk in Port Carnelian for 38 Echoes per sack, travel to the Cumaean Canal and ascend to the surface (it requires 22 fuel which you can buy for cheap in the nearby Iron Republic). Travel to Naples and then to Vienna; a coffee shop here will buy your Coffee for 80 Echoes each. You can only sell them a certain number of units before something happens. From what I understand, this number is randomised and somewhere between 60 and 300. Even if you get unlucky and can only sell 60, that equates to 2520 Echoes profit (excluding the cost of fuel and supplies). While you're in Naples you can 'Carry cargoes around the Mediterranean' which is a guaranteed few hundred Echoes profit but you will lose 1-3 Crew.

Smuggling sunlight into London
Another business venture that can only be done for a certain number of units; sunlight produces greater profits than just about anything in Sunless Sea. First you need to have the Nephrite Ring to be able to trade in Khan's Heart; this requires donating 25 Coffee to Khan's Glory. Once you have the ring, you can buy Empty Mirrorcatch Boxes for 250 Echoes each, however many you can afford and have cargo space for. Travel to the Surface and box the Sunlight, gaining between four and seven Yearning, Burning for each box. Pay attention to your Yearning, Burning score (visible in the Journal), it must not go over 100 or else you can wind up dying. Return to the Neath and dock in London safely (see my Avoiding Harbour Checks section). The Blind Bruiser will present himself and offer to buy your sunlight boxes for 400 Echoes each. You even get to keep the boxes so you can repeat the process and make pure profit from that point onwards (the only cost associated is the fuel needed to get to the Surface). Once you're done with the boxes, you can sell them to Khan's Shadow for 200 Echoes each.

Because of the Yearning, Burning status, you can only do this for 14-25 boxes before having to stop or look at removing your Yearning, Burning. You can remove Yearning, Burning incredibly slowly by resting in Your Lodgings (preferably the cheaper Blind Helmsman). A better method is to pursue the storyline of the Cladery Heir (recruited in London). After about five interactions with her, she will offer to perform surgery on you, which resets Yearning, Burning to zero but can only be done once.

Completing the Principles quest for Scintillack
The Principles (Chess) quest in Port Cecil requires you to collect various items for the Principles, and will award you a total of 61 Scintillack (assuming you win the final match). This is worth over 4000 Echoes sold in London but you are much better off trading it at the Temple of Mihir in Varchas for two Outlandish Artefacts per Scintillack. This can be quite a tedious process because you can only trade five at a time before having to rest in Varchas, leave (or just wait at the dock), and return with SAY. The effort is worth it though, the Scholar will buy your 122 Artefacts for 100 Echoes each, or 12,200 Echoes.

Selling Wakeful Idols to the Scholar
Hunting-Trophies can be obtained by killing larger Zee-Creatures e.g Angler Crab, Bound Shark and Albino Moray. If you dock in Khan's Shadow with SAY, the One-Eyed Scrimshander will give you four Watchful Curios for a Hunting-Trophy. Convert your Trophies into as many Curios as you can carry (just wait for SAY each time), travel to Polythreme and do the 'An audience with the King with the Hundred Hearts' action over and over again. This will give you a Wakeful Idol for every Watchful Curio. They can be sold to the Scholar for 100 Echoes each.

Smuggling Red Honey into London
First you need the Key to the Cage Gardens from the Isle of Cats which requires you to gain the Pirate-King's notice, do some errands for either Isery or Zaira, then meet with the Pirate-King. Once you have the key, you can buy a Firkin of Red Honey for 600 Echoes and SAY. Waiting for SAY for every firkin, buy as many as you can comfortably afford. Return to London without SAY (see my Avoiding Harbour Checks section), and sell the Red Honey at the Brass Embassy for 999 Echoes per firkin. Alternatively, if you haven't unlocked the Brass Embassy (from the Mt. Palmerston quest), do the 'Honey at the crossroads' action in London and receive 900 Echoes or a Captivating Treasure worth 1000 Echoes.
The Wiki
The Wiki can be a little tricky to follow sometimes but all the answers to your Sunless Sea questions are on there. It's up to you how much or how little you decide to use it, depending on your play-style and ethics. Going in blind is obviously the best approach to enjoy the story but having certainty about things can save you a lot of time in what is already a very slow game, preventing you from getting burnt out. That's my argument for using it at least.

Sunless Sea Wiki[sunlesssea.fandom.com]
Supremacy
London (the Admiralty) is the dominant power by default in Sunless Sea but there are 3 other factions that can rise and overthrow London as a result of your actions. The power level of a faction is known as Supremacy in game and is displayed in your Journal.

Sometimes your actions may inadvertently benefit a certain faction, and they will typically gain +1 Supremacy. Don't worry if this wasn't your intention; it takes seven Supremacy in another faction for anything to really happen. Getting a score this high requires going out of your way to help them, which is an option if that interests you. I recommend researching the consequences of doing so beforehand though.
A Few Warnings
I wanted to provide a few warnings to prevent potentially very annoying consequences without spoiling any details. Feel free to skip this section if you don't want spoilers of any kind.
  • Maybe be nice to the Raggedy Fellow.
  • If you get Salt’s Curse, do not dock in London if you have a sweetheart/child. Curses can be removed in Whither.
  • As long as you have Mr Sacks on board, you should prioritise his quests and completely forget about any other errands!
  • Maybe avoid the castaway woman in the green gown.
  • If you like using the Light-Ships, maybe don’t give any of them a mushroom.
Legacy Items
There are five tricky-to-obtain 'legacy items' that give a boost of 25+ to a single stat for all following captains (but not your current one). Gaining all the legacy items will require multiple captains and beforehand planning. Check out this guide to see how to get them.

Engine Power & Fuel Efficiency
This is not something that really belongs in a beginners guide but it's something I wanted to mention anyway. It's also not something I fully understand but I'll try my best to explain what I know!

Engine power increases the speed at which your ship moves but also the rate at which it consumes fuel. This does not inherently mean that using a high-powered engine will require you to buy more fuel. This is because, even though the ship is going through fuel faster, it's getting to where you need to be faster, so the engine is running for less time. This is why engine power alone doesn't really mean anything, and fuel efficiency and speed are more important statistics.

Fuel efficiency is not something that is displayed in-game but you can calculate it if you know the formula. I just refer to this spreadsheet[docs.google.com] which someone put together (I'm assuming it's accurate). Choose a ship from the bottom bar and look at the final subsection; the important numbers are in the 'Gear 2, lights on' row, with all the engines shown at the top. A higher number means that that engine is more fuel efficient for that ship.

Yet these numbers alone should not dictate which ship/engine you choose, speed should also be taken into account. A slow moving ship can be just as fuel efficient as a fast moving one, but the fast moving one will always be better. Moving slower means that your ship consumes more supplies and also it makes the game painful to play. Complete optimisation is a trade-off between moving fast and having high fuel efficiency. You can see a ship + engine's speed in the Ship Speed (2) row of the spreadsheet.
Answering Your Questions
What’s with all the Zs?
Sunless Sea has quite a few made up words beginning with Z e.g the Zee, Zzoup, Zailor and so on. Of course, the Z is simply an S, and I assume it’s a stylistic choice to make the writing more interesting.

Which Officers should I choose first?
I would say all of them. You should be able to recruit every Officer you come across; only the Modiste (First Officer) and the Poissonnier (Chef) are expensive to hire. If I had to prioritise one, I would pick the Genial Magician (found in London), because his storyline is quite easy to do and it rewards you with a great engine that will literally speed up your progress through the game. There is a 30% chance you get unlucky and will be locked out of receiving the engine however!
YouTube Guides
Sometimes the Wiki can be unclear or confusing and you want to see something actually play out from a player's perspective. I wanted to share some YouTube videos I found which were helpful.

Although minor aspects may be outdated now, Spork has made some guides on Officers' storylines and other stuff which you can find here.

A smaller YoutTuber that I found, Wayward Python, has made some videos more recently on storylines and other topics, also quite helpful. Watch them here.
Afterword
Thanks for reading, I hope you found this informative. Please leave any corrections in the comments but keep in mind some parts are just my opinion and yours may differ!

Credit to the Wiki for lots of information and some images used, and to the guy who made the fuel efficiency spreadsheet which I found in this thread here.
13 条留言
L3androvsky 2022 年 7 月 19 日 下午 12:41 
It helped a lot. Thank you.
aloejelly  [作者] 2022 年 7 月 15 日 下午 1:24 
I've forgotten a lot about his game so I might've made a mistake and I also didn't play the Submariner content so I really don't know how that ties in. You might want to ask on the Steam forums if you want to be certain about everything. I'm glad my guide could be helpful to you though :)
aloejelly  [作者] 2022 年 7 月 15 日 下午 1:18 
Regarding the ending you choose, I think the retiring via the wealth goal is the better option if you have the mansion and the money available. This is because in my experience it is much harder to do than the Avid Horizon (Merchant Venturer) method. So if you already have the money, you might as well use it. Also retiring to wealth counts as a victory (you will get the achievement for finishing the game), but you won't get this from the Merchant Venturer method (IIRC). The Merchant Venturer method gives you a Legacy Item instead.
aloejelly  [作者] 2022 年 7 月 15 日 下午 1:18 
2. First of all you'll definitely want the scion as mentioned. After that, you probably want to look into the Legacy Items which are items that give huge buffs to your next captain's stats (and all captains after that). You cannot obtain all Legacy Items with one captain or two, they will take multiple 'runs', so you should definitely be aiming to get 1-2 Legacy Items per captain.

If it's your first captain, I would be inclined to end the run sooner rather than later, with a scion and without worrying too much about Legacy Items, because you want to have that security of not potentially losing everything if you wind up dying somehow. This is especially the case if you are playing without the ability to make saves. But even if you are playing with saving, I think you can still die without being able to reload a save (IIRC).
aloejelly  [作者] 2022 年 7 月 15 日 下午 12:39 
1. As far as I remember, having a romance with an officer doesn't do anything at all. You want to have a romance with a sweetheart which you can do by choosing 'Carouse in Wolfstack Docks' when you dock back in London. You might need to do it a few times but eventually you will meet a lady/gentleman who can become your sweetheart. After some time has passed, and provided you keep making positive dialogue options when they appear, you will eventually have a child. The child can then be made into a scion (see the future-proofing section).

The reason you want a scion is because when you end your captain's run, you get to pass on items to your next captain by choosing a Legacy, and having a scion lets you choose two Legacies and therefore carry over twice as many things.
Narit 2022 年 7 月 15 日 上午 5:59 
Guide has been instrumental in me getting into this game, thanks. I do have a few questions (assuming these comments are still checked)
What's the benefit of a romance/kid and how do I actually do one? I've propositioned one of my officers but nothing has really come of it.
I'm nearing the point where I can end the game (be it via wealth goal or avid horizon), is there anything in particular I should try to accomplish or do to prepare for the next run? I know about herlooms but beyond that? I don't think I'm gonna end it yet but still curious.
Any submariner stuff?
fradow 2021 年 12 月 9 日 下午 10:26 
Ok, fair enough. That helps me evaluate trade without having lots of experience, but perhaps that's just me.

Here are the others I attributed prices to (it's an ongoing effort):
Mutersalt: 50 echoes
Vision of the Surface: 15 echoes
Admiralty Favour: 25 Echoes (repair ship cheaper or get Fuel)
Strategic information: 175 echoes: 150 echos + Admiralty Favour
Vital Intelligence: 350 echoes + Supremacy London (no clear value)
Outlandish Artifact: 100 echoes
Live Specimen: 100/150 echoes
Strange Catch: 25 echoes
Captivating Treasure: 1000 echoes
aloejelly  [作者] 2021 年 12 月 9 日 下午 2:29 
Ok I think I understand what you're trying to do but I think it's pretty impossible to calculate values for items which don't have set values. For example the items you've listed can be gained in many different ways so you can't really give them one value.

Also knowing whether a trade is worthwhile or not is just something that comes from experience of playing the game. I can most of the time know when a trade is a good idea even if I don't have a concrete value for the items involved.

With all that said, if you want to try to refine this and come up with some more prices I would be interested to see them, but I won't be adding it to the guide :)
fradow 2021 年 12 月 9 日 上午 10:55 
Nice, thanks for answering those questions in your guide!

Approximate price is how much you should expect for items, especially when you cannot buy/sell directly from a shop (or when shops have an outrageous price), so you can evaluate trades against a "baseline" price.
A few examples:
- 1 Terror: about 10 Echoes (London price before buying a townhouse, and commonly found in lots of places)
- Zee-Ztory / Memory of Distant Shores:10 echoes
- Tale of Terror: 10 echoes
- Recent News: 60 Echoes (5 Terror + 1 Zee-Ztory in the Light Ship)
- Moves in the Great Game: 50 echoes (that also means: don't use it to transform Strategic Information into Vital Intelligence, other options are cheaper)

Of course those prices are subjective, since you can get better prices on all of those, but that helps make decisions to get favorable trades (when prices are cheaper than that) and avoid bad trades (when prices are more expensive), by reducing everything to an Echoes price.
aloejelly  [作者] 2021 年 12 月 9 日 上午 10:34 
@fradow I made a section about weapons and I tried to answer the other questions in a new section at the end. What do you mean by approximate prices of items? Like a list of values e.g mushroom wine = 21, sapphires = 86 etc?