动物园之星

动物园之星

182 个评价
Some Personal Notes on Planet Zoo
由 Angraug 制作
Tips, tricks, hints, and work-arounds for Planet Zoo.
6
13
2
2
   
奖励
收藏
已收藏
取消收藏
Some Personal Notes
Is anybody else a little freaked out that there are Common Death Adders?
Shy Animals

A list of shy animals, who become stressed if they do not have somewhere to hide - so make sure there is a line-of-sight-blocking hiding place somewhere in the habitat, that the animal can access. Large plants such as bamboo and elephant grass are good for blocking line-of-sight from guests.
Animals are listed in alphabetical order:
  • Aldabra Giant Tortoise
  • Common Ostrich
  • Springbok
  • Galapagos Tortoises (though they get stressed more rarely than other shy animals)
Long-Lived Animals
One major advantage to keeping long-lived animals is that they usually breed throughout their lives, giving you multiple sets of offspring to rehouse, build up their genetics, or trade away for cash or Conservation Credits. (You also get less frequent depressing updates about them being near death.)
Long-lived animals (who live 50+ years) include:
  • African Elephant
  • Aldabra Giant Tortoise
  • American Alligator (?)
  • Galapagos Giant Tortoise
  • Gharial (though they don't live much past 50 years)
  • Greater Flamingo
  • Hippopotamus
  • Indian Elephant
  • Saltwater Crocodile
  • Western Chimpanzee

With some luck & good genetics, these animals also might live to see 50 years:
  • American Alligator
  • Bornean Organgutan
  • Common Ostrich
  • Cuvier's Dwarf Caiman
  • Western Lowland Gorilla

You can also find these statistics under the "Species Data" tab in an animal's Zoopedia entry.
High CC-Value Animals
If you are a practicing conservationist, and want to take care of all the animals that have a high cost in Conservation Credits (CCs), you'll need a way to generate those credits. Here is a list of animals that you can trade away or release to the wild for a decent chunk of CCs. Each of these animals usually sells for at least a few hundred (300+) CCs.
  • Bengal Tiger
  • Formosan Black Bear
  • Indian Rhinoceros
  • Siberian Tiger
  • Snow Leopard
  • West African Lion

You cannot trade away juvenile animals. You must raise them to be a Young Adult first.

The CC value of these animals fluctuates based on their Conservation Status, Appeal and genetics. Animals with lower Conservation Status (critically endangered, endangered, etc.) sell for more CC.
Albino or leucistic animals usually have greater Appeal than skin-typical animals.
Higher percentages of genetics (at least in the "green" level above 50%) sell for much more than those with lower percentages of genetics.

In order to Trade away animals on the player market for Conservation Credits, you have to box up the animal and put them in the Animal Trade Center. Then, find them in the Animal Trade Center and click the "Trade" button on the right.
There is a recommended default value to trade the animal for, but you can raise or lower this price. Be careful! I've seen some sneaky players try to sell animals with low genetics for 10,000 CCs! (The maximum amount of CCs you can buy an animal for.) Please do not do this.

To Quick Trade an animal and sell them for cash, you have to box up the animal and put them in the Animal Trade Center. Then, find them in the Animal Trade Center and click the "Quick Trade" button on the right. This will instantly sell them for significant cash.
If the animal is an elder (in the last, red quarter of their life-circle), OR if you already bought them for cash, they can only be Quick Traded for cash.

In order to Release Animal to the Wild in exchange for a handful of Conservation Credits, simply click on the animal in their habitat, and if they are not too old, not injured, and not diseased, you can "Release Animal to the Wild" with a button in the lower-right corner of their Overview tab.
Releasing Animal to the Wild usually results in fewer CCs for you, but it is instantaneous and guaranteed.
Education - Habitats
Animal Talks
Needs
  • power
  • 1 educator employee
  • space on a pathway for guests
  • a date assigned
  • flat ground space inside the habitat to throw food
Produces
  • +100% education AFTER the related animal has been fully researched

Animal talks are the best way to promote education among your guests. All guests who fully listen to 1 talk will gain +100% education.

Education before animal talk ---------------------Education after animal talk

Educator employees arrive at an animal talk about 1-3 weeks before it begins, and give the talk for an entire month. If space inside the habitat is available, the educator will throw food for animals in the habitat about 2/3s of the way through the talk (about the 20th of the given month). I have not yet determined if this adds to the food costs for the animals of the habitat, but I doubt it, so animal talks are a decent way to keep your animals fed for cheap.

Habitat Information Boards
Needs
  • power
  • a little flat ground space to set the board
Produces
  • +10% education

Speakers
Needs
  • power
  • any surface to attach to
Produces
  • +10% education
Barriers for Beginnerers
Barrier Basics
Undulating Barrier
There is a very important difference between "undulate" and "ungulate". An ungulate (with a G) is a mammal with hooves, such as a cow, goat, or deer. An undulating barrier (with a D) is a barrier that remains a fixed height (default 2 meters) no matter the terrain it crosses.
Note that when the terrain height changes, the height of the barrier remains fixed. This is what you might think of as a "standard wall", that follows the terrain height.

Flat Top Barrier
A flat top barrier keeps the top of the barrier at the same height relative a flat foundation line across the entire length of the barrier. The bottom of the barrier will adjust to always be in line with the terrain it stands on.
This means that you can build it across terrain that rises or sinks, and the top of the barrier will never move. Note that the height of the barrier depends on your starting location, and the default height is 2 meters (about 6 feet in American) above the ground where you first place the barrier.

Flat Top & Editable Bottom Barrier
Flat top & editable bottom barriers are slightly tricksy: as the name suggests, the top remains at a fixed height, so you can start off using it just like a flat top barrier (see above). When used on downward-sloping terrain, the bottom will extend to meet the ground, just like the flat top barrier. However, when extending into upward-sloping terrain, the barrier will keep the same top height and bottom height as it goes into the terrain, and it will not "shrink" even if it goes into the terrain (unlike regular flat top barriers).
note that from the starting point, the barrier keeps the same height, but does not shorten to match the terrain as the barrier goes into the hillside
starting in the middle and extending side-to-side, the flat top & editable bottom barrier will stay at the same maximum height, but only extend downwards if the terrain lets it

Curved Barrier
By selecting the "Curved Sections" option while editing barriers, you can place sections that curve more naturally than the series-of-small-straight-walls that happens by default.
The curved sections do not curve very much - not even quite up to 45-degrees from the start point, so you can make a not-quite-perfectly-circular section.
However, these curved sections might look more natural and better if, for example, you want to weave between the supports of a raised path, or make a wavy-style viewing section.

Barrier Tips
A handy way to set up barriers for a habitat is to follow the line of nearby pathways. Pathways will create an area of short grass around them, that may create a natural line you can follow to draw barriers. This natural line is a good distance from the edge of a pathway, to set up information boards or other narrow facilities or construction items.
the natural line has been approximately outlined in red

You can also reverse this, and make your paths line up with your barriers by selecting "Snap Alongside Barrier" under the Path settings (scroll down).

By changing the barrier height settings, using straight or curved sections, changing the length of the barrier section, and selecting & modifying specific sections of a barrier, you can create sections of barrier with different purposes, such as area for a gate (on the right) or a short-walled viewing area (on the left).

just one of the many things you can do by changing barrier settings, structure, and placement

An interesting concept I have used many times to contain animals while giving full viewing access to guests is to sink the habitat below ground, then build a viewing bridge across the habitat. In this way, the natural terrain acts like a barrier all on its own, and the sunken habitat does not need to be very deep, especially if you are going to surround it with a habitat barrier. A few meters (6-10 feet) of depth is enough to stop most critters - but beware! Natural terrain is climbable by all climbing species (such as monkeys)!

Construct a barrier normally around most of the habitat (at normal ground level). When you come to the end of a viewing bridge, use the "null" barrier to cross the viewing bridge, and continue the regular barrier on the other side.
Since the barrier is above the animals, and most animals cannot climb up sheer walls, you can make the barriers of almost any type to save money. WARNING: There are a few animals who can climb terrain! You will need the right kind of barrier (with anti-climb barricades) to contain these animals!
Habitats - Water
Water in habitats will need at least a Water Purification Facility, and possibly a Water Temperature Regulator Facility if the animal has an unusual temperature requirement. A Water Temperature Regulator will automatically balance the water temperature for something appropriate for the animal type(s) in the habitat.

this picture demonstrates the approximate width of a waterway, and height of any props above the waterway, needed for an animal to navigate under

As a rule of thumb, the waterway needs to be as wide as an animal is long. A proper pond will be as wide in diameter as the largest animal in the habitat is long. You can check the length / size of an animal on their Genetics tab, Physical Stats section.


Slope & Accessibility

If the slope leading down into water is too steep, animals will not be able to access the water. If the animals cannot access the water, the water will not count for their Terrain needs.
To make sure the slope is not too steep, you can use the Smooth function in the Terrain Sculpting tools.
Do not make the water too deep at the edges - grade it down slowly so that when you smooth it, it's more horizontal than vertical (less than 45 degrees in slope, definitely).


an example of a slope that is too steep
Pathways - Corners, Curves, and Overlaps
You can hold down the CTRL button to make pathways that do not snap together.

Corners
The best way to make neat corners is to check the "Auto Angle Snap" tool in Pathway tools. You can then create corners at 15o to 90o angles relative to the current pathway.
If you need more freedom in angles, UNCHECK the "Auto Angle Snap" tool. Wiggle the mouse around until you have the desired angle to create a corner or curve.

Curves (Horizontal)
The trick to curves is simply to UNCHECK the "Auto Angle Snap" tool in Pathway tools. Then, you can freely turn a path in any direction. If you attempt to turn the pathway back on itself, it will eventually "collide" with the path, and you will not be able to build there.
If you want to make a neat U-turn of pathway, use the "Auto Angle Snap" tool to make two 90-degree turns backwards. To make a circle of pathway, make three 90-degree turns. You may have to move the mouse carefully to make the auto-snap system line up properly.

Overlaps
It is possible to make large fields or plazas of pathways where guests can move freely, but it takes some planning & finagling.
To make a large field of pathway, you can start with a small circle by curving a pathway back in on itself [see Curves (Horizontal), above]. From there, add new, outwardly concentric circles of pathway until you fill the space you want.
Pathways - Different Heights
You can hold down the SHFT button to change the height position of a path.

When trying to merge pathways of different heights, you will have to build 1 section of pathway at the first height, and the next section of pathway some ways away at the next height. Pathways will need quite a lot of space to change heights dramatically, and if you put different-height pathways too close to each other, they will snap together without smoothly sloping & merging.
I have not yet found any display that shows the height (above foundation? above sea level??) of a pathway, so I've had to eyeball it so far without precise measurements.

Creating Ramps / Stairs
If you want to create a shallow ramp or steeper stairs at the end of a path, without having to build another level using the height adjuster, all you have to do is hold down the left mouse button (LMB) / your click-to-place button, and drag your mouse up slightly (to create a ramp)
Like the llama says:


or up sharply (to create stairs).


You can create a down-ramp or down-stairs by clicking and dragging downwards.
The style of the elevation change - stairs or ramp - depends on the exact placement of your mouse. If the angle between the different heights is steeper, the automatic system will place stairs. If the angle between the different heights is shallower, the automatic system will place a ramp.
The height and angle of these stairs / ramps are fixed - you get one or the other. If you need a pathway at a specific, custom height, read on.

One level of stairs created this way is not high enough to have paths that cross each other vertically - but two sets of stairs created this way should be high enough.
the azaleas are 4m tall, and a pathway needs to be at least 4m above another pathway for them to cross

1 section of ramp is half as steep as 1 section of stairs, so it takes a ramp twice as much distance to reach the same height as stairs.


Creating Custom Height Pathways
pathways that are too close together; the higher pathway snaps down to the ground-level pathway

a higher pathway that is far enough away from the ground-level pathway to change heights

a higher pathway merged with a ground-level pathway via automatic sloping

a pathway with 3 separate heights - ground-level, medium-level, high-level

If the difference in height is too great, the pathways will not automatically slope together, and you must build another pathway at a median height.

roughly, the minimum height of one path about another path, to overlap paths vertically

The azaleas are 4 meters long/tall, so the minimum height of one pathway above another to overlap needs to be at least 4 meters.

if the terrain on either end of a bridge is perfectly the same height, there is no issue

pathways work the same if any terrain in the middle is the exact same height

In a case like this, the pathway system still might count the terrain in the middle as a bridge / elevated section. Notice the railings (which I set to only appear on elevated pathways).

If you want to build just a very short stairway, maybe 1m up, here is the way to do it:
  • Select a small Facility like a shop or Keeper Hut.
  • Place the small facility near the pathway you want to raise up.
  • Hold down the SHFT button / your height-change button and raise or lower the small facility until you have the desired height of the path.
  • Click to place the small facility, and the stairs will spawn to link the small facility with the nearby pathway.
  • Delete the small facility, and the stairs will remain.
  • You can then create a new pathway from the top of the stairs, at the same height.
Credit for this idea goes to YouTuber Toves, who in turn collected ideas from other sources in this handy-dandy video:
Project: C.H.U.D.
Join me as I attempt to complete Project: C.H.U.D. (Crocodilian Happy Underwater Display). The goal of the Project is to build a half-aboveground, half-belowground habitat for any of the semi-aquatic reptiles: Saltwater Crocodiles, American Alligators, Dwarf Caimans, etc. In doing so, I will be exploring the use of many different terrain tools and pathing directions to figure out the best (and hopefully easiest) design. Follow along, and learn from my mistakes so that they may never be repeated. Save yourself (some time and frustration)!

Planned Features:
  • ground-level land habitat
  • underground AND underwater viewing section
  • underground lair / nest
  • coastal cave-like theme

Budget Proposal: $10,000
Your biggest expenses will be barriers (probably), pathing (maybe), and habitat enrichment. Terrain was actually the cheapest part of the design - it didn't cost me more than $1,500. Barriers & pathing, on the other hand, cost about $4,000.
Of course, if you need a new Water Temperature Regulator and Water Treatment, the cost will go up *significantly* (each cost $2,000).
This proposed budget does not include outside-of-habitat facilities such as educational items.

General Tips:
  • For a project of this scale, do ALL your terrain modification before adding in any barriers, paths, construction items, or habitat items. (For projects of smaller scale, you might want to place down barriers or paths first.)
  • Make sure to use special settings for terrain, barriers, and pathing.

Step 1: Terrain
I started by using the cylindrical Stamp tool to carve out a canyon; I didn't think it was deep enough, so I used the Stamp tool again at the bottom of the first canyon to make one twice as deep.
You can adjust the upper height (with the + selected) or the minimum depth (with the - selected) by holding down SHFT and wiggling your mouse up or down. The stamp tool has a maximum height of 10 meters at a time. You can see where the bottom of the Stamp tool is by how straightly it lines up with the ground; if you see crinkling (as above), then it is not even with the floor level.
To make the ramp up from the bottom to the surface, I used the stamp tool to push into the wall of the cave, then gradually raised the minimum depth of the Stamp, then used Smooth Terrain to make it look like an actual ramp.
It turns out I could have just started my pathing down here, and selected the "Tunnel" option under pathing settings, and made a nice, neat, smooth tunnel from the bottom to the surface.
To make the overhang, I used Flatten to Foundation on the ground level, and it automatically created a thick layer of terrain over the cave area.

Step 2: Barriers
I then put in my glass barrier to make the cave viewing area; I used the Flat Top setting on the barrier to make sure it would be even all the way across. I stuck either end of the glass barrier into the walls of the cave.
Then I grabbed the top of the entire barrier and dragged it up in the ceiling, so it would look flush with every edge of the cave.
Placing the chain link barriers around the rest of the habitat was easy; I chose chain link because it's one of the cheapest options, and with the sheer sides of the habitat, I don't have to worry about the crocs attacking the barrier. I placed the habitat gate in the cave viewing area (because that's the only place I left myself space to put it! If you want to place your gate somewhere further away from guests, plan better than I did.)

Step 3: Paths
Pathing was somewhat difficult, since I had to work underground and on slopes, and I didn't simply use the Tunneling Tool under Pathway settings.
What I actually did was start the pathway at the upper-left outer ring of the habitat, where I connected it to the path above, and then went around the outer ring until I hit the ramp leading into the cave area.
The pathing did give me a little trouble; I had to make sure there was enough flat space in the outer ring with no overhang to fit my 5m path; I simply carved out a shallow cave in the wall, and I am planning on making that a natural viewing area with cave-like scenery.
When doing your pathing, I highly recommend using the Tunnel setting of pathing; then you can just drag your path downwards to create ramps or stairs, and it will automatically create a tunnel with enough height to accommodate guests & workers. It will also make sure your path sticks evenly to the ground, with no bumps or kinks. The Tunnel system also gives you more control over where your path goes; you can draw paths freehand, or use Snap to Angle. In my design, I overshot where I wanted to go with the path, and had to Undo and try it again.

Step 4: Water
The water, thankfully, gave me no trouble at all. I simply used the Add Water tool to set it at the height I wanted, and since my glass barrier fit wall-to-wall, it did not give me any placement errors. Since I wanted to be able to see my crocs swimming around, I make sure to click on the water, go to the paint tab, and make it clear tropical water, instead of murky Amazon or Everglades water.

Retrospect
I probably didn't need to dig down as deeply as I did; the underwater viewing area & sunken habitat itself could've been at at half the depth.
I came in a little over budget because I splurged a little on habitat Nature items & enrichment. I had to take out a few trees & some bamboo to reduce coverage.
It would've been better to use the pathing Tunneling tool, and build a two-way path to the viewing area underground, instead of having it dead-end at a talking point.
Finances
Interestingly, even if you have no money left and start to go into serious debt, the game does not end. You cannot "lose" Planet Zoo. Instead, when you go into debt (a negative cash total and negative income), you just can't build anything new that costs money.
If this happens, you can take out a loan from the Finances tab of the Zoo overview. However, you had better make sure that you use that money to pull in more guests & make your zoo more attractive to them, so that you can generate a positive income. You will also have to pay back the loan + interest over the course of years.

Training & Promotions
Be careful when and how much you train up Staff. Their pay goes up dramatically (about +50% of base salary) for each level of training they receive.

To keep Staff happy without paying nearly as much, give them a Perk at their local Staff Room.

Side Costs
Remember that even after you build a habitat, place construction items, and buy critters, there are often long-term side costs in the form of water treatment, power, and the salary of your staff members. This is something to keep in mind particularly when placing shops - shops automatically hire a new vendor to work at each one, and each of those vendors has a salary that you will be paying.
This means that the "real" cost of a new exhibit, habitat, or shop needs to factor in the cost of staff used to maintain it.
Money-Saving Tips
Early Game
  • Exhibit animals are cheaper in every way than habitat animals. With your starting cash, you should be able to build several Exhibits for the price you'd pay to build one medium habitat.
  • Don't bother with construction items or blueprints until you have some spending cash. Blueprints can get very expensive! AFTER you've got some spare cash, then you can doll up your facilities with construction items.
  • Your Animal Trade Center is shared across your own account, including among your different Franchise zoos. You can breed animals in one of your zoos and transfer them to a new zoo. This has no cost, and now you have free animals to draw in customers!

Short-Term
  • If you make a mistake placing an item, choose to move the item you already placed, instead of selling / deleting & making a new one. When you delete / sell an item, you only get part of the cost back, even if the game is paused. Alternatively, try pressing CTRL+Z to "undo" an action, or CTRL+Y to "redo" an action. This seems to give/take the full price while the game is paused
  • Plain Facilities (without extra Construction add-ons) are usually much cheaper than pre-designed Facilities. The trade-off is that guests will not be as happy using plain Facilities
  • You can save up the Challenge rewards you get from completing small side-tasks (such as breeding animals or raising profits on venues), and then collect those cash rewards when you're in a tight spot financially. The rewards might be enough to build an exhibit, small habitat, buy a new animal, or start a marketing campaign.


Long-Term
  • Use Solar Panels or Wind Turbines instead of Transformers; though they cost 4x as much, and provide power in a smaller area, they have no power running costs
  • Be careful about how often and how many staff you train up. Their salary goes up about 50% of their base pay each time they train up
  • Use the Exhibit "Manage Population" tool in the info box to store extra numbers of critters. Most exhibit animals are happy with 1-2 adults of either sex, so you can store the elder generation, or store the younger generation(s). With several exhibits, you can store lots of creatures over the course of a few years, then sell them en masse for tons of cash! (We're talking $100,000+!)
Care & Feeding - Bornean Orangutan
Terrain Needs
One of the most consistent problems I've seen with Bornean Orangutans is a good space-to-population ratio. It's very easy for Bornean Orangutans to get overcrowded, so if the habitat is on the small side, maybe limit your Orangutan population to just 2 adults, or 1 adult and 1-2 juveniles.

Adult Ratio
Space is a very important factor when considering adult ratio. Orangutans move in fairly large social groups, as long as there's enough space. You can easily fit 1 male to 3 or 4 females, but to prevent overcrowding, make sure the habitat is extremely large! The minimum requirements for orangutans might fit a mated pair of 1 adult male and 1 adult female, but if they have any offspring, it gets overcrowded very quickly. I would recommend at least doubling the minimum area if you plan on having more than 1 male and 1 female.
The best adult ratio is 1 male : 3-4 females

Conservation Credit Value
Bornean Orangutans do not sell for as many Conservation Credits (CCs) as you might think. Improving their genetics, appeal, and overall happiness will increase their value.
Care & Feeding - Saltwater Crocodile
Terrain Needs
Saltwater Crocodiles need quite a bit of water, at about a 2 land : 1 water ratio (or better), so at least 1/3 of the enclosed habitat should be water.

Adult Ratio
Saltwater Crocodiles are polygynous - one male can breed with multiple females. However, if there is more than 1 adult male, they will fight. If there are too many adult females (3 or more), they may occasionally fight, but I have not seen nearly as much infighting among females.
A good adult ratio is 1 male : 1-2 females.

Conservation Credit Value
The only real "drawback" I have seen with Saltwater Crocodiles is their low value in Conservation Credits (CCs). Even a Saltwater Crocodile with good genetics and appeal will only go for up to 100 CCs.
Care & Feeding - Snow Leopard
Adult Ratio
One of the most common issues with Snow Leopards is infighting: when there are too many adults in the same enclosure, they will attack one another sooner or later. "Too many adults" is more than 1 adult male OR more than 1 adult female.
Pay attention to messages about when Snow Leopards are maturing, to remove extra adults.
Juvenile Snow Leopards do not cause or initiate infighting.
The best adult ratio is 1 male : 1 female.

Conservation Credit Value
One benefit of raising Snow Leopards is their high value in Conservation Credits (CCs). Even Snow Leopards with poor genetics and appeal will go for 300-400 CCs.
Care & Feeding - West African Lion
Terrain Needs
In spite of what you may have seen on nature documentaries, the West African Lions in Planet Zoo do not prefer tall grass. Instead, they prefer wide-open plains of short grass and rock.
I was surprised at how small a space West African Lions need in their habitat - a single adult only needs about 900 square meters, which is about 1/7th the size of an American football field.
However, since you will likely have several adults and more juveniles running around, I recommend building a habitat that is 3000 square meters (about half the size of an American football field), or larger.
(If you've ever been to the San Diego Zoo in California, U.S.A., you may have seen the smallish habitat that houses their lions. Please think about donating and let's see if we can get them a bigger habitat!)
(The San Diego Zoo did not sponsor this message in any way.)

Adult Ratio
West African Lions are polygynous, with one male overseeing a potentially ridiculous harem of 30 females. I don't recommend having a pride this size, but 1 male to 2-3 females should make everybody happy. If you are planning to breed West African Lions heavily, make sure that you have a very large habitat, because the offspring take up to 5 years to mature, and they will need lots of exercise room!

Conservation Credit Value
West African Lions are one of the animals that sell for oodles of Conservation Credits (CCs).
18 条留言
Scoopitybop 2023 年 11 月 14 日 上午 11:07 
Imagine having to give a lecture for a entire month after waiting 3 weeks to give it. 💀
Yellowstone 2023 年 7 月 26 日 下午 2:24 
This is awesome! I got some inspiration from the croc habitat! INCREDIBLE!!!:steamthumbsup::steamthumbsup::steamthumbsup:
Angraug  [作者] 2022 年 12 月 9 日 上午 6:56 
:D
Yapybara 2022 年 12 月 8 日 下午 11:57 
I found this guide really helpful, thank you for sharing your expert advice to the rest of the PZ Community!:steamthumbsup:
WolfieWrites 2022 年 12 月 3 日 下午 1:54 
This is amazing! I am a newer player who struggles with the animal needs and habitat/barrier places. This really helps!
Hidden_Llama 2022 年 11 月 6 日 上午 1:19 
Flamingos are also shy animals - they get overwhelmed by crowds, especially if you let guests into the habitat.
Ivan 2022 年 10 月 15 日 下午 7:08 
Thank you! This has solved some of my problems in my game!
RaccoonSaloon 2022 年 2 月 21 日 上午 8:23 
For pathing, if you hold CTRL+SHIFT you can adjust the height of your path pieces like an invisible slider! That way you don't need to do the nonsense of buying a shop and raising it to get a couple of steps.

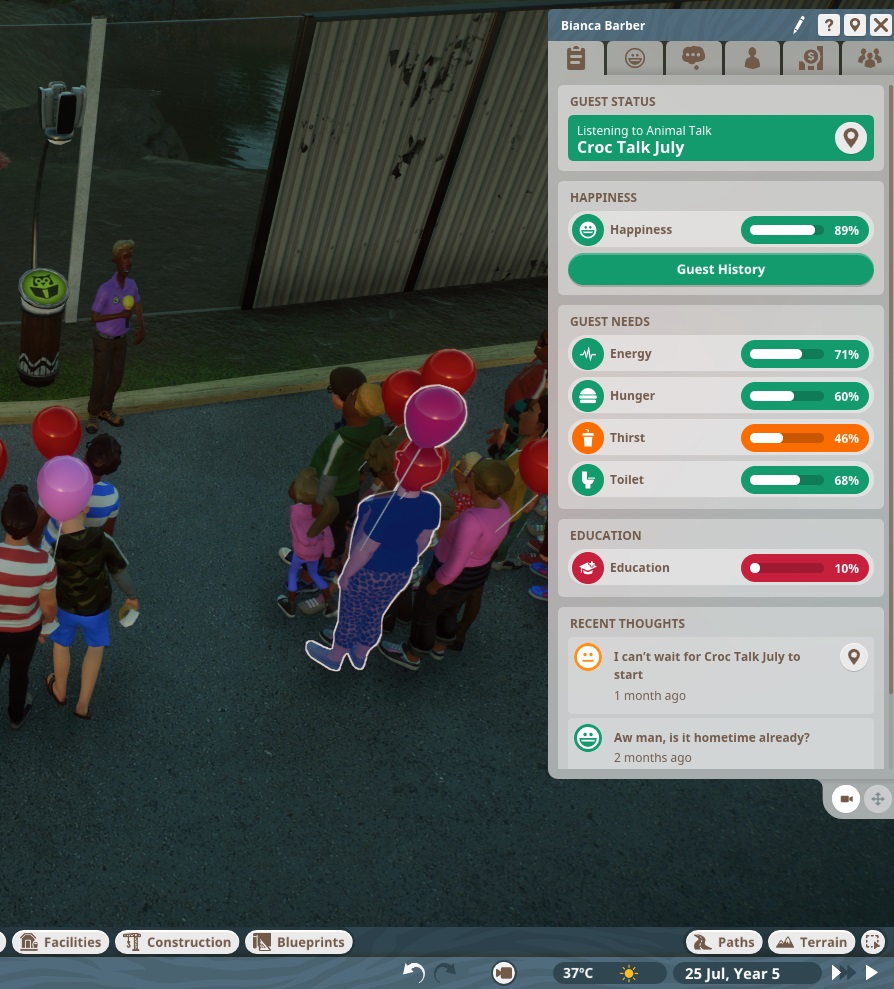
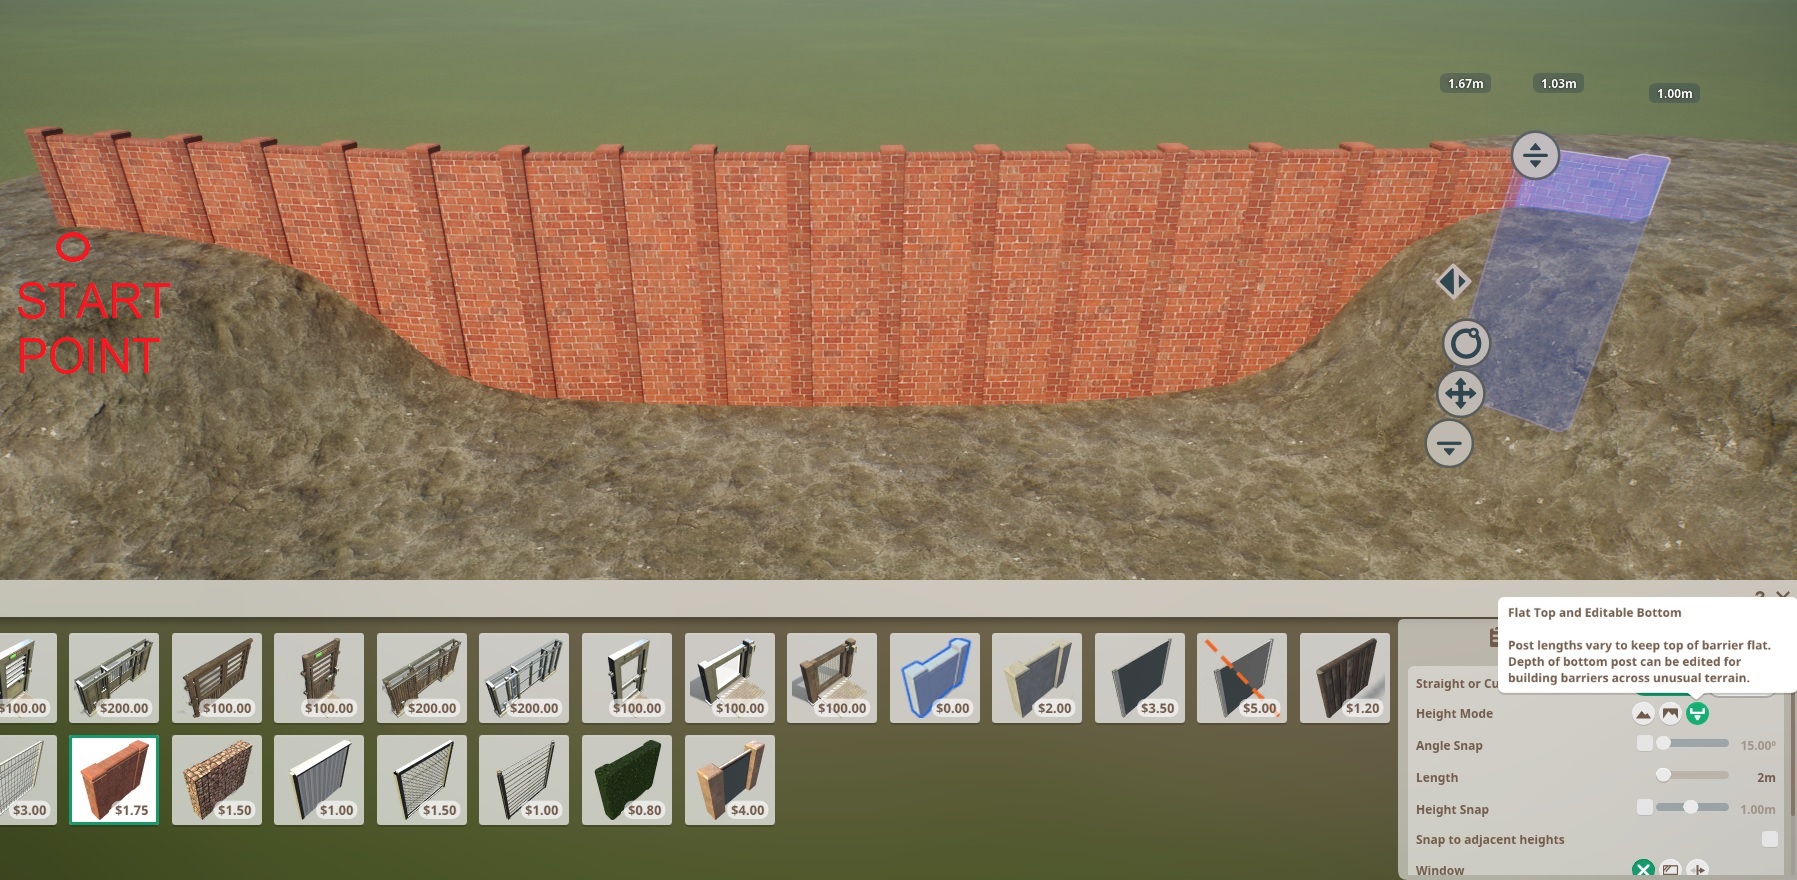
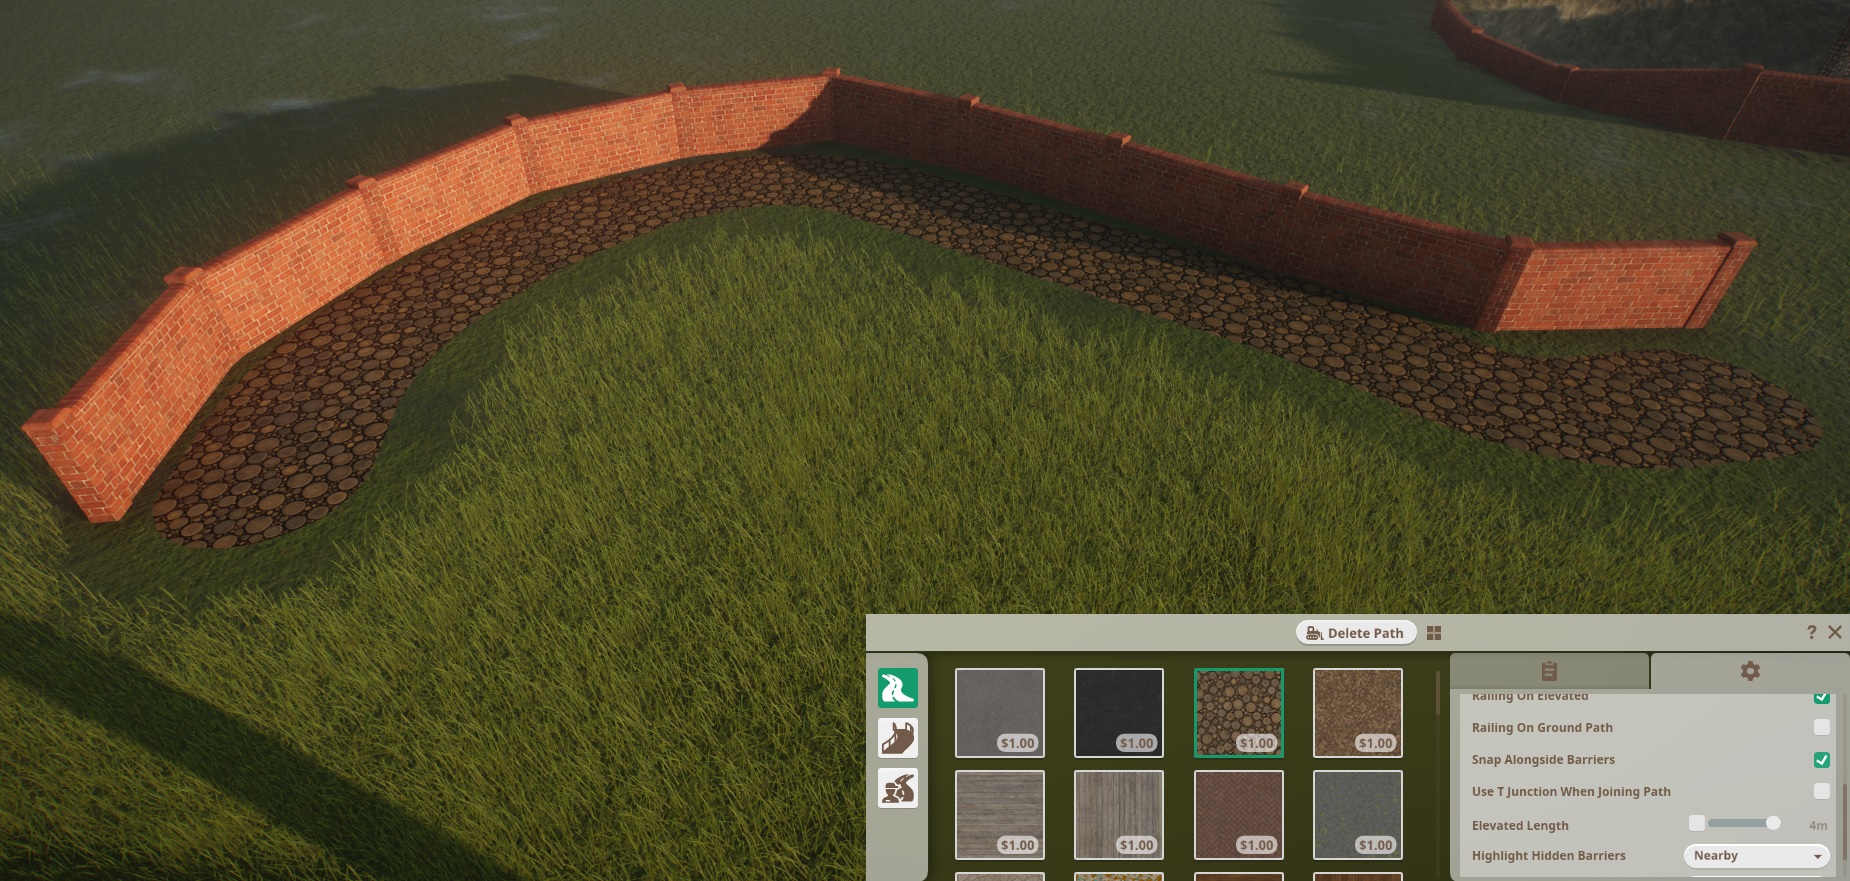
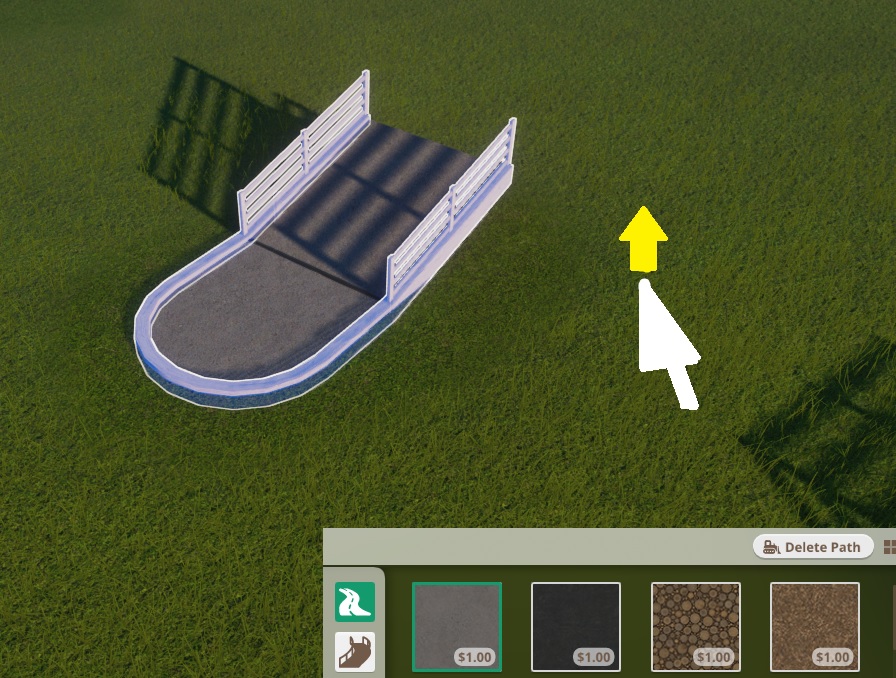
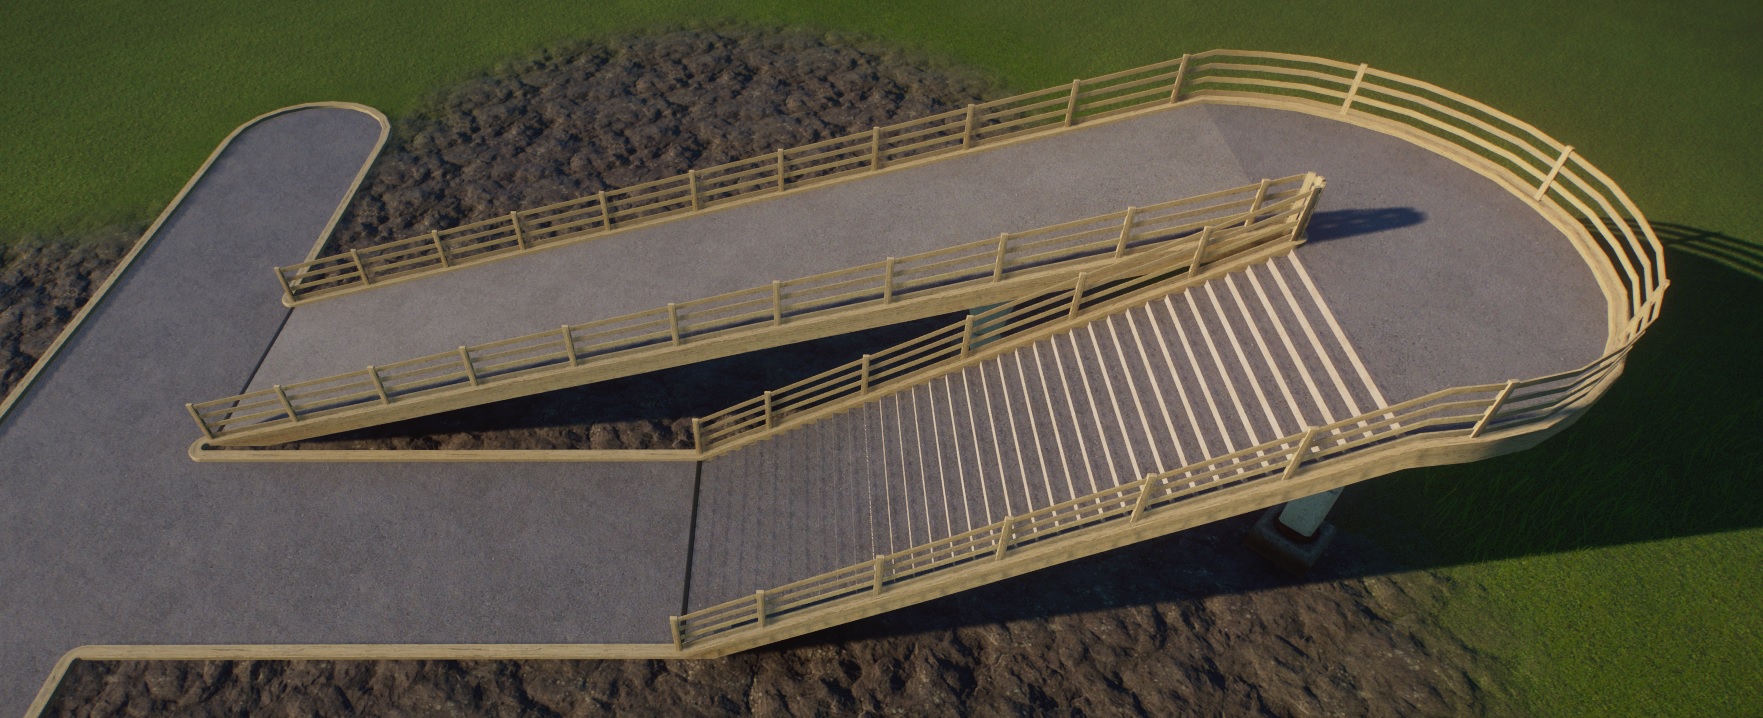
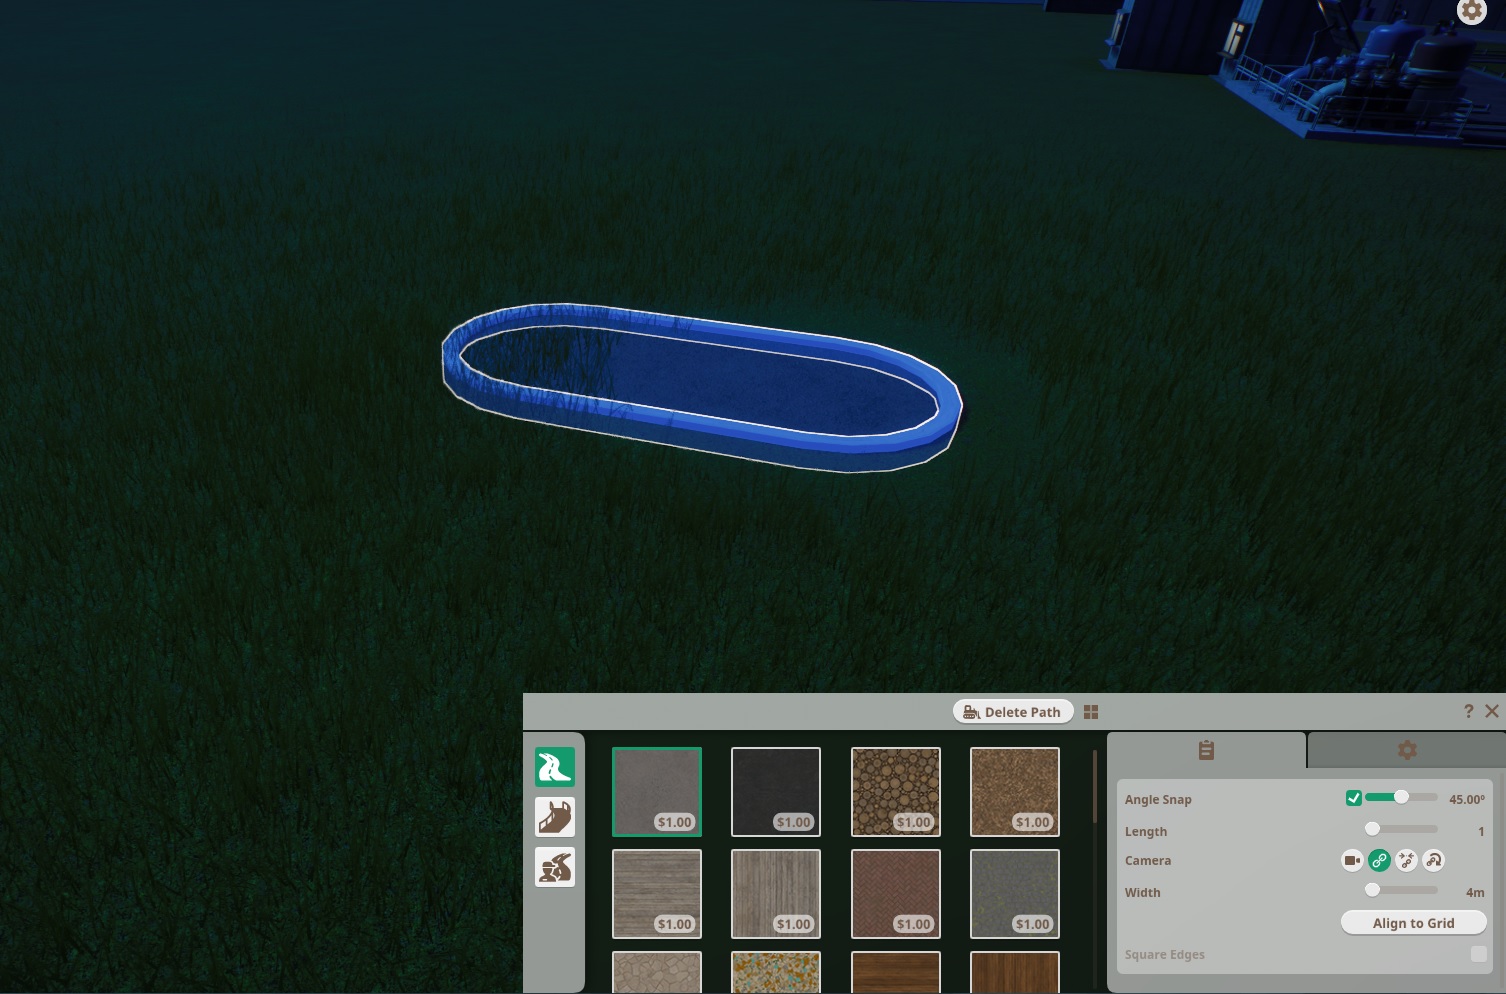
Holding CTRL keeps the path piece from snapping to another path, so you can place paths right next to each other.

SHIFT while holding CTRL allows you to manually adjust your height for your path. You can do this too to create more gradual slops for your path, it just requires some patience and eyeing up things to keep everything in line as much as possible.
RaccoonSaloon 2022 年 2 月 21 日 上午 8:22 
To do a gradual slope you do it in at least 3, or more for longer "hills", pieces:
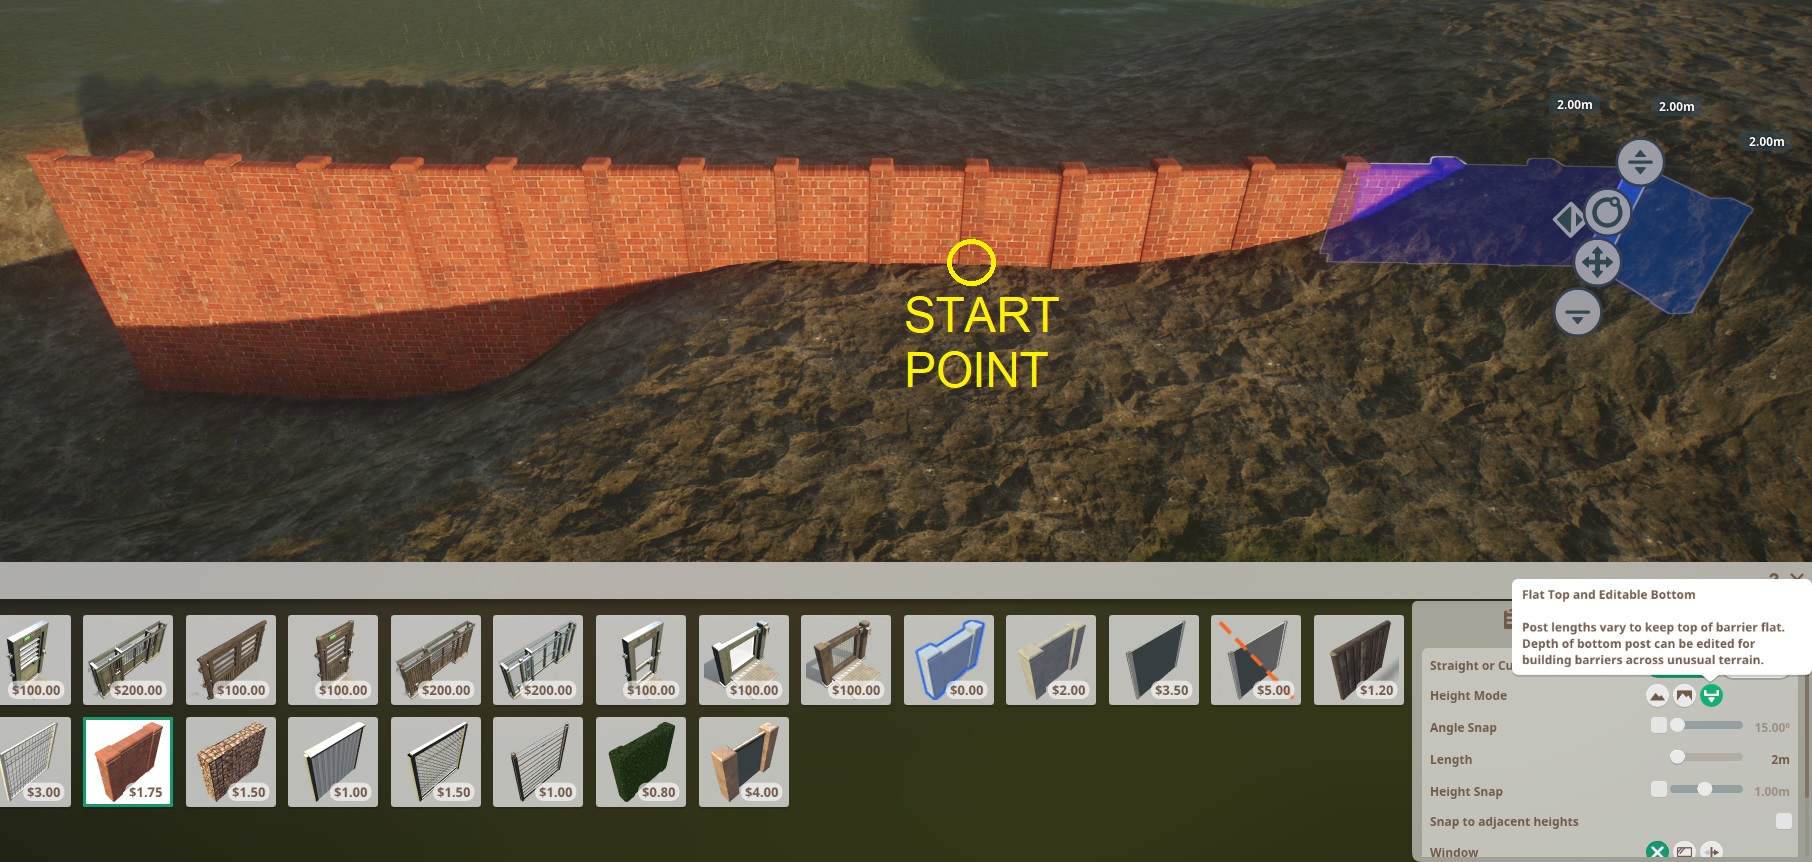
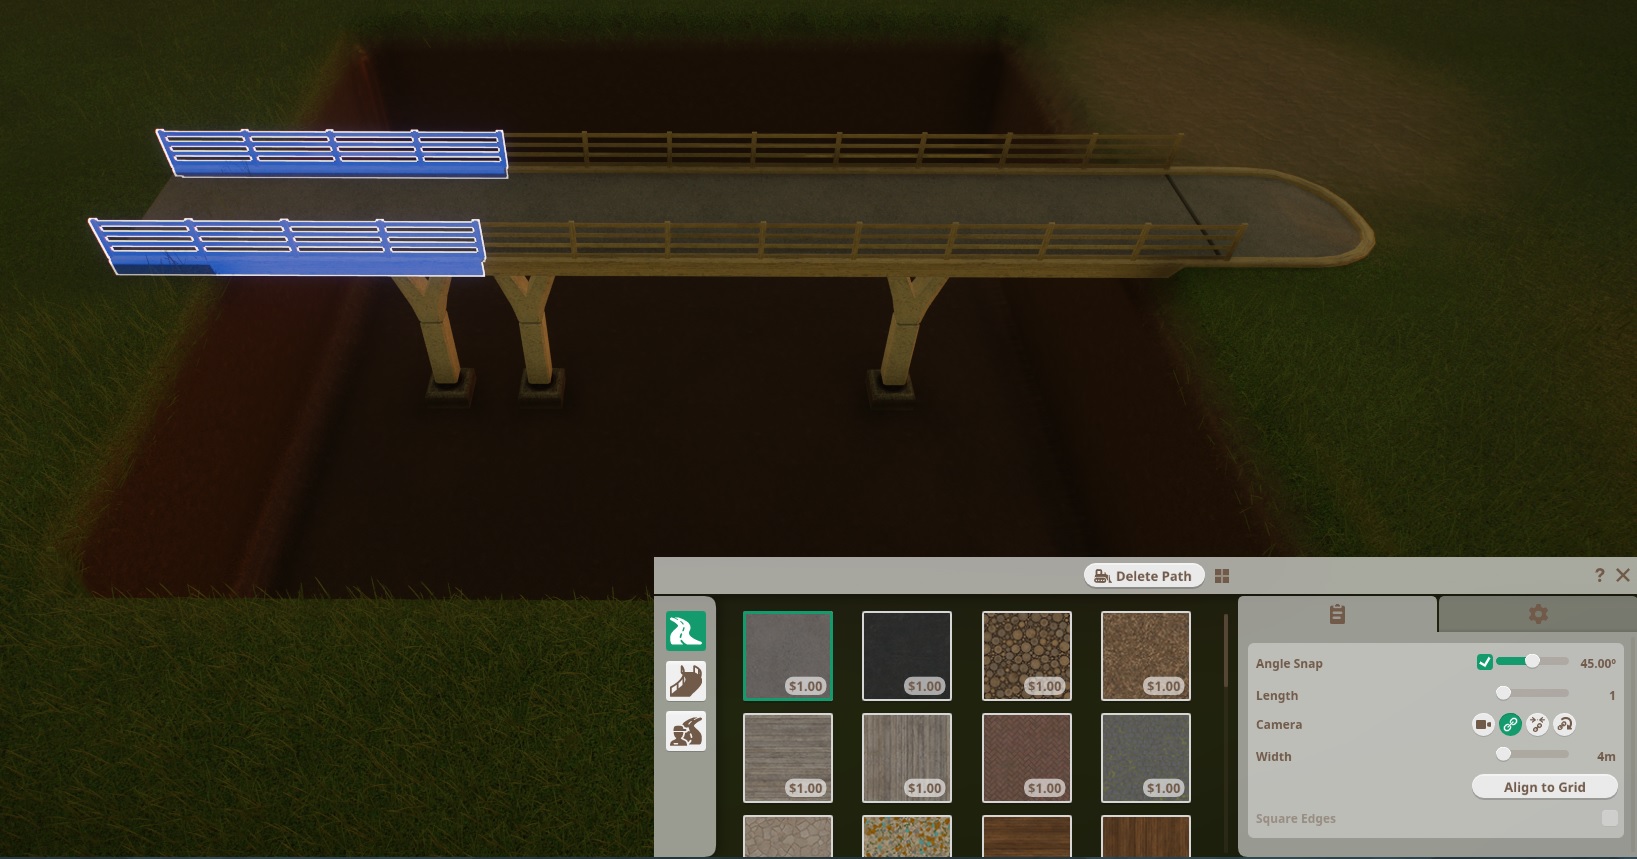
- Figure one end and place a single piece of path, either a single circle, or square if you are using square edges.

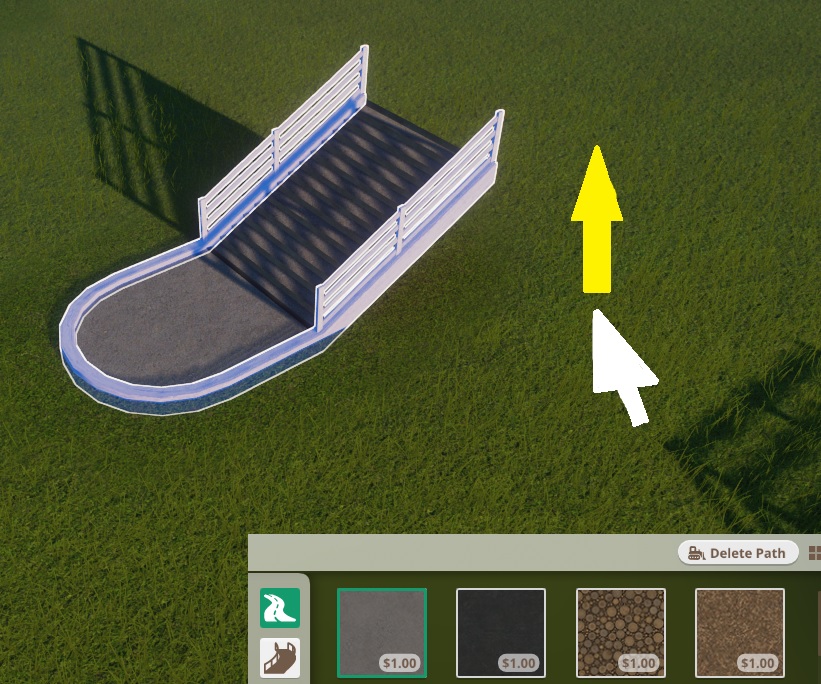
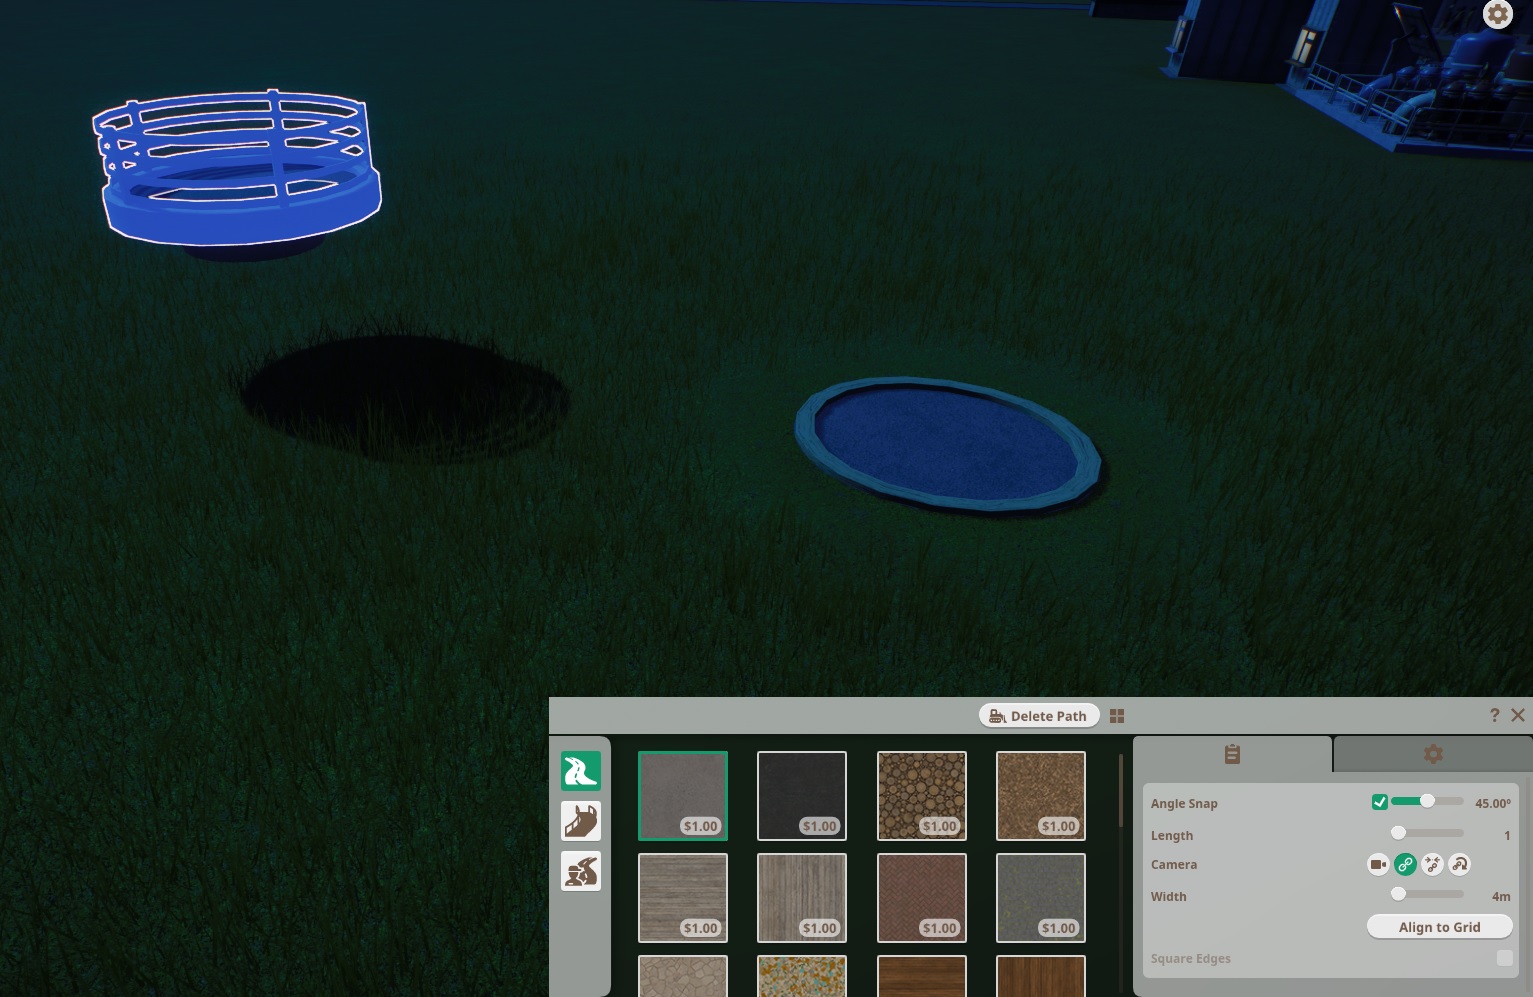
- Then go out a way from where you want your path to head and do the CTRL+SHIFT method to slowly raise up your path placement from the ground a bit. Place the new piece.

- You can repeat this again to slowly go higher and rinse repeat till you get the height you want.

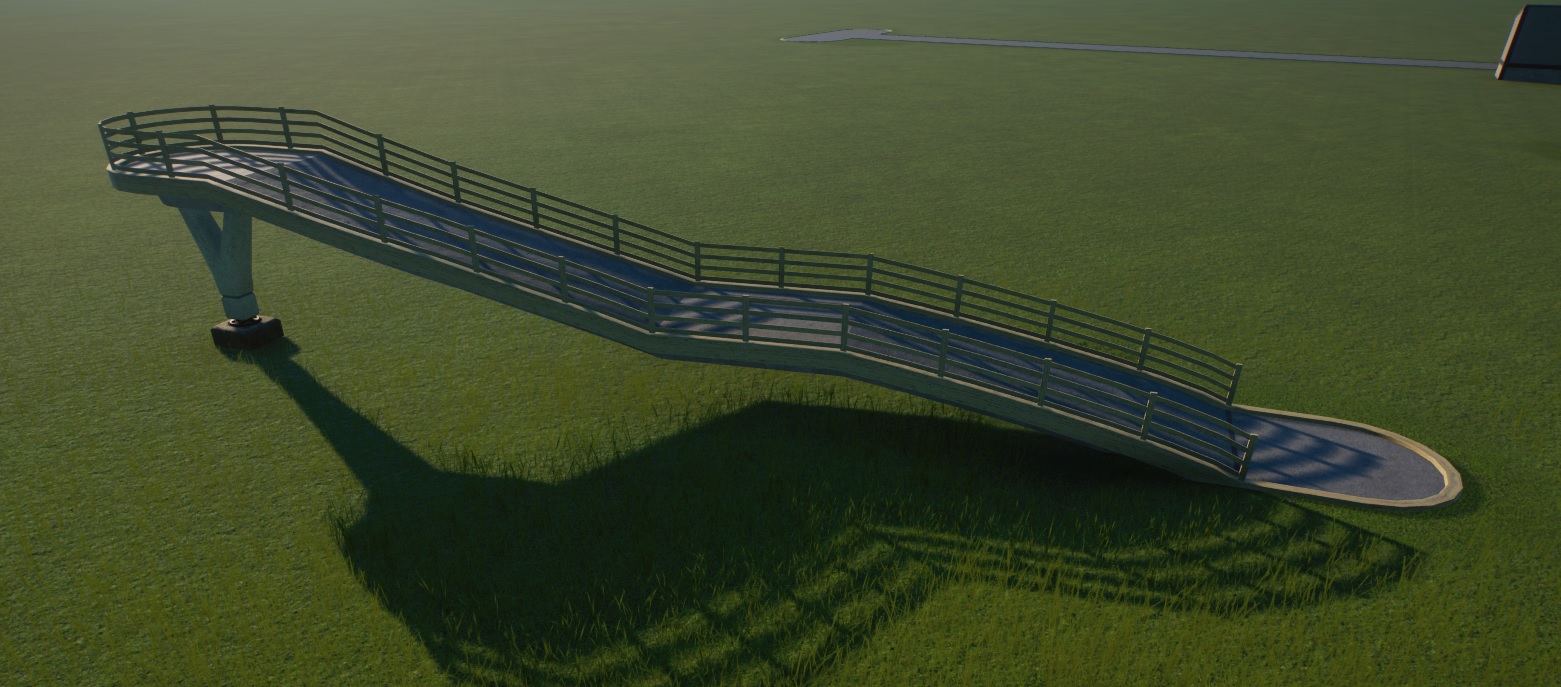
- When finished do the same thing but now slowly go down, placing pieces here and there to control the slope, all while using CTRL to keep the paths from snapping together.

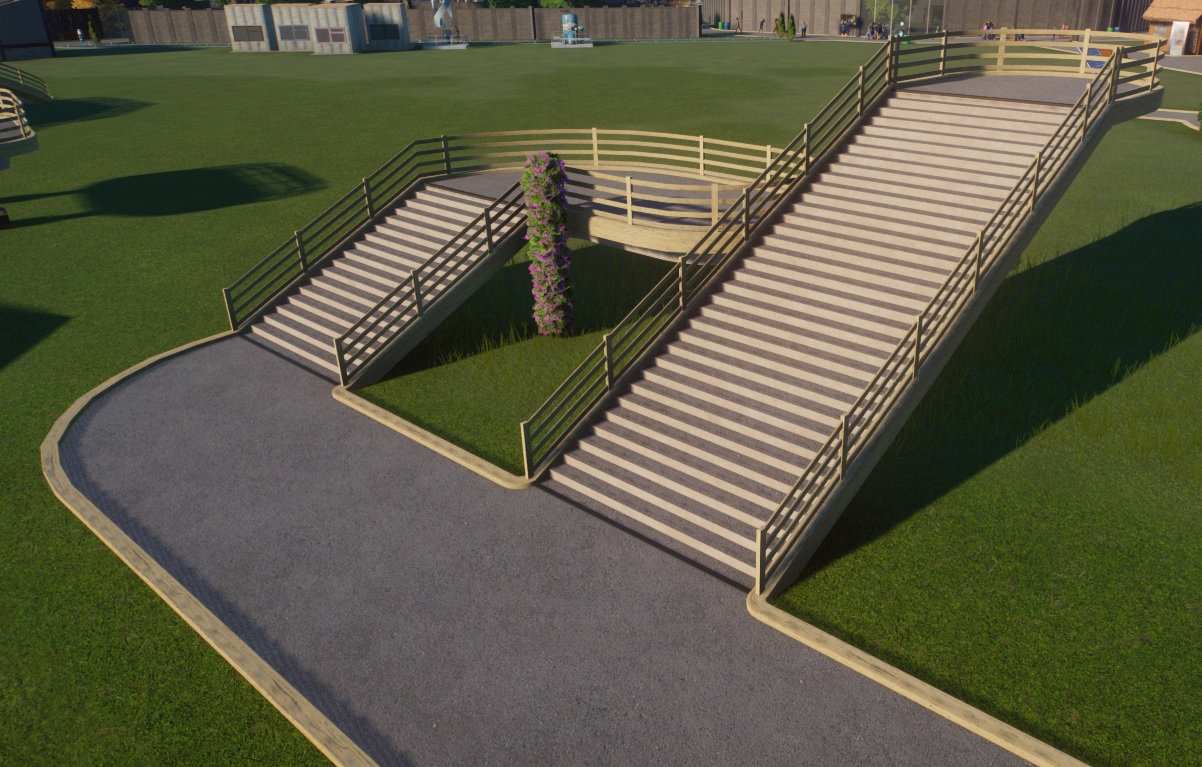
- Once you hit the end of your "hill", connect the pieces without holding CTRL and you'll notice that now instead of a sharp ramp connecting your paths, they gradually slope up and over for a softer look!
mzda_grl 2021 年 12 月 5 日 下午 7:18 
Very nice guide! I really should have read this long ago.