循环勇士

循环勇士

33 个评价
Information about the 4-team secret boss (SPOILERS)
由 turtle1won 制作
This is a guide covering how to summon this boss and details on how to get the best chance to beat it
(SPOILERS)
   
奖励
收藏
已收藏
取消收藏
Introduction
So you want to learn how to summon and get a few pointers on how to beat it?
This just might be the guide for you then, however there are a few things I should go over:

-I have not yet beaten this boss, everything in this guide has only been put from interpretation and analysis of the enemies and patterns of the fight.
(I have now beaten this boss, thanks to commentators explaining their strategies. However, I don't plan on changing this guide by much or making a new guide entirely simply because I'm lazy. I used rogue on chapter 3 for my victory. Surprisingly, when I fought them, the DECEIVER didn't have his health reduced by 50% (or at all) despite my camp supply having 25 empty item slots (18/43). I assume this is a bug but it could also be something I'm missing[?])

-This guide includes spoilers on not only how to summon the boss, but also what abilities they have to use against you. If you wish to find out more about this secret boss on your own, this guide is not for you.

-This guide will not be detailing a step by step guide on how to defeat this boss, rather information and interpretation of how to increase the chances of defeating this boss. However, I won't stop and actually highly encourage anyone from deciding to share information on ways to defeat this boss in the comments.

-Loop hero is still an early game and everything is subject to change, the version that this guide was made in is v1.012

-I am open to any criticism or changes that you think can make this guide better for everyone, I will make sure to credit you if I use your word(s) to make a change to this guide.

-how am i supposed to know the genders of these characters

-I originally wrote down all of the information said in this guide in Notepad for myself but I decided to make a guide from it cause why not


Summoning
I won't go too much into detail about how to summon this boss but I will do a quick summary.

This boss is summoned by having 6 or more different cards that have area effects touch a single tile, this will start to make blue particles come from that tile.
Once you see those particles, use an oblivion on that tile which will then spawn the boss on that tile.
Here are some examples of cards that can be used to summon the boss:

-Vampire Mansion
-Battlefield
-Bookery
-Road Lantern
-Smith's Forge
-Chrono Crystals
-Outpost
-Beacon
-Temporal Beacon
THERANDOM
THERANDOM is one of the four enemies that are a part of this boss, and should be one of the first ones that you should focus on fighting, due to his high damage output, however there are ways to lower his damage output.
Here is all of his abilities (there is also an image present and will be for all enemy sections):

"Life-Loving"
Against the necromancer: always the first target in battle and recieves double damage.

"Perfectionism"
+5 damage for each unoccupied camp tile
(Farms and the gardens that they spawn DO count towards occupying tiles. This fact was tested and discovered by Dasorine)

"Story Lover"
-1% damage for each unlocked monster article (no more than 50%)

"Useless Debate"
When health is lower than 60%, causes the entire team to argue for 3 seconds

Notes:
Use necromancer to kill THERANDOM easier

Occupy as many spaces in your camp as you possibly can

Unlock as many monster articles as you can (up to 50)

Targeting THERANDOM first can help because of the "Useless debate" ability


DECEIVER
The DECEIVER is likely one of the toughest one from the four enemies to face in this boss, due to his ever-increasing health. However, similar to THERANDOM, he has a few ways to reduce his insane health, which can be seen in his abilities listed below:

"Pacifist"
Against the warrior: always the first target in battle and receives double damage.

"Grind"
Health is equal to [Number of monsters slain on this save x2]

"Item Lover"
-2% health for each empty slot in the camp supply
(Has a hidden cap of -50% health or 25 empty supply items. Credit for this discovery goes to Dasorine)

"Deadline"
+100% attack speed when health is lower than 20%

Notes:
Use warrior to kill the DECEIVER easier

Using a smaller or even fresh save file can help because of the "Grind" ability, or un-equip useless items in your supply

Keeping a balance between items and empty items can be helpful due to the "Item Lover" ability

It may be best to kill the DECEIVER last because of the low damage output and because getting the DECEIVER to low hp triggers the "DEADLINE" ability


FINLAL
FINLAL might be one of the most flexible enemies in this fight, being one that will have stats that will likely change on each attempt, while also being one of the most difficult to kill because to one of his abilities. You can counter this by either playing rogue or following along with his abilities which are shown below:

"Gullible"
Against the rogue: always the first target in battle and receives double damage

"Speedrun"
+1% attack speed for each occupied tile in this expedition

"Casual"
-25% defense for each chapter after the first one.
(C1 = 0%, C2 = -25%, C3 = -50% and C4 = -75%)

"Not Bug, But Feature"
When health reaches 1%, either gives up or gets +100% hp and fully heals

Notes:
Use the rogue to kill FINLAL easier

Going to this boss earlier rather than later might be better due to the "Speedrun" ability

Going to this boss on a later chapter makes the difficulty counterbalanced by the "Casual" ability

Killing FINLAL might serve to be quite difficult due to the "Not Bug, But Feature" ability


BLINCH
BLINCH might serve to be one of the tankiest enemies in comparison to the rest of the team because of his high evasion on high loops and because he will always be the second target after you beat the hero-specific enemy. However, his damage output can easily be so low it can barely touch you with one simple trick (this trick will be covered in spoiler text because it might be fun to figure it out during the fight)
Anyways, here are the abilities to BLINCH:

"Teamwork"
Always the second target in battle

"Bunnyhop"
Evasion is equal to [Loops completed in this expedition x2] (Not more than 50%)

"Musica Universalis"
??? Attack power ???
(This ability provides no information other than the fact that
his attack power scales in some way (Scroll down to notes to see the hidden
effect))


"Procrastination"
30% chance to skip the attack

Notes:
BLINCH will always be the second target in battle, however his damage output
(can easily) be extremely low. Try to get as much DPS as possible against
BLINCH.

"Bunnyhop" gives another reason to try to fight this boss as soon as you
are ready to.

"Musica Universalis"
This ability's secret is the master volume in the game's settings (yellow slider)
The higher the volume, the more damage he does (between -75% to +75%)


BLINCH in general does not do that much damage and is mainly there to stall
you from letting you attack the other "team members" if you can, try getting
as much DPS as you can against BLINCH.


Summary
This section is essentially what to think about and what to focus on when and before fighting this boss, which includes planning and how to go about the fight:

Depending on what hero you pick, you will attack a different target. The necromancer might be the most beneficial from this fact as THERANDOM should be considered a priority target unless you manage to reduce his damage output to a tolerable amount

Try to fill up as many camp tiles as possible to reduce the damage dealt by THERANDOM

Unlock as many monster articles in the encyclopedia to reduce the amount of damage THERANDOM does even more (up to -50%)

Using a fresh save might prove to be useful to reduce the health that the DECEIVER has. Or, if you don't want to go to a fresh save; you can play as the warrior or unequip some of your supply items to counter the DECEIVER

FINLAL benefits from taking your time with the game. Try to rush the boss as soon as you have the correct cards and gear to kill them off.

BLINCH's goal is to slow you down as much as possible, by gaining evasion for each loop that you complete and by being the second target in battle. It may be beneficial to have offensive gear ready when you kill your hero specific enemy, then switch back to offensive/defensive after he is dead. Also make sure to change your master volume to 0% to reduce the damage he deals by -75%, and after he's dead you can jam to the oddly familiar music all you want

Unlike normal bosses, the battlefield gains the effects from roadside tiles that grant those effects (blood grove, vampire mansion, etc.) which should also be used to your advantage. This also makes vampire mansion quite bad to use to spawn this boss due to the given 10% vampirism to all enemies (a vampire wont spawn though)


15 条留言
Hudbus 2022 年 3 月 30 日 下午 9:31 
Ran across this guide by chance the other day and shot for it with a save that had chapter 4 unlocked.

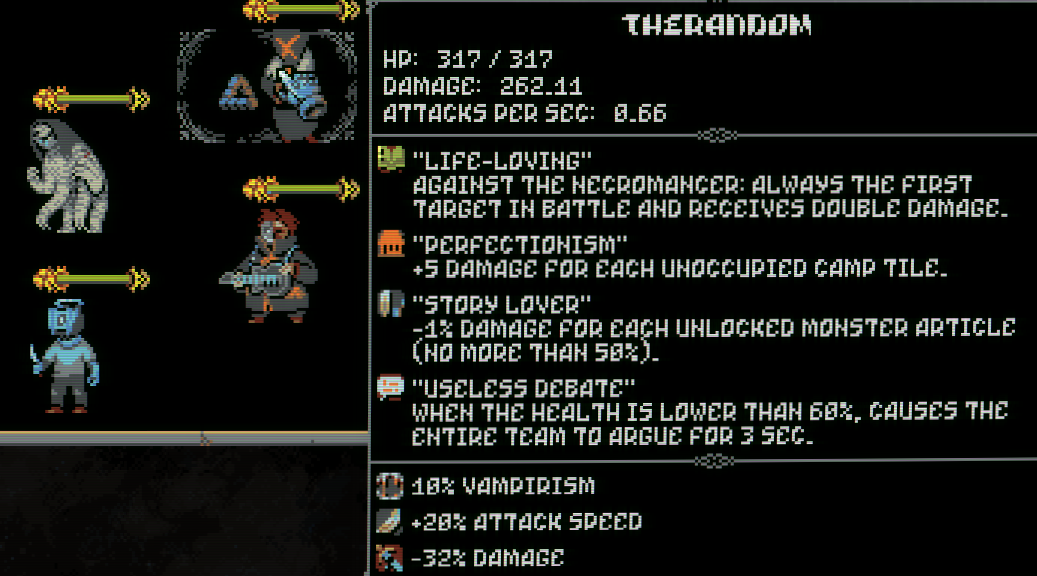
I've gotten a slew of camp upgrades, etc. but was still able to defeat the team on my first attempt via resurrections.
Fluffdogg 2021 年 11 月 24 日 下午 2:07 
mmmmmmmmmmmmmmmmmmmmmmmmmmmmmmmmmmmmmmmmmmmmmm
turtle1won  [作者] 2021 年 3 月 31 日 下午 2:47 
the boss likely gets more difficult when you play on a later chapter simply because of the nature of higher chapters, but there isn't any hidden ability (other than FINLAL's "Casual" ability) that makes this boss easier on a later chapter. i hope this helps!
vibi338 2021 年 3 月 31 日 下午 1:50 
hey guys, trying to beat this without much spoilers, any clue on if the boss gets harder depending on which chapter you fight them on? want to fight it at its best lol
turtle1won  [作者] 2021 年 3 月 25 日 下午 7:46 
Not sure. There might be some lore if you beat them multiple times though.
AltesBlank 2021 年 3 月 25 日 下午 5:02 
Beat him Pretty easy, but is there a reason to beat him again?
turtle1won  [作者] 2021 年 3 月 23 日 下午 2:24 
Alright. I doubt that jewelers lenses help with far late-game rogue unless they have a hidden mechanic that I am unaware of, but this can still be tested. The gardens/farms fact will be very helpful for me and other players who haven't defeated this boss yet. I appreciate the work and credit has been given.
Dasorine 2021 年 3 月 23 日 下午 1:19 
jewelers lenses do work with rogue from what I've seen, I get high quality items much more often and much sooner, what specific effect they have on late runs where you turn in enough trophies for all orange im not sure, maybe increase the level?

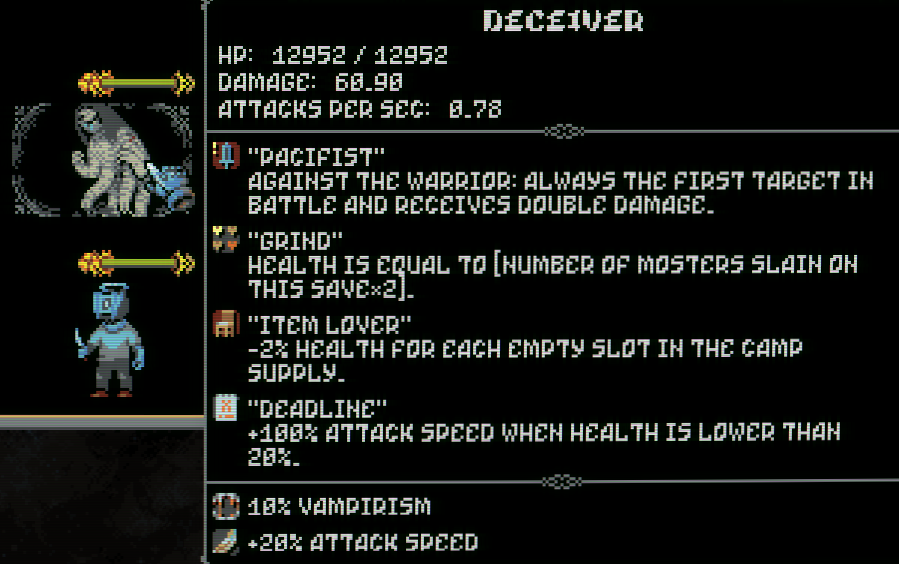
After testing, gardens DO count as filled camp area so spamming farms is the best way to fill it out and nerf the damage, at loop 5 it was down to 15.95 damage and removing 5 gardens and a farm upped it to 30.95. Though mud huts are cheap and add supply slots for nerfing deceivers hp too so a mix until you have enough for the full hp nerf is best I guess.
turtle1won  [作者] 2021 年 3 月 23 日 下午 12:02 
I guess I could've assumed that there was a hidden cap on the supply hp reduction on the DECEIVER, but it's relieving knowing the exact cap. I assume by "lenses" you mean jeweler's lenses, which I'm not sure applies to rogue due to the trophy mechanic. Let me know if farms do count as empty tiles, as that would be great to know, I'll make sure to credit you once you do.
Dasorine 2021 年 3 月 23 日 上午 10:40 
Rogue with Smoke Screen and Fuss with a decent number of counts chairs, farmers scythes and old paintings is great, squeeze in any lenses you can without missing out on the -50% hp on deceiver too. Other traits that are useful is master of fencing and child of the forest for more extra damage but smoke screen is the only must have.