全面战争:三国

全面战争:三国

60 个评价
Advanced Legendary Speed-Running Guide
由 Geroiko 制作
In this guide we will discuss advanced concepts, strategies and tricks to speed-run your legendary campaigns.
2
2
   
奖励
收藏
已收藏
取消收藏
What is this guide about?
Total War Three Kingdoms has been out for more than 2 years now. A quick research will yield a good amount of information in the form of written and video guides at a basic level that will help you familiarize yourself with the core gameplay. However, there is very little information and material about more advanced gameplay on how to min-max and speed-run your campaign. On top of that, that meagre amount of advanced tips is scattered in so many different places, be it old threads in official forums or Steam discussions, bulletin boards and lengthy videos, which is not practical to access.

This guide here incorporates advanced gameplay elements to help you speed run your legendary campaigns in order to achieve victory in as few turns as possible. I will be sharing tips, army builds, commandery builds and more that I have discovered over time and extensively used in my campaigns to achieve quick victories. I will break down this guide in sections that I consider them to be the most important building blocks to further improve your gameplay.

If you are not familiar with certain basic aspects of the game or not confident in your gameplay to beat your campaign consistently in legendary difficiulty, the guide is still going to offer you plenty of insight to hasten your victory times, but when it comes to manual fight battles, general gameplay decisions and utilising campaign mechanics to the maximum, that is something you will have to exercise on your own. Nevertheless, I am planning to include gameplay videos at some point in the future illustrating how I utilise all the aspects included on this guide and also provide battle footage of some hard-fought victories with very bad odds.

Finally, I want to point out that I will not be discussing game breaking cheese that nullifies gameplay. Things like diplomacy abuse on how to steal every ancillary from the map on turn 1, or how to annex territories and factions on turn 1 will not be discussed at length here as they are unintended game behaviours that have nothing to do with skill or actual gameplay. It is true that such elements may be incorporated to shorten the turns to victory, but this guide will focus on the player achieving a clean victory through gameplay, not through total exploitation.
Prestige:
Prestige is the metric used to determine how fast you increase the rank of your faction. There are limited ways in which you gain prestige and as such, it is imperative that you incorporate a specific playstyle that allows faster accumulation of prestige: that is an aggressive expansion playstyle. On top of that, achieving higher ranks quicker results in unlocking the perks of that rank faster (e.g. extra trade agreement, extra administrators, council positions etc). Furthermore, it is imperative to rank up faster in order to be able to change taxes from normal to very high (more on that later).

The first source of prestige comes from the level of your settlement. You can simply hover over the various levels and see in the tooltip how much prestige you get.


You will notice that prestige does not increase linearly. In addition, building higher level settlements requires a lot of upfront money, in other words, that is money that does not go to army spending and expanding. As a result, it is advised that you only manually upgrade a settlement to a small city (level 4) at most. A small city gives you 3 construction slots, 12 prestige and it only costs 2 food to maintain. By following the guidelines in the next section about how to build your commandery, you can secure good income and focus on expanding instead. Playing tall has never been an effective option in any Total War and that does not change in TW:Three Kingdoms. The bottom line is that the more commanderies you capture, the more prestige you get from the settlement level. If you are lucky, in some cases the AI will have advanced their settlements to level 5 and beyond, which means that you will get more prestige once you capture it, assuming that you can support the food requirements. If you can do that, then, by all means, do not downgrade the settlement. If not, then simply downgrade.

The second way of gaining prestige is through another building chain, the “Administration Office”. It is a much more cost-effective option of gaining prestige than levelling up your settlement, so it is required that you dedicate 1 slot in each and every commandery you own to construct this building. Level 1 administration office gives 5 prestige and +10% income from all sources, level 2 administration office gives 10 prestige and +15% income from all sources. For level 3 you need to upgrade your settlement to small regional city (level 7) which is not advised at all unless you conquer such a settlement from the AI. I will provide a more detailed description on commandery builds in the next section. For now, keep in mind that administration office is a must to progress faster in your campaign.

Lastly, there is a 3rd way of getting prestige and that is by holding the “Imperial Jade Seal” ancillary. This item is unique and provides 25 prestige, which is a huge amount. To put this into perspective, consider that the equivalent of 25 prestige is a small regional city (level 7 settlement) which costs 22000 gold to construct from level 1 to level 7 (before any cost reduction) or 14500 from level 4 (small city) to level 7 (again before any cost reduction). Not only that, upgrading settlements takes a lot of time and has certain penalties (e.g., food requirements). As such, it is very important to get your hands on that item. In 190 start it is Sun Jian that has the item, and on 194 start it is Sun Ce. In 194 you have vision of everyone in diplomacy menu, ergo it is not difficult to exchange it for ancillaries/gold per turn/food. On 190 start, however, if your faction starts far away from Sun Jian chances are slim. Sometimes when you do diplomacy with other factions, they tend to reveal their lands momentarily to you, hence, their neighbours. By abusing that you can theoretically get to reveal Sun Jian on the map. It is not very consistent, however, and it is a problematic method if you are planning to attack a faction you just signed a diplomacy agreement with. Whether it is worth to take this risk or not will depend on your proximity to Sun Jian’s faction. The Imperial Jade Seal’s value is really that high where you might have to consider such tricks to get your hands on it.
Commandery build / Taxes / Rebellions: (part 1/2)
A big part of this playstyle I am about to present you revolves around the concept of triggering constant rebellions and dealing with them easily in order to passively generate gold. There are a few problems associated with that playstyle. First, you need a consistent way to lower public order in your settlement to constantly trigger rebellions. The second issue is associated with how you are going to deal with them.

First things first, there are two consistent ways of lowering the public order in your commanderies: The first way is by building the “Tax Collection Office” building. This structure is key to this strategy because it not only achieves the goal of diminishing public order, but it also costs zero gold to construct. This is the most cost-effective building in the game as it takes no resources to construct and it instantly generates a hefty amount of peasant income. Unfortunately, only the first 2 levels are available by default and to further upgrade it you need to unlock reforms, but this branch of the reform tree is readily accessible should you wish to unlock the higher levels of this building chain.


The subsequent concern then becomes: “How do I deal with the public order penalties and upcoming rebellions?” Under normal circumstances, and assuming you are playing “romance mode” campaign, you could simply deploy 2 generals with no units in their retinues, hence zero gold deployment cost, and simply crash the rebellion the very turn it appears on the map. This approach, however, comes with a few issues. First of all, it assumes you are playing romance and not records mode. While it is not impossible to deal with a small rebellion even in records mode by simply using your generals, this line of thinking leads to the next problem; This assumes that you actually have two or three available generals ready to be deployed. If that is the case, then there are more issues. First of all, it means that you are actually stashing idle generals in your faction who are getting paid 150 gold each turn waiting to be occasionally deployed to crash a rebellion. The amount of gold you have to pay on their salaries relative to the gold you would make out of a rebellion would render this playstyle subpar. Ideally, you should never have idle generals in your faction. They either need to be used in administrative work / assignments or on the field, not on the bench. Keep that always in your mind because stashing generals is one of the common culprits of crippling your economy by spending gold to salaries of generals you are not actively using.

Moreover, there is an additional problem associated with using your generals to crush rebellions: that is the problem of seasonal deployment allowance. Each season you are allowed to deploy a specific number of generals (usually 3 by default). Increasing that number is not an easy task as it requires specific reforms/buildings, that take time and time is something you do not have in a speed-run. Assume that there are 4 or 5 rebellions in the map at the same time, then how exactly do you deal with this situation? On top of that, assume that on the same turn you need to redeploy one of your main armies to a different front, what would you do in that case? Would you delay redeploying your army by a turn in order to deploy first the generals that will deal with rebellions? Regardless of how you look at it, this is a problematic situation.

However, there is an alternative and that takes us to addressing the second issue. The answer is constructing the “Military Infrastructure” building category. At first glance, its purpose appears to be that of simply adding more units to the garrison of the commandery’s capital. That much is true, but there is more to it. That building constitutes a cheap way of dealing with rebellions in an easy way without ever having to worry about them. An auto-resolve is all that it takes to deal with a rebellion in that case.


Let’s take a deeper look at this line of buildings and why they are a superior choice. In order to consistently deal with any rebellion regardless of size, the most secure and painless way is by advancing the patrols building all the way to level 3. As it can be seen in the following pictures, at level 3 you unlock more garrison units compared to the previous two levels. From experience, I can tell that even if a full stack of rebellion gathers up, fully masters and attacks your settlement, you will still easily win with very good odds by auto-resolving. In some cases, it has also been observed that even a level 1 patrols building can deal with a full stack rebellion. The odds will be slightly worse, but auto-resolve will work 9 out of 10 times. There are, however, some odd cases where the rebels recruit better units and, in that case, you may end up having to play the battle manually with a level 1 building. The only prerequisite for constructing the Patrols building is having a small city (i.e., a level 4 settlement) which is the bare minimum that you would have used either way to unlock the 3rd construction slot in the commandery and maximise your profits in a cost-effective manner.

The price for level 1 (Patrols) is 840 gold, level 2 (Guard Posts) is 1400 gold and level 3 (Patrol Barracks) is 1260. At level 3 you have two options available, but Patrol Barracks will always be the superior option because it has lower upkeep cost plus the fact that the negative military supplies will be detrimental to enemy armies in the province, including rebels. The downside of the level 3 building is that it provides +6 public order compared to the +2 of level 1. This is a bit unwanted because it can delay the time it takes for a rebellion to spawn. The overall price for going all the way to level 3 is 3500 gold. However, this price can be considerably decreased in the following two ways: You can send a sentinel in an assignment to decrease construction cost and time (or have a sentinel as administrator in that province, or both cases at same time). The second way is through a red reform that you will naturally unlock if you follow this guide. The reform is called “Garrison Conscripts” and is a prerequisite for unlocking the necessary 10% replenishment red reform. This reform alone decreases the cost from 3500 gold to 2625 gold. As it becomes apparent, adding the further reduction from sending a sentinel on assignment before building all 3 levels will bring the price to below 2000 gold. Compare that to how much gold you would normally spend to recruiting and deploying a simple vanguard general for instance: 1000 gold to recruit and then about 1600-2000 to deploy him depending on the value of the retinue he comes with, which you will disband right after, and that doesn’t count his 150 salary every turn. In other words, recruiting a few generals and deploying them to deal with rebellions will cost you way more gold than constructing this extra garrison units building no matter how you look at it.

Commandery build / Taxes / Rebellions: (part 2/2)
Deciding between keeping the garrison building at level 1 or upgrade it to level 3 is a decision that will be based on the circumstances. That takes us to the second focal point which is enemy AI. After sufficient testing I have observed that in most cases the AI is way more hesitant to attack capital commanderies with the extra garrison units. Instead, the AI will opt to attack minor resource settlements first due to being easier targets to beat according to algorithmic calculations. What that means effectively is that you buy time to redeploy an army on the capital commandery and deal with the AI. The more important takeaway, however, is that the AI is more reluctant to attack you.
Say, for instance, that you are bordering with an aggressive AI but you are still at peace with each other. Under normal circumstances, once you expanded further and your armies were far away, the aggressive AI would evaluate that weakness and declare war on you to specifically attack that one capital commandery that is undermanned, and you have left exposed. On the other hand, if that capital commandery had more garrison units, the AI would take that into consideration in its calculations and not backstab you. Nevertheless, even if it did backstab you, it would not opt to attack the capital settlement right away, it would go for minor settlement. Similar behaviour is observed in TW:WH from my testing.

Whether the AI will attack your main settlement will obviously depend on the quality of their army. With good quality units they will not hesitate to attack your main settlement. But even in that case, with the extra garrison units, with the help of deployables (that, again, you will naturally unlock as your first reforms if you follow this guide) and with smart deployment in a manual fight, you can easily beat a full stack of high-quality units just because you have these extra garrison units. There is also the case where the AI sieges you but does not trigger the siege because it estimates that it would lose without siege weapons. In that case, the negative modifier for enemy supplies would slowly drain the AI from its supplies to the point it would have to retreat. In fact, I have had this scenario happen many times in my campaigns where the AI breaks off the siege and leaves as their army has run out of supplies. As a result, a level 3 (Patrol Barracks) is advised not just to easily deal with any sort of rebel army by auto-resolving, but also to deter AI from attacking you. Or even if it does, to give you higher chances of survival without halting your expansion for the sake of redeploying your main army elsewhere and playing a pointless game of whac-a-mole with the AI. The only case in which I would advise to only build a level 1 Patrols is for commanderies that are very safe and are not bordering with AI factions. In those cases, you will only have to worry about rebels and that is something you can easily deal with even with level 1 Patrols.


The tax collection and garrison buildings take 2 out of 3 possible construction slots in the commandery. So, what building should we construct for the final slot? There are two ways: If food is an issue because you are not getting enough of it from minor settlements, then go for the land development building that produces food. It is a relatively expensive option but if you are in danger of falling below zero food, then you must do it. But if a minor settlement also provides you with food, then consider upgrading that minor settlement first. If food is not an issue, then there is only one option left which was also discussed previously in the “Prestige” section and that is the administration office that yields bonus prestige. It is the cheapest available option you have to boost your prestige and rank up faster. Upgrading your settlement beyond small city is not recommended as it is very costly for the amount of prestige you are gaining, plus it requires extra food to maintain. It is preferable to just conquer high level commanderies instead of constructing them yourself so long that you can fulfil the food requirements.


Finally, it should be pointed out that when capturing a new settlement, the first course of action should always be to demolish all of its buildings that are not tax collection office, garrison building or administration office. This way you get rid of all useless building that deviate from the strategy discussed earlier, and you make a considerable amount of profit out of demolishing what is not needed. Keeping that level 3 inn (or any other money-making building in newly acquired commanderies) in a settlement that you are not planning to further upgrade is pointless because once corruption debuff kicks in, that settlement is going to generate pennies. At that point, the only consistent way of generating gold will be rebellions.

The reason why this strategy works is because everything compliments each other extremely well to achieve your goal. At first sight, this may look like low profit build, but considering how low the investment is and how quickly it generates profit, its value can be quickly observed. There is no easy way of evaluating the amount of gold you generate from crushing rebellions in this setting, but I can assure you it is way more profitable than anything else you could achieve in the same amount of time and money spent. Generating rebellions and crashing them has another benefit: You very often get ancillaries from rebels which you can either use or sell for gold per turn. Furthermore, when you auto-resolve the fight, you have a chance of capturing a rebel general. In that case the only two options available are to execute them or release them. When you release them, you strip them from gold (usually 200 gold, but can go higher) so you should always choose that option when it happens to make that endeavour even more profitable.

On paper, things like commerce/industry building combinations can yield the highest income over time, but the amount of gold you need to invest, the amount of time it takes to unlock the necessary reforms and, also, the amount of time before you get your return on your investment, it will be too slow for speed-running and it will take too long before it catches up with my build. The only exception to that rule is your starting province. Since you almost always start with a commandery that includes a capital which you can instantly start upgrading, you can actually make an argument that even with a high upfront investment, you would still see a return on investment by the middle to late stage of your campaign. It is definitely something you can consider, more so for factions that start in very lucrative provinces, but regardless of how you decide to build your starting province, you need to remember that high taxes will apply to every province regardless, hence, constructing a garrison will be a must. Excluding your money-making starting province from taxes is not an option as it nullifies the money-making nature of it should you go down that path.
Commandery build: Caveats for specific factions
As a final note to commandery builds, I would like to point out some irregularities / incompatibilities with certain factions.

Ma Teng is the first irregularity because his special building replaces the garrison building. As such, you will not have access to extra garrison units, hence, the build described above will not work. That alone renders Ma Teng a very slow faction to play on top of being a governor which means you need extra time to capture a seat first once realm divide occurs. Remember, however, that using the highest taxes setting is a must for any speed-run as the additional upfront money you get from higher taxes will always be superior to using lowest taxes and waiting out the commandery to grow via good public order and increased population. Hence, you will have to find a way to make this work with Ma Teng, potentially by deploying generals and crashing these rebellions. If that's what you choose to do, then consider getting the reforms and buildings that increase the maximum number of seasonal retinues you can deploy per turn to avoid the default restrictions.

The second irregularity is Yellow Turbans. The garrison building for Yellow Turbans is not as strong as the Han factions’ version of it even at level 3. This is due to the fact that the Yellow Turban garrison building gives less overall units at level 3 than the Han equivalent. It also has to do with yellow turban units having lower value in the algorithm compared to Han units when it comes to auto-resolving fights. As such you will either have to compromise on playing some rebellion fights manually, or you will have to upgrade it to level 4 if you want to consistently auto-resolve rebellion fights. It is a small nuisance you will have to cope with.

The third irregularity is Liu Bei. Liu Bei's tax collection office was changed in patch 1.6 to no longer lower public order. In practice, this means that you can still generate rebellions by selecting the highest taxes setting but at a lower rate than other factions due to reduced public disorder. But remember, as mentioned earlier in Ma Teng's paragraph, highest tax settings are a must and will always be superior for a speed-run. Hence, you will eventually still get rebellions that you have to crash, however, the time it will take to get a return on your investment for the garrison building will be slightly longer. The positive thing with Liu Bei is that the new tax collection office building provides you with a replenishment bonus for your militia units. This is extremely helpful for a rapid expansion considering that Liu Bei provides a large discount to militia units.

As a last irregularity, I would include all Nanman and Bandit factions that have different playstyle and access to different types of buildings. Again, even with those factions you want to use the highest taxes and crash rebellions, however, the specific buildings you have to go after and the efficiency of such a build compared to alternatives is not actively considered in this guide. At some point in the future I will include a dedicated section for Nanman and Bandits with all the details.
Army builds: (part 1/2)
Effective army builds are a complex topic that needs consideration of various parameters. A very important parameter is what generals do you have at your disposal? Are you playing romance or records mode? By any chance, do you have a unique legendary character that is very strong?
In order to establish a baseline, I will assume that we are playing records mode. I am choosing records because army templates can be rendered pointless in romance mode due to how powerful characters are. Nonetheless, all the things that will be discussed below and the templates that will be illustrated will also apply in romance mode. I am simply doing that to avoid an argument of “let’s recruit more lords instead of units since they are better”, which holds true to an extent and is something that can be abused in romance, especially during offensive sieges.

The best starting point for creating an army template is by first deciding the leading general out of the 3 in the army. When it comes to that, the choice is straight forward. The only effective leading generals are Champions and Vanguards. The reason for that is because both have two very powerful skills in their arsenal, the +25% campaign movement range (Reach) and the +5% replenishment rate. Choosing between a Champion or a Vanguard as leading generals comes down to which one of the two at your disposal has these two skills unlocked or is closer to unlocking them. The impact and importance of these two skills is very high and paramount to speed running. Each and every single one of your armies should have one of the two classes leading the army. If for some reason there is none of the 2 available at your disposal, then choosing a strategist with the campaign movement range (Reach) unlocked is an alternative temporary measure, but this situation should be avoided by all means.

Now we get to the difficult part of deciding the other two generals and retinues for each one of them. There are different ways to go about it. Always keep in mind that our goal is aggressive expansion and that entails using as many cheap armies as possible without going bankrupt. As such, elite units that are locked behind many reforms with very expensive upkeep are instantly out of the question.

Build 1: Champion + Vanguard / Sentinel + Commander + 4 or 5 mounted sabre militia

This is a high skill cap build that requires very good micro management but if it is managed properly, it can beat a full army stack. The strength in this build lies in the speed of the units and the extremely high block chance of arrows by the mounted sabre militia units. By default, the ranged block chance is 65%, but after unlocking the appropriate commander skill that boost that stat by 20%, they can get an impressive 85% ranged block chance. If you use them properly, these horsemen can essentially soak all enemy arrows before you engage the army with minimal losses. Keep in mind that units can only block projectiles in the direction they are facing, not from their flanks or behind them, so correct positioning is a must. The idea behind this build is to kite enemies around, split them and use hammer and anvil to crash them. The correct way to use hammer and anvil with horsemen against any unit, but especially spearmen, is to distract the unit from both sides. You can press control and drag a line on top of an enemy unit so that your unit walks slowly towards them without charging (pay attention to that detail of dragging a line on top of the enemy unit and not right clicking on them). If they do not charge, then no need to worry about mass casualties. When your units reach the enemy and engage them in melee combat, then you use another horsemen unit to charge from behind and crash them. This whole process must happen in mere seconds. When your horsemen are tired, you can find a place with a few trees to hide them, while kiting all other units in the map with the rest of your horsemen/generals. Once they are rested, repeat the process. Any direct confrontation with the enemy should be short and you should avoid being flanked. Use the high speed of these units to your advantage. The vanguard can be replaced with a good sentinel. It depends on what generals you have available at your disposal.

Another advantage of this build is that the AI believes that you are weak, especially when you siege a settlement, minor or major, and the AI fields some spearmen. Very often and depending on the settlement level the AI units will come out of the safety of the settlement and chase you around the map. In that case, the best practice is to kite them around and find opportunities to destroy the easy targets, that is ranged units and sabre units. For spearmen you will have to execute the hammer and anvil trick with your horsemen as I explained above. Use your generals to crash enemy horsemen. If available, choose to position your troops up a small hill for extra charge speed.

Build 2: Champion/Sentinel + Vanguard + 5x Mounted Lancer Militia + Commander/Sentinel

This build follows the same vein as build 1, but it is riskier, more squishy and needs excellent micromanagement. There is no room for error in this build because the red horsemen do not block arrows. The idea is to force the enemy army to constantly move around without firing at you or engaging you. The AI by default is using skirmish mode on their ranged units. What that means effectively is that when you get close to them, they will try to retreat. The principle here is to abuse that by getting to their ranged units from different sides so that they start moving to a safe spot and wait until you find a good opportunity to charge at them when there are no spearmen in-between your horses and the AI’s archers. This build is more unforgiving, but it has its merits, considering that red horsemen have higher charge stat overall than yellow horsemen. Another benefit of using red horsemen is that a vanguard general provides a lot of buffs to horsemen units in his retinue, hence, even basic lancer militia can become extremely effective units. It is a good build to use when you have a good Vanguard that you can use as commanding general. Either the champion or the commander can be replaced with a sentinel depending on what you have available. Overall, I would say that this is a more niche build suited only for specific factions. It will certainly suffer more than yellow shielded horsemen. It is the type of build you should only use when you have played a particular campaign with a faction a number of times and you know what to expect from your enemies.
Army builds: (part 2/2)
Build 3: Champion + 2x strategist + 4x spearguards + 11x crossbowmen/archers

This is most likely going to be your bread-and-butter army template. This build is one of the strongest and easiest builds to play around. All you need to do is deploy your 4 spearmen in front in turtle or spear wall formation, and then create 2 lines of crossbowmen. After the buffs crossbowmen got to their range again (now 220, was 200) they are the most cost effective ranged units. Their very high armor piercing damage means that they will have very easy time beating not only elite units but also generals. There is only one alternative to them and that is “Archers” (the unit that is unlocked by the first blue reform). The only benefit of archers over crossbowmen is that they can use flaming arrows as well as fire arrows at a bigger curvature. If you happen to play one of the faction that starts with that blue reform unlocked that allows you to build Archers (e.g. Kong Rong, Shi Xie etc), then by all means you can use them instead of crossbowmen. My mathematical analysis and custom battle tests for these two units has shown that they are very close in terms of performance. Their price and upkeep is also very similar. But crossbowmen will always have a small edge over archers due to their high armor penetration which makes killing generals easier. On the other hand, if you were playing Shi Xie and you were planning to fight Nanman, then Archers would perform better because Nanman have low armor units, hence armor penetration stat would be overkill.

Furthermore, you will probably notice that I have chosen 11x crossbowmen/archers instead of 12. The one free spot in the strategist’s retinue is saved for an artillery unit. The reason I don’t include it in the picture is because you do not need an artillery unit at all times. Artillery units are the slowest and that makes them decrease slightly the maximum campaign map movement range. This is unwanted. You only need to recruit 1 artillery unit on the turn you attack a walled settlement in order to trigger the siege battle right away. After you win the siege fight, then instantly delete the artillery unit to make sure that on next turn you don’t get your campaign movement range crippled, plus not having to pay the expensive upkeep for it.

In offensive siege fights, all you have to do is put the spearmen in turtle formation in front, so that all enemy towers will focus them with barely killing anything (due to 100% ranged block chance, but be careful of tower arrows on the flanks), and then use your crossbowmen/archers to deplete units inside walls.

Lastly, the champion and the 4 spearmen units can be replaced with a vanguard and 4 sabre militia. Sabre Militia are naturally much weaker than spear guards, but they are expandable units and a decent meatshield that buys time for your archers/crossbowmen to wipe the field.

Build 4: Vanguard + 2x Sentinels + 11x Crossbowmen/Archers + 3 or 4 Raider Cavalry

This is a bit more unorthodox template for cases when you don’t have any spare champion with the appropriate skills unlocked and for some reason you need the extra speed of horsemen. The idea is same as before but this time you use horsemen instead as front line to distract enemy melee infantry to follow you around until you find good opportunities to flank. This is the build I would advise the least, but it can get the job done. It will naturally struggle more during sieges due to lack of melee units, but do not forget that you can dismount your horsemen and use them as melee units instead.
Army Builds: (General info)
Deploying:
When deploying ranged heavy armies, avoid fighting in trees due to the penalties. Try to deploy your units in open areas. In case you have Archers and fire arrows unlocked, try to place your units in such a way so that when they fire the fire arrow, they blaze the forest through which the enemy units are coming from. If it a plain map where you are wide open, positioning yourself in the very corner of the map is a good option. This way you have the borders of the map forming an obstacle and, as such, you do not have to worry about being flanked. Make sure you always turn off skirmish stance and that guard stance on your archers/crossbowmen is on. Moreover, don't just leave crossbowmen firing at random targets. Instead, choose targets manually as soon as they enter your range. Prioritise strong units first. Finally, if you are certain that you cannot win a fight, what you can do is fight very close to the edge of the map, have your ranged units fire a few volleys to cause mass casualties and once the enemy is about to engage with your units in melee, press the "Retreat" button so that your units flee from the map. This way, you have successfully caused casualties for not receiving any and you can always trigger a battle again to finish what you started.

When deploying cavalry heavy armies against superior number of units, the goal is to divide the enemy's forces and find opportunities to charge and wipe easy targets (ranged units and non-speared units). Taking care of the enemy cavalry with your generals should also be done early in the fight. The enemy AI cavalry has a tendency of overextending and attacking you before back-up arrives, so make sure you capitalise on that opportunity. In short, use groups to divide your horsemen all over the map, use opportunities to wipe out easy targets and always pay attention everywhere on the map and stay on the move to avoid pointlessly losing a single horseman unit. Finally, in case AI is hiding its archers behind many speared units, abuse the skirmish stance the AI always uses by getting close to the archers from different directions and charge at them when they move away to an unguarded area.

Recruitment:
A very important parameter that improves unit performance is unit ranks. The higher the unit rank, the better their stats get. Something to consider is that when you recruit your units, if possible, make sure that level 1 conscription building is constructed even for 1 turn. Especially for your first army when you still haven’t constructed any other building yet. A level 1 conscription building increases the recruitment rank of your units by 2, hence you recruit level 3 units right away. If you are fortunate to have a faction leader and/or heir with the “+1 rank for all unit” skill unlocked, then you can get up to level 5 units right away. That sort of unit rank advantage can be immense and game changing. Do not neglect it!

The value of 2x strategists in an army:
There is a particular advantage when you have 2x strategists in the same army that is not very well known by many players. The blue stats from strategists provide two things: More ammunition to your ranged units which is straightforward, but also more military supplies. Military supplies are overlooked but they are very important. When you have high total military supplies and the supplies bar is close to full, then you are granted a +4% replenishment rate. By itself, this percentage doesn't look that great, but since a big part of the strategy revolves around stacking modifiers and particularly replenishment rate, this is an excellent thing to have. Not only that, but also in the early game when you don't have access to many modifiers yet, every single % counts.

Another important element of having strategists and, hence, high military supplies is that when you are playing factions with low "faction support" (that is the stat with which you slowly convert newly captured settlements to your allegiance), then there is a hefty penalty when you conquer new settlements as you will probably have noticed. That hefty penalty affects many things including how quickly you regenerate supplies. If you are commanding an army with no strategist and with very low overall Cunning stat (the blue stat) among your 3 generals, then you will start noticing low supply problems after moving to enemy area and capturing a settlement. If your faction support is too low, then this can also lead to attrition because the rate at which the settlement regenerates military supplies will be reduced. This can be detrimental in the early game and can cripple the pace of your expansion. As such, having 2x strategists and, hence, more Cunning stat, will significantly help you avoid such a scenario.

Of course, there are certain factions whose faction leader has a very high "faction support" bonus from the beginning of the campaign, so you will not have to worry about potential attrition with them (e.g. He Yi and Gongsun Zan after the update they received in a recent patch). But even in that case, you are still gaining all the aforementioned advantages from having high supplies.
Reforms:
There are two primary constraints in an aggressive expansion. The first one is campaign movement range, which determines how far you can travel in order to conquer settlements faster. The second factor is replenishment rate which determines how fast your army recovers its casualties (caps at 50%).

The way to address both issues is by focusing almost exclusively on the red reforms. The 6 reforms shown below are your bread and butter. Regional levy grants you the much needed 10% replenishment which is a very significant perk for an aggressive expansion. The other 5 reforms required to unlock the 10% replenishment reform are also very valuable in their own ways. You get to unlock deployables (which are really overpowered in defensive sieges), caltrops, decreased recruitment cost, reduced mustering time (compliments well replenishment rate), decreased construction cost for red buildings by -25% (vital for the commandery build discussed earlier).

One exception to the above recommendation for red reforms is Shi Xie’s faction. Shi Xie’s special mechanic allows him to get some special ancillaries that grant 15% replenishment. Assuming that at least 2 out of 3 of your generals in an army have those special ancillaries equipped, b-lining for Regional Levy is not particularly required, although not entirely useless. Instead, you should aim to first get the extra campaign movement range (in order to traverse the Nanman jungles faster) and trade agreements, which compliment a lot his faction mechanic of having vassals.


After unlocking Regional Levy reform, the other most important reforms to unlock are the following: “Swiftness is the key” and “Green dragon supply ships”. Both of these grant you more campaign movement range, the former 15% and the latter 5%.


These are 11 red reforms you must unlock in total. Depending on your starting faction and starting date the total number might be less than 11. For instance, Lu Bu and Sun Ce factions have already some of those unlocked so it will take you less time to unlock the remaining reforms. By the time you are done unlocking those, you will probably be at the middle to late stages of your campaign. After that, what you unlock is up to you. Here are my suggestion: The two trade agreement reforms are very strong options especially later on when their value increases further with the more special resources you own.


Another late option is to unlock the 3 reforms that allow you building higher levels of the tax collection building chain. Not only they cost zero gold to construct, but they also help a lot by lowering public order. Less public order means more frequent rebellions, more frequent rebellions mean more gold / ancillary generation.


In the same line of thought, for Yellow Turbans any reform that yields campaign movement range and replenishment rate are top priority.
Faction Leader / Heir / Prime Minister:
The 3 highest court governmental positions play a very significant role in a campaign as they apply faction wide buffs from personalities, traits and ancillaries. As such, choosing the right people and the right class of generals is of critical importance.

There is not really much choice when it comes to faction leader, you are stuck with what you start with. There are tricks that involve killing your faction leader in first few turns if he is not that great in order for the heir to take over the faction, but this is not something that I would recommend in vast majority of cases. The problem with resorting to such a move is that most faction leaders in the base game are very good generals with unique faction bonuses. If you try to kill them, then that means you are losing a family member and a general from your faction and that will result in more unnecessary expenditures to fill the gap. The only reason to kill a starting faction leader and have someone else take over the faction is for role-playing purposes and that is contradicting with speed running, so avoid it.

Then what about heir and prime minister? Each different general class offers different faction bonuses based on the unlocked skills in their trees. For the sake of brevity, I will not analyse and compare all faction bonuses of different generals. I will only present which general class best fits that role and why.

The best heir / prime minister / faction leader class is Commanders (yellow generals). This might not be a surprise to some players, but let us take a look as to why they are the best option. Commanders provide the most important faction bonuses than any other class, namely:
+1 starting rank for all units from "Understanding" skill
+1 available assignments from "Nobility" skill
+5 faction support from "Dignity" skill
-25% redeployment cost from "Flexibility" skill
-Increased faction-wide happiness because of more yellow stat on average


All of these faction bonuses compliment the whole speed running strategy exceptionally well. The redeployment cost saves you thousands of gold not only when you redeploy existing armies, but also when you deploy an army for first time (in case that wasn't clear already due to the wording in the tooltip). Faction support is a resource that comes from very limited sources and as such it is a very important buff to have for the vast majority of factions who do not have any such bonus. I have talked a bit about the importance of faction support earlier in the army builds section. An additional assignment is another very welcome bonus that can help a lot with generating bonus gold. I will analyse assignments a bit more in later paragraph.

Moreover, the +1 starting rank is also a very important bonus, especially early on when you recruit your first 2 armies. By having a commander and faction leader heir with that skill unlocked as well as tier 1 conscription building, it means you can recruit level 5 units right away. It is not uncommon in many of my games to instantly build a conscription building right away on first couple of turns when I am about to recruit my first army and then demolishing that structure. High level units have night and day difference compared to fresh level 1 conscripts, especially for ranged infantry and artillery. Given that most of your army is comprised from ranged units, securing higher recruitment level for them can be paramount. Higher level units can also fill the power gap when having weak generals with no ancillaries leading the army.

Finally, you shouldn't neglect the higher faction-wide happiness you get from commanders due to having higher yellow stat on average. Higher happiness on legendary difficulty is a must in order to avoid assigning titles that increase characters' salary as well as to deal with negative penalties when you utilise the banishing tool to make money out of firing freshly-recruited high-level generals (more on that later).

When you start a fresh campaign, you should always check if there is available commander in the family, and, if yes, then promote him/her to heir, even if that means you have to disinherit someone else. Both Cao Cao and Liu Bei (194 start) are good examples. In both cases you have a commander family member (e.g. Lady Bian and Lady Mi). In cases you have more than one commanders in the family then make sure to choose the one who is closer to unlocking all 4 faction wide buffs listed above. If you do not have a commander available, then there are two options: The first option is to marry a commander from another faction, bring them to your faction and make them heir. For example, you can marry Liu Bei in 190 start with the daughter of Liu Dai (daughter's name is Liu Huimin) in order to get quick access to a heir. The other option is, obviously, to adopt a commander either from your faction, or from the recruitment list. Typically, this is not the best course of action because you may end up adopting a spy that can eventually assassinate your faction leader, let alone that adoption is expensive.

Overall, it is important that you get a commander in the heir position as soon as your campaign starts in order to have sufficient time to level him up and unlock all the buffs, because chances are that he is not going to have all the useful skills unlocked by default. Nevertheless, it must be noted that there are some special cases that require further consideration. With regards to generic lords, sentinels with the personality "clerk" provide a -2 turns construction time bonus. One such easily accessible character is the daughter of Ze Rong. It is difficult to value whether it's better to use a sentinel with that personality specifically or commander in this case. Ideally, you would want to have both and keep swapping the two in the heir slot based on the needs (e.g. put the clerk as heir when you are about to construct something, then instantly swap him out with the commander). In the long term, commander is more valuable, but early in the campaign a reduction in construction time is also something to consider in order to propel your economy at a faster pace.

Lastly, there are some legendary lords with interesting personalities and faction-wide bonuses. I am not going to list all of them here. The important thing to remember is that if you find a particular legendary lord providing interesting bonuses for your faction, then you can consider assigning him to the position of prime minister, not as heir! The rule of thumb you should always apply is the following: Do I have at least 2x commanders in the roles of heir / faction leader / prime minster? If not, then make sure you have at least two before considering using the 3rd slot on another type of general. If you already have (e.g. Yuan Shao, Cao Cao, Liu Bei factions etc), then you can consider using the prime minister slot later in your campaign for a general of another class with useful and unique perks. A good example is Zhang Liao (Lu Bu's faction) who provides a 5% campaign movement range. In my speed-run campaign with Lu Bu I ended up using Zhang Liao as prime minister for the additional movement range. As a final note, do not be afraid to swap in and out people in the prime minister slot within the same turn and regardless of their class, if you reckon that a particular perk is required more for your circumstances.
Administrators and Court positions:
Patch 1.7 brought a lot of changes, along with changes to the court positions. In short, now it does not matter whom you appoint in the court. My early testing shows that the council missions you get once per year are currently randomised and not associated at all with the type of general you have assigned to that position as it used to be in previous patches. In patch 1.6 you would get different missions depending on the type of general (e.g. commanders' missions granting anti-corruption buffs, strategists' missions giving commerce buff, vangaurds granting replenishment rate etc), so there would be a lot to discuss in this section. Now there appears to be no correlation at all and as such not much to talk about. If there is any discovery made in the process, I will make sure to update this part.

With regards to administrators, they provide you with a nice reduction of corruption in the province they are overseeing along with other buffs. When it comes to selecting administrators for a province, it is important to have a good look at their personality as well as the traits they have developed over the course of the game. Some of these traits might actually give a buff or debuff in the province. Given the playstyle we are proposing here for speed-running, some debuffs might actually be positive to have in our case. For instance, Xiahou Dun (general of Cao Cao) is a really good example of a general who falls under this category. One of his traits is a debuff to public order for the commandery he is administrating. Under normal circumstances, this would be unwanted, but since the playstyle revolves around raising rebellions as often as possible, this debuff is one of the greatest you could wish for.

Leaving aside traits and personalities, the next question is naturally: "What class of generals make the best administrators?" The answer to that question would normally be sentinels if we were not speedrunning. The huge reduction in cost they provide is really great and you save a lot of money in the process. However, in our case the commandery build we are using is very low cost. The tax collection building chain, for instance, costs 0 gold. As such, you are not really saving much money. If anything, the sentinel administrator's salary might be more detrimental to you than the price reduction he grants you.

For the purposes of speed-running, it is better to send a sentinel in an assignment to reduce prices and construction time by 1 turn compared to appointing him as administrator. So what then? Given that this build mostly revolves around peasantry income, a champion with the relevant skill that gives bonus to peasantry unlocked, would be the ideal case. Of course, if you elect to upgrade your starting province into money making province, then choosing the appropriate administrator class is recommended (strategist for commerce oriented build, sentinel for industry build). Commanders and vanguards should never be appointed as administrators as they do not provide anything of value.

Moreover, as you are progressing and expanding further in your campaign, it is very likely that you will end up conquering a well developed province that is making a lot of gold despite the corruption debuff. If that's the case, do not hesitate to remove an administrator from another settlement and placing him in a newly conquered one that happens to be more lucrative. The most profitable option should almost always be considered at all times.

As a final note with regards to appointing administrators, it is important that you do some quick math to calculate whether appointing someone as administrator is going to be profitable or if his salary is higher than the profit he is going to generate. Do not be baited into appointing someone administrator because you have the notification of this council spot being open, always make sure first if profit will be made or at least that the profit covers the salary costs of this new position.

Lastly, there are two gimmicky uses of administrators. An administrator that is not deployed on the field will appear as a garrison unit in the overseeing settlement. As such, you are going to have more garrison units in the capital settlement of that province. Moreover, since he is not actively deployed and acts only as garrison unit, you are only paying for his salary but not for the upkeep of his retinue. As such, what you can do is hire a full retinue (all 6 units) under him and recall him immediately. Next turn, he and his retinue will appear as garrison units. Not only that, both the general and the retinue will appear in the garrison units list with full HP. Of course, as mentioned previously, stashing generals and keeping them idle is not ideal, but this is a neat trick to consider if you find yourself in a desperate defensive situation.

The second trick is to use administrators for the purposes of creating easy vassals. You have the ability of "granting independence" to an administrator. That effectively means that they will leave your faction and become your vassal instantly. In general, having vassals is very good, but please read the "vassals" section for more information on that matter. It goes without saying that if you decide to grant independence to an administrator in order to turn him into a vassal, make sure that you choose a low-level generic general with mild personality and not someone with cunning / treacherous tendencies.
Diplomacy:
With regards to diplomacy, there are some important elements to consider. First of all, avoid conducting diplomacy with many factions for no good reason. Signing trade agreements for extra income is a good reason. Trading important ancillaries on turn 1 is a good reason. However, making non-aggression pacts and giving military access to random factions even for money is not a good reason.

Why is that? Diplomacy is a complex and dynamic system in Three Kingdoms. It has a sophisticated algorithm and it is important to understand some basic principles before you next complain about a seemingly peaceful faction declaring war at you out of the blue. When you make a deal with a faction, then all friends and vassals of that faction will like you more and all their enemies will start hating you. This follows common sense from real life. However, this is something that carries on throughout the campaign and is easily forgotten. For instance, signing a trade agreement with a faction on turn 1 means that the friends/vassals of that faction will like you more. However, if a few turns later that faction goes to war against another faction, then that other faction is going to start disliking you more and more as time goes by for as long as you have a continuous diplomatic option active (e.g. trade agreement, non-aggression pact etc) with their enemies.

What does that tell us in essence? Making unnecessary lasting agreements (e.g. non-aggression pact) will make things more and more complicated and will only backfire further down the line. Understandably, you may decide to sell your big surplus of food for gold per turn during winter season with other factions. But if it is a faction that you have never dealt business with before, then it is a terrible idea as it is only going to drag you into potentially unwanted wars, even if that faction is on the most distant corner of the map. In short, limit unnecessary trading unless it is a necessity or unless you can land a very lucrative deal.

The rule of thumb you should always have in your mind is the following:
Do not sign any non-aggression pacts or military access agreements with random factions. Only sign those with factions that you know you are going to have a long standing relationship, you are not planning to attack at all in your campaign and you are not planning to vassalize. Make sure that these factions are actually reliable and not treacherous (e.g. Lu Bu, Yuan Shu, Cao Cao etc).

Secondly, use your trade agreement slots wisely. It is important to sign your trade agreements as soon as possible until you fill all trade slot. However, if you know that in 1-2 turns you are going to encounter new factions due to expansion, or that you are about to capture a settlement with a port (so that you can trade with distant factions), then you can delay signing a trade deal in order to use it with some other faction for more gold. When it comes to trade agreements, it is important to note that the most lucrative option isn't always the best. You should show preference in signing trade agreements with weaker factions and not with strong ones. For example, trading with Sun Jian / Sun Ce might be a lucrative option but remember that trade agreements go both ways, so Sun Ce on the receiving end is benefiting too. By trading with him you are effectively buffing him and in hindsight you know that in most campaigns he is one of the 3 competitors for the throne (190 start) due to the easy expansion route he has. By buffing him further with a trade agreement, you are only consolidating his position as a major faction and that should be avoided. On the other hand, trading with someone like Liu Biao or any other governor and their vassals is an excellent option because you know in advance that no matter how strong they are, they will never have a direct claim to the throne. They have to capture a seat from someone else before declaring themselves emperors.

Thirdly, use gold per turn as much as you can instead of straight gold. In 9 out of 10 cases, the AI is willing to give you higher amount of total gold when it is per turn compared to right away. The only exception is when that faction is already poor with low income, in which case getting straight gold is much better option. In addition, avoid entering or forming random alliances that will only result in more wars. Lastly, avoid conducting diplomacy with factions you are planning to attack soon. This might be an obvious one for most of you, but not few are the cases where players sign random deals that are cancelled by a sudden war and end up receiving a "treacherous" penalty.

Trading ancillaries:
On turn 1 you have the option to trade ancillaries with the AI. In fact, you can trade ancillaries on any turn, but it is only on turn 1 that the AI hasn't equipped any of their ancillaries to characters yet. The AI has a tendency of equipping every single ancillary, so you will notice that in most cases they have no ancillaries to trade with you, unless they have run out of characters to equip them. As such, turn 1 is your best opportunity at trading good ancillaries from other factions. Note, that each time you restart a campaign, both you and the AI are given different starting ancillaries. There are of course certain items that are 100% guaranteed to be given to certain factions. In 194 start, you have access to all faction on the map in the diplomacy menu. As a result, you can take a sneak peak right away to see what items each faction got. There are some specific ancillaries that I consider to be the most valuable ones in the game for speed running and you should always try to get them if possible.

The first one that I have mentioned in the "Prestige" section is the Imperial Jade Seal. In 190 start it is Sun Jian that has it and on 194 start it is Sun Ce. This should be your top priority ancillary to grab. It is an expensive one to get, but by trading away some of your ancillaries, some food and maybe some gold per turn, you can easily get it. The next most important ancillary is the "Book of Mountains & Seas". This ancillary provides +10% campaign movement range to an army (any general can wield it, it doesn't have to be the commanding general). This buff is huge and it stacks. Getting access to 2 or even 3 of these items in 194 start campaign is not impossible. After the seal, these books should be your number 1 priority. That bonus in campaign movement range will make a huge difference over the course of campaign. Finally, the last item you should try and grab is "Overseer". This item provides another +5% campaign movement range, but this effect only applies if the item is equipped by the commanding general, hence, it doesn't stack.


Stacking modifiers of any sort is really powerful in Three Kingdoms. In my fastest Lu Bu speed run, I used 3x Book of Mountains & Seas + 1x Overseer in Lu Bu's army along with the bonus you get from "Reach" skill as vanguard. Lu Bu also gets extra movement range from his faction's unique resource. You can only imagine how far I could reach with him on a single turn! Over the course of the campaign, these bonuses can save you more turns than you can think of.

A final but important note with regards to campaign movement range: It has been observed that closing the game and re-loading your campaign will cause your army to lose that bonus for that one turn. As such, if you are planning to stop playing for the day, make sure that the army with all these modifiers is within close distance to the settlement you are planning to move / attack. This is a really annoying bug and there is nothing you can do about it other than planning ahead and exiting the game when you are not going to need the big movement range bonus to reach your next target.
Treachery / Trustworthiness:
Treachery is a temporary debuff you get after prematurely ending a diplomacy agreement (e.g. cancelling an ancillary trade for gold per turn, or declaring war right after a peace treaty and before 10 turns have passed). For the average or pedantic player, treachery or being treacherous is seen as something negative. However, treachery is a very powerful yet limited tool that the player has at his disposal that should be used wisely to gain a large advantage.

First of all, it's important to understand that not all treacherous actions carry they same weight. For instance, annexing a vassal of yours that you previously offered a guarantee of autonomy is a more serious penalty than prematurely declaring a war after a peace treaty, or cancelling a gold per turn agreement. As such, the timing of when to use treachery to your advantage is very important.

Moreover, similar to treachery, there is also the opposite positive value, honour. Honour is gained in limited ways. The simplest way is by honouring your duty to protect your vassals when they are attacked by someone. If you accept to defend them, you gain more trustworthiness and become "honourable" in diplomacy. If you decide to not defend your vassal and let them become independent, you then lose trustworthiness and become "treacherous". This buff / debuff is temporary and gradually decreases over time. One extra caveat with regards to being treacherous is that certain AI factions have particular personalities that makes them remember your treacherous acts for way longer (regardless of if it was treachery or just making deals with their enemies).

In a nutshell, honour and treachery are essentially modifiers in diplomacy menus that make it easier or harder to sign a diplomacy agreement with someone else. If you are treacherous, then you will require more points in diplomacy to convince the other side to sign a deal with you and vice versa.

Remember that cancelling a single deal is better than cancelling multiple deals at the same time. As such, avoid making complex deals if you intend to cancel them (e.g. avoid offering trade agreement + food per turn + gold per turn in exchange for ancillaries if you are planning to cancel them right away, otherwise you get a large penalty that accounts for all these different agreements you broke at once).

Important Note: The negative modifiers from being treacherous are not applied until the next turn (or until you generate a new save in legendary difficulty by attacking someone or ending your turn) even though in the diplomacy UI says you are treacherous. Theoretically, you could use that technique to steal every ancillary in the map on turn 1, as long as you are prepared for the negative consequences in diplomacy.

Generally speaking, there are 2 main windows in a campaign that you can use treachery to gain a substantial advantage.

1st window:
The first window is on turn 1 of your campaign. After having signed your trade agreements and whatnot, you can use treachery to steal ancillaries from other factions. How to do that? Simply, promise to give them gold per turn in exchange for some really good quality ancillaries. The gold per turn payments do not start until next turn, but the ancillary exchange takes place right away. After signing such a deal, you can just go to diplomacy menu again and cancel that gold per turn agreement and you still get to keep the ancillaries you got. Each such agreement you break gives you a -10 trustworthiness. That translates to 10 turns of reduced trustworthiness in diplomacy. If you make two separate agreements to grab ancillaries from other factions and cancel them, then you get -20 trustworthiness, so on and so forth. As such, it is advised that you get as many items as you can in a single agreement and only get a 10 turn penalty rather than 20 turn one.

If you are not planning to sign any other major deal within the next 10 turns, then there is no problem. By turn 11 you will be back to normal trustworthiness standing and carry on with your diplomacy normally again without any negative modifiers. However, there is one problem associated with being treacherous. From experience, the AI really frowns upon treacherous factions and they sometimes end up going to war with them because of that. In the first 10 turns of the game, this is usually not the case as the AI tends to be relatively weak to consider declaring a war, but if you use treachery between, say turn 10 to turn 20, then things might be totally different.

The important ancillaries to grab have been discussed in a previous section. Obviously, try to use treachery to steal the most expensive option. Usually, the most expensive one is the Imperial Seal of Sun Jian / Sun Ce, however, you will have to test yourself and see if that's actually the case in your campaign, or if it is more expensive to grab 2x other ancillaries from another faction.

2nd window:
The second window to use treachery is towards the end of your campaign when you have already consolidated your position in the map and you are about to trigger the Three Kingdoms (Realm Divide). In this window, you are already very strong and you are not worried about consequences. Hence, you can get away even with most treacherous acts (e.g. annexing a vassal with guarantee of autonomy in order to instantly get large amount of Prestige and hit the last faction rank) as long as you are prepared to never sign a diplomacy agreement again. To be frank, this is a very difficult decision to make in the late game because it might end up backfiring and it is difficult to know if you are actually going to get an advantage or disadvantage by the end of it. Allow me to elaborate:

Assume you annex a vassal and become one of the Three Kingdoms with the extra prestige you got. Triggering Three Kingdoms faster is certainly a positive thing for speed running. However, due to the large treachery / untrustworthiness debuff you will probably not be able to demand a potential "abdication" from one of the other two Kingdoms that has been significantly weakened. Making someone abdicate means that they no longer have claim for the throne and they pass all their lands to you. Hence, this buys you a lot of time. But the tough question then becomes: What's better? To hit Three Kingdoms period earlier by being treacherous? Or remain trustworthy / honourable to potentially force someone to abdicate and buy time that way?

This is a very difficult question to answer and, frankly, it can only be answered in hindsight. You can only know the answer if you have played the same campaign a number of times and have tested both cases. Personally, I only opt to become treacherous at the late game if I have played the campaign before and know what to expect. If you are playing a faction for first time and you are still working on optimising your run, then it is advised you do NOT use that second treachery window.

There is another common pitfall to consider and avoid. Assume that previously you have been very honourable by accepting to defend your vassals from enemy declarations of war and you have stacked a large amount of positive trustworthiness points (say +30 positive) and then you commit a treacherous act and get, say -40 points, then this might seem like a small 10 point difference that will go away soon. Nevertheless, this is not really the case considering that both the positive and negative points will decrease over time. So, it will not be just 10 turns before these modifiers become even, but 40 turns instead. Of course, if in the process you manage to somehow get more positive points then this might not be the worst case. But be advised that from my testing I have noticed that when you are conducting diplomacy with enemies, the negative modifier appears to affect things a bit more than the positive one, even though they may appear to be equal in magnitude in the UI.
Vassals:
Many players do not find much value in vassals given that vassals tend to be quite passive and not assist the player much. The only exception is when the vassal has many territories, hence, a good income so that he can provide assistance to you by conquering territories.

First of all, let's start by answering the most basic question: "Are vassals worth it?"
The answer is, yes! The core benefit for having vassals is that they pay you a healthy percentage of their gross income each turn. What that means effectively is that the more wealthy the vassal is, the more money he will pay you. As such, having a vassal and making sure that he has a decent portion of settlements is almost always going to be a positive thing.

Beyond the profits you make out of them every turn, vassals bring a few extra advantages that should be taken into account in a speedrun.

Firstly, they tend to be a good meat-shield acting as a buffer state between you and an aggressor. This of course will depend on the relative locations of you, your vassal and the aggressor. But assuming that you vassalize someone that you are bordering with, then you have some extra safety from attackers coming from that direction. However, to be frank, this benefit alone (i.e. bordering your vassal) is not sufficient by itself to justify vassals. What makes this benefit important is that it enables some other gimmicks you can utilise.

And that brings us to point number two, which is land trading. Trading commanderies with random AI factions is not the greatest idea in a speedrun. However, trading land with a vassal of yours is a very good idea and allow me to elaborate on that.

As we discussed in the "commandery builds" section, during your speedrun you only have time to fully develop 1 (maybe 2 sometimes) in order to make sure that there is sufficient return-on-investment before the end of the campaign. All other commanderies need to follow the generic build we described with taxation and garrison buildings. However, as you start conquering more and more land you will notice that corruption debuffs hit your economy and you are not making much except for your 1-2 settlements in which you have appointed an administrator (who passively applies corruption reduction). Corruption level is determined by how much land you own; the more land, the worse the corruption modifier. This tells us effectively that trading settlements with your vassals, especially newly conquered settlements that you are not going to develop at all, can be beneficial, not only because you lower corruption, but also because you can make a lot of money out of the deal when trading it.

The second advantage associated with having vassals you are bordering with is that you can sell them land when there is an aggressor in your lands who is about to capture an undefended / underdeveloped minor settlement. If your vassal is also at war with the same aggressor, then naturally he is going to lose that land, but that doesn't mean that you shouldn't make some profit out of it. Resorting to trading a settlement that was going to be lost regardless will always net an advantage.

In addition, vassals are a quick way of generating trustworthiness points as we discussed in the section about treachery. Answering their call to go to war and defend them, will grant you extra trustworthiness. Extra trustworthiness effectively boosts your diplomatic standing and makes it more likely to seal deals that are more favourable to you.

Moreover, the most important advantage you can abuse when having a vassal is that you can annex them at any point. What does that mean in practice? If they have a decent number of settlements, then you instantly grab them and get a huge boost to your prestige. This technique was discussed earlier in the part about "the 2nd best window in a campaign of committing treachery". Not few are the times that I have used that trick to instantly achieve the last faction rank and trigger 3 Kingdoms immediately. However, as it was discussed earlier, this trick is a double edged sword that can backfire. Since you are getting that hefty amount of treachery points for annexing a vassal, it means you might not be able to conduct diplomacy any more. It is hard to assess if that will be a problem or not late in your campaign and it will be totally dependent on your discretion. Having said that, with no risk there is no reward.

It must be noted that the land of your vassals counts towards the final quest of "having control of X amount of settlements" in order to get victory screen, but the prestige from the land they own is not added to your prestige. Annexation is the only way to get hold of their prestige.

Lastly, I would like to point out another element of the game that I figured out while I was playing one of the 8 princes factions that benefits from having vassals. In diplomacy menu, you can always find the relative strength of a faction and short the list by strength. The formula takes into account a number of things. However, here is an interesting fact that I can best explain with a simple example: Owning 10 settlements while having 1 army deployed will always make you look weaker in the standings than owning 1 settlement and having 3 armies deployed (just using random values here). This might seem intuitive when you think about it in realistic terms, but it is something easily forgotten when playing the game. As such, if you sometimes wonder why the AI declares war at you even though you own so much land and you are making so much gold each turn, it is because according to the algorithm, you appear weak to the AI. The relative strength of each faction is always skewed more heavily towards military strength. The same thing can be said about the quality of your units considering that each unit has a strength value associated with it in the game files. Owning 1 army of high quality units might not be the same as owning 3 armies of militia units. This is another reason why I recommend crossbowmen so much in the "armies builds" section. The value of their quality in the code is really great among among the low tier units you can instantly recruit without any research restrictions. In contrary, the horsemen-only build will look weak to AI in terms of algorithm even though you can actually beat a full enemy stack with them.

When creating vassals, it is important to consider their personality, or, more precisely, the personality of the leader (as it can be seen in diplomacy menu under the factions name). By hovering over these personalities and reading the tooltip, you can see what you can expect from that faction. In general, you should avoid dealings with factions that have the "cunning" personality attribute. As you will read in the tooltip, "cunning" effectively means treacherous in the game. In practice, what that means is that these factions do not care about diplomatic standing, they don't care if you have +300 positive relationship with them or -300. If they can backstab you, they will backstab you, whether you are best buddies or in the same military alliance. All it takes is a moment of weakness and then you instantly see them in your backyard. Notable examples of AI with the "cunning" trait is Cao Cao, Yuan Shu, Han Sui, Sun Ce and others. In short, try to limit your dealings with them and, if possible, try to wipe them out as early as you can in your campaign.

As an end note, I want to remind to the player that when you own a vassal, make sure you use the "co-ordinate attack" button in order to select a target for your vassal. Your vassal will typically go after that target once they have mustered a sufficient army to launch an attack. In general, it is better if you select a settlement for them over an army. If the enemy army is superior, they will hesitate and may never attack.
Other tricks:
TBA
Fates Divided changes overview:
Fates Divided introduced a number of interesting changes to the game. This section will not be a patch rundown. We will mostly focus on key changes and how they affect speed running.
===========================================================================
Faction progression ranks:
First of all, one interesting change is the faction ranks. Now when you hit a new faction rank you get to choose on your own the rank perks based on your needs. This is a great change for speed running as you can now prioritise to get the most useful buffs to boost your economy and expand even faster. The question becomes: "How should I allocate my points?". The best option by far is the trade agreements. If you can secure trade deals, then this becomes the most profitable option.

The other potential option is the extra administrators. More administrators becomes valuable in the later stages of your campaign once you have expanded a lot and you own many commanderies. Extra administrators will make sure to reduce the corruption in your commanderies significantly plus it is an easy way of keeping your generals happy overall. A problem with administrators is that, even though they reduce corruption and, theoretically, help your commanderies generate more gold, the administrator position requires a higher salary than average, so the real income benefits you get are not as great as it would be with more trade agreements.

Unfortunately, the "more armies" option is not really a great way to spend points. What you end up struggling most of the time is not more armies but seasonal deployments and gold. If there was an upkeep reduction and an increase in seasonal deployments with every rank, this option would become somewhat viable. There is actually an upkeep reduction once you fill the bar, but it is only a mere -15%... For the most part of the campaign you could actually generate more money from a single trade deal than from saving -15% from armies' upkeep. Lastly, it should be mentioned that for Cao Cao specifically, extra spies might be the better option because the number of spy positions you have is associated with the maximum amount of schemes you can use.
===========================================================================
Morale and unit stats re-balancing:
The overall experience with the new morale changes makes you feel like you are playing Skaven in Warhammer with their atrociously low morale and rallying shortly after running away pattern. With regards to morale and fatigue changes, the clear winners from these changes are of course ranged units and horsemen. Ranged units are not bothered by fatigue and morale at all, and horsemen can disengage and rest much faster than before. The changes were aiming to make battles slower and more tactical, but I personally believe that some of them have only resulted in increasing the gap between melee and ranged infantry once again, especially with how more prominent triggering a chain routing is currently.

An important change was the nerf to bows specifically. Now they deal less damage overall and have worse accuracy. With regards to crossbows, they had their reload speed lowered. What do these changes effectively mean? It means that the gap between bowmen and crossbowmen grew even larger than before. Crossbows already had an edge previously but now they are even better. The might fire at a slightly slower rate but the armour piercing value was not touched at all and that is the important thing to note. Making lower tier units rout was never an issue with either of the two ranged unit types, it has always been about dealing with generals and well-armoured units.

Having tested it myself, I believe that the crossbowmen-heavy build I suggest in the army templates is currently the best option. However, it must be pointed that due to the morale changes, now it becomes slightly more annoying to deal with offensive siege battles, especially in records mode. What you will have to adjust now is to fill the 2 empty strategist slots with trebuchets that you might have to carry around all the time. You should use these trebuchets to destroy walls and then charge through that opening, or at least, use that opening to fire arrows to enemies, while your spear guards are in turtle stance and are soaking tower arrows. Frankly, this is not much different to what you would do before.

I have also tested bowmen with fire arrows in night battles under the new morale system. While it is not a bad combo, as I said earlier, the problem has never been making lower tier units flee, but dealing with generals and units with decent armour values (e.g. Zhanmajian Infantry). You may think that the -4 morale fire arrows bring is cool and helps you force enemies flee faster, but this is not entirely true. The morale debuff for casualties is much higher than the mere -4 from flaming arrows. As such, making sure that your volleys land and cause damage is more important, hence, why crossbowmen are better, especially now that bows have reduced accuracy.

About horsemen: "Cavalry charges do less damage initially but now run further into the unit than they did previously". This particular change, I have to admit, is way more annoying than I initially thought it would be. The fact that horsemen now run deeper into enemy lines after charging results in some units getting caught out and, as a result, cycle charging is not as smooth as it used to be. With that being said, horsemen are still strong and that has to do with the fact that fatigue now reduces morale by -12. Effectively, this makes your bread and butter cheesy tactic that you were already utilising before, became more prominent: Having the enemy chase you around till they are tired, then engage and rout them easily.
===========================================================================
Other changes:
The faction council replaced the previous council system. Now the missions and rewards are random and totally unrelated to whom you assign there or what class that general is, unlike before. Some of the council missions are really powerful. But it is also noticeable that these annual council missions have become a money sink. In general, these changes do not really affect speed-running at all as it is a totally random mechanic now that you cannot really plan around. Try to avoid paying for things that are not useful to you. For instance, launching a pirate raid or paying 2000 gold to kill a legendary wounded character are useless options. Also, avoid signing the mission that yields bonus public order, as this reward contradicts the playstyle we have discussed here. The mission to re-roll a character's skills is quite useful for vanguards and champions who haven't unlocked the extra campaign movement range and the +5% replenishment rate.

With regards to imperial intrigue (for 200 start date), I would suggest that you only increase your own favour so that you get the extra benefits. Using "decrease favour" is a bit pointless in most cases because not only it lowers your own intrigue points, the AI can accumulate a lot of points faster so you are not doing much harm. I would only suggest using the "decrease favour" if you can also use the "enemy of the Han" declaration right after to someone you are fighting with in order to make sure you are actually gaining points (you can use that option only if you control the emperor). The low public order might make you lose some intrigue, but it is going to even out with the more food you are having for very high taxes plus beating the yellow turban rebels that spawn due to public unrest. Overall, the perks you are getting from that system are decent, but not vital for speed-running.

Lastly, the Northern Army ancillaries are very powerful to have because they grant such a huge bonus to campaign movement range. But, sadly, these are not widely accessible to everyone.
Conclusion:
This is a summarised overview for several gameplay aspects and the logic behind them. "Summarised" might actually not be the correct wording here considering the amount of text, but I tend to think of all the principles of this guide as a natural thinking process when I approach a campaign. Considering that, I tried to offer a considerable amount of insight in order to give the player a better idea of the whole concept, instead of just making a simplified version of the form "do this, do that" without any reasoning behind it. It is certainly plenty of information to digest and putting it all together might be challenging at first. The best way is practising by applying one thing at a time. In due time, everything you read here will come out naturally.

You need to remember that each faction plays differently and has different potential for fastest finishing time. For instance, it is possible to finish a campaign with Lu Bu or Liu Bei in 12-13 turns, but a governor faction wouldn't be able to achieve victory that fast. Another thing to consider is how much you are willing to exploit the game in order to achieve a faster victory. There are known glitches and unintended game mechanics that can be abused to achieve crazy things including a victory on turn 1, which would render all the contents of this guide pointless. But these things have nothing to do with actual gameplay and a clean victory, hence, why they are neglected almost entirely in this guide.

I hope that after reading this lengthy guide you have gotten a glimpse and basic idea to an elaborate playstyle and thought process. Given that there is no turn-based leaderboard for speed-running, I will be looking forward to hearing your results in the comments if you are willing to share. I will keep adding extra information and tips in all sections, so make sure you check back later for any updates.

Moving forward, at some point I am planning to record a full campaign that incorporates all the principles discussed in previous sections. For the visual type of person it might be better to learn via watching how it is done than reading a lengthy text.

That is all for now...


============================================================================
18 条留言
Geroiko  [作者] 2024 年 9 月 7 日 上午 3:29 
@aribetdetka Late reply, but speedrun in Total War games always refers to least amount of turns, not amount of real-life time. Real time depends on many external factors such as hardware, so it is a bit pointless. Now, obviously, if someone doesn't enjoy min-maxing, there is no obligation to play like that, you can play the way you enjoy the most and that's fine.

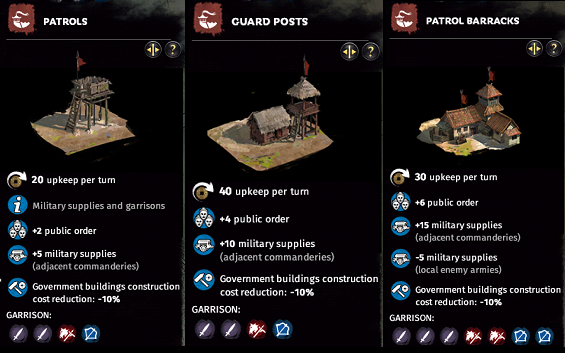
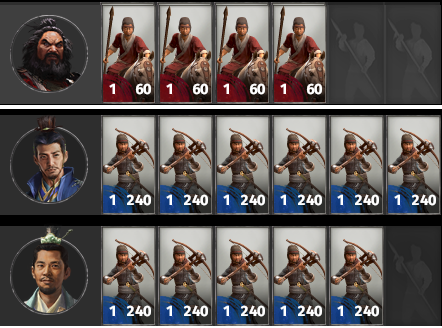
As for the military posts, I would kindly urge you to carefully reread the guide. The strategy works as intended and has been tested in several campaigns yielding the best results in terms of total turns (average turns: 30-70 depending on faction, my fastest is Lu Bu in 17 turns with lot of cheese).

Your only gold-making province is your starting one in most cases since it has good RoI. Building other provinces is inefficient due to bad RoI relative to total turns needed as well as corruption debuffs. Gold comes from crashing rebellions, selling heirlooms, rapid conquering and demolishing buildings in new provinces.
aribetdetka 2024 年 6 月 17 日 上午 9:19 
So, I note that the system of protection against uprisings by using the first level of military posts does not work. Even the presence of a third-level building does not help. Automatic battles lose too many people, and without a field army it is impossible to finish off the rebels.
On the next turn, the AI ​​again takes the city under siege and holds it until complete surrender. 2-3 such auto battles and now the calculation is not in favor of the player, either bring a field army, or say goodbye to the province. And replaying dozens of battles of the same type every turn, just to stay “with your own” is a very dubious pleasure.
In addition, a siege resets revenues from the region and blocks trade, which when playing at constant 0, relying only on income from battles, leads to the collapse of the economy and desertion in the armies.
aribetdetka 2024 年 6 月 3 日 上午 8:46 
Thanks for the comprehensive guide. These tips were very relevant. But after thousands of hours of play, I was puzzled by one question. How much real time does such a “speedrun” take?
The proposed format will certainly allow you to win in the minimum possible number of game years, but requires 99% of battles to be carried out manually. My average campaign requires 100-125 turns (faction leaders are usually still alive) and about the same number of battles (without a single defeat). At the same time, 5/6 battles are carried out by automatic calculation, which saves a huge amount of time in the real world. Perhaps such a leisurely campaign still turns out faster than a speedrun with several hundred manual battles?
thanhlong18k 2023 年 6 月 30 日 上午 8:42 
tks
leb.gerald 2023 年 6 月 10 日 下午 6:36 
Thank you. Brilliant.
Geroiko  [作者] 2022 年 3 月 5 日 上午 2:33 
@Mox_the_disorganised As I state in the guide, there is no doubt that there is a breakpoint after which a tall industry/commerce economy overtakes the suggested build above but by that time I will be close to finishing the campaign. The limiting factor as you point out in your guide about tall gameplay is research which cannot be boosted for Han factions. Unfortunately, the reforms required to unlock all tier 5 builds are too spread in the research tree. But if you base your tall strategy around a hard feat such as "This is Total War" where you declare war on everyone, tall is certainly a viable path to victory.

Therefore, keep in mind that beyond numbers context also matters for builds. Looking at them in a vacuum might detract from the real value. Also for tall builds, you must find a way to attribute a value to research per turn and add it to fund investment because there are going to be many turns where you don’t construct anything and simply wait for research to unlock.
Geroiko  [作者] 2022 年 3 月 5 日 上午 2:32 
@Mox_the_disorganised Hello and thanks for kind words. With the above strategy, it is a little bit more complex than calculating a single figure. The idea is that you minimise investment through cheap buildings and you rapidly expand while also farming rebellions. It's simple to alienate a single province in this strat and try to calculate the average expected income in a vacuum based on the buildings I suggest, however, it would be quite misleading number. The reason is that here we try to balance rapid expansion with a profitable yet low cost commandery build.

Plenty of value comes from winning battles, capturing settlements and demolishing buildings. High taxes and rebellions are also a significant influx of gold and so are ancillaries you often get from rebels. All that together is further magnified the more settlements and armies you own which translates to more expansion. It's not impossible but it is quite hard to attribute a specific value to the above components of success.
Mox_the_disorganised 2022 年 3 月 4 日 下午 10:29 
Hey @kon - thanks for writting this guide, its got some great stuff. I'd like to compare notes about GPT in early & mid game - what kind of total gold figure would you get for this strat?
(guessing its 1k every 3turns x number of commanderies you own?)

I wrote a strategy for building semi-tall: ~2.5k per MegaCommandery <turn50 & 5-10k turn 50-100. https://psteamcommunity.yuanyoumao.com/sharedfiles/filedetails/?id=2771291413
Lateralus 2021 年 5 月 13 日 下午 6:57 
Great, I look forward to seeing your new YouTube channel.
Geroiko  [作者] 2021 年 5 月 13 日 下午 3:07 
@Lateralus Hi lad, I think most of the tips if not all can be applied to non-speed running campaigns too, possibly making things easier. About the rebel farming, I don't consider it an exploit per se because it can be done in all total war games, it just so happens that the gold income from them in 3K is very worth it and there are more ways to decrease public order. I consider exploits things like stealing everybody's ancillary on the first turn, or manipulating diplomacy to vassalise everyone or steal their land. These are definitely exploits. I have employed some of these in the past to get some insane speed-runs, like in my Lu Bu campaign.

I don't have a youtube channel, but I am planning to create one during this summer simply to upload a full series showcasing the implementation of all things mentioned in the guide. When I do, I will put a link in the guide.