

安装 Steam
登录
|
语言
繁體中文(繁体中文)
日本語(日语)
한국어(韩语)
ไทย(泰语)
български(保加利亚语)
Čeština(捷克语)
Dansk(丹麦语)
Deutsch(德语)
English(英语)
Español-España(西班牙语 - 西班牙)
Español - Latinoamérica(西班牙语 - 拉丁美洲)
Ελληνικά(希腊语)
Français(法语)
Italiano(意大利语)
Bahasa Indonesia(印度尼西亚语)
Magyar(匈牙利语)
Nederlands(荷兰语)
Norsk(挪威语)
Polski(波兰语)
Português(葡萄牙语 - 葡萄牙)
Português-Brasil(葡萄牙语 - 巴西)
Română(罗马尼亚语)
Русский(俄语)
Suomi(芬兰语)
Svenska(瑞典语)
Türkçe(土耳其语)
Tiếng Việt(越南语)
Українська(乌克兰语)
报告翻译问题


this is very useful for support characters that dont have huge alpha strike abilities and therefor dont get as much of the kills
I haven't seen any walkthroughs which fully discerned which events were static or randomized, and often found my experience to be different than that of the author. I also wasn't sure whether these are truly random each time, or based on a seed generated at some interval, or something else. Perhaps more are available now which are more complete.
Skal!
thanks for the contributions. first question:
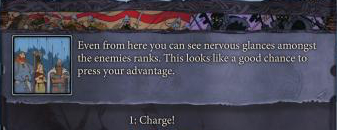
"...when given the option to pursue fleeing Dredge, or to let them scatter, you should pursue ... this will give you even more Renown, in addition to a higher chance of finding an item afterwards."
is it confirmed somewhere that random loot can still be found if you don't pursue a second round of battle? if not, the wording is slightly misleading.
At a quick glance, you can look at the day count between savegame checkpoints (if checkpoints exist in the right places,) for a quick idea of time between, but you'd need to know how often you rested and how events may have changed that timing to make it more accurate. You could even reload those games and run through between them to check (assuming no battles, wouldn't take long - battles would make it much longer.) I assume difficulty doesn't impact travel times?
I'll update the guide with a live link. Thanks!